 General
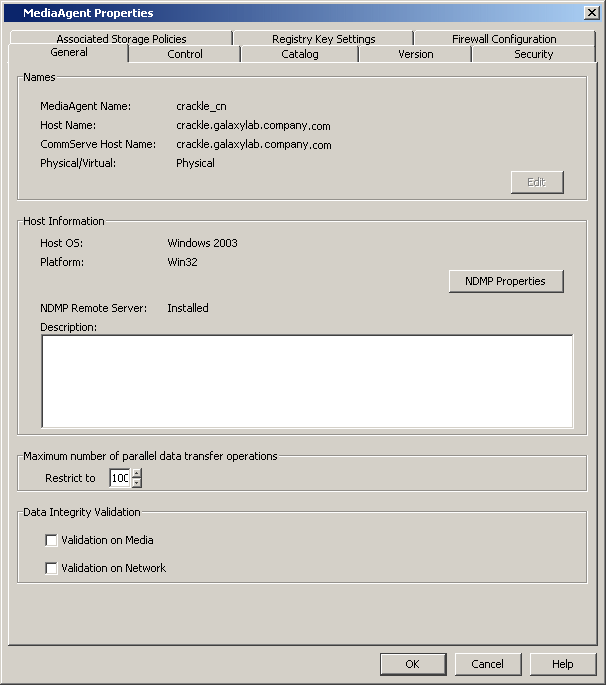
The MediaAgent properties can be viewed from the General tab of the MediaAgent Properties dialog box.
Names
General information includes the MediaAgent name, host name, the name of the CommServe to which the MediaAgent is attached, and whether the MediaAgent is installed in the Physical or in the Virtual machine in a clustered environment.
You can change the name of the Client/MediaAgent computer if the Host name is changed. See Name Management for more information.
| Do not use spaces when specifying a new name for the Client. |
Host Information
Information includes the MediaAgent's operating system and platform. If necessary you can use the description field to record additional information about the MediaAgent. Click on NDMP Properties to edit the details of the NDMP Server host filer.
Maximum number of parallel data transfer operations
This feature allows you to set the maximum number of concurrent read/write operations to the MediaAgent. This value controls the maximum number of data streams that can be managed by the MediaAgent. See Set the Maximum Number of Parallel Data Transfer Operations for a MediaAgent for step-by-step instructions.
The default number of concurrent read/write operations to a MediaAgent is 25. This value can be set between 1 and 75. If Optimize for Concurrent LAN Backup option is enabled from the Control tab, then the default is set to 100 and this value can be set to a maximum of 200 (only on Windows and Unix).
Data Integrity Validation
The integrity of data protection operations can be ensured by enabling Data Integrity Validation at the MediaAgent. Data Integrity Validation can be used to verify the data stored in the media as well as the data transferred over network. See Data Integrity Validation for more information.
 Control
MediaAgent Control
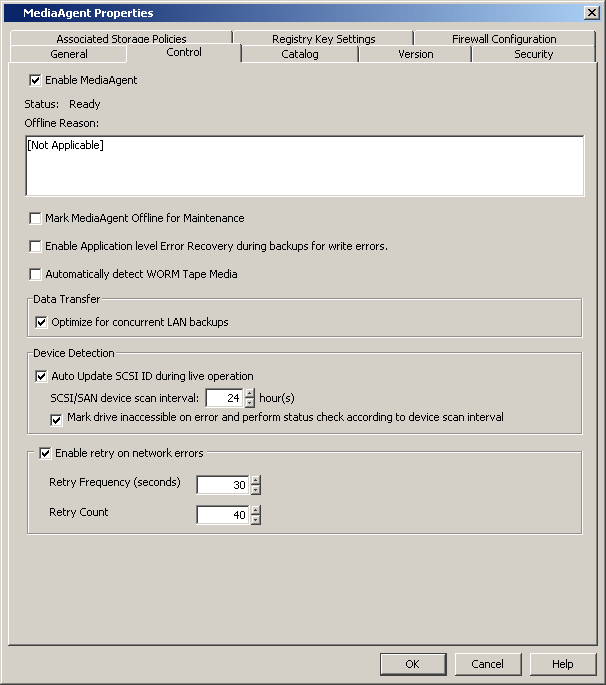
The following options for controlling the MediaAgent is provided:
- Enable or disable the MediaAgent
You can enable or disable a MediaAgent. When a MediaAgent is disabled, it is not used, even if it is physically available. (See Enable (or Disable) a MediaAgent for step-by-step instructions.)
MediaAgents and data protection and recovery operations for clients can be enabled or disabled in bulk with the EnableDisableComputers command line utility in the Resource Pack. The tool can be applied to all MediaAgents and clients, or for a select targeted group.
- Status of the MediaAgent
The status of the MediaAgent is displayed to indicate whether the MediaAgent software is online or offline, and if offline, the reason for the offline status is also displayed.
The system checks for the status of the MediaAgent and updates the information based on the values established in the LAN-Free MediaAgent liveliness check interval in Minutes and LAN MediaAgent liveliness check interval in Minutes options from the Media Management Configuration (Service Configuration) dialog box available in the Control Panel.
- Mark MediaAgent
Offline for Maintenance
You can enable this option when you wish to perform routine or other maintenance tasks on devices. This option is available in the MediaAgent, Library and Drive levels and you can appropriately enable them where needed.
Data protection, data recovery and auxiliary copy operations will not use the associated MediaAgent/Library/Drive, depending on where the option is enabled. However, other administrative tasks on the devices such as Full Scan, Drive Cleaning, Verify Media etc. can be performed, if required.
When this option is enabled, the system will automatically select an alternate resource (MediaAgent/Library/Drive) if Alternate Data Paths (GridStor) is enabled. If alternate resources are not available, data protection, data recovery and auxiliary copy will remain in the Waiting state in the Job Controller and will automatically resume when you re-enable the appropriate MediaAgent/Library/Drive.
See Mark MediaAgent/Library/Drive Offline for Maintenance for step-by-step instructions.
-
Enable Application level Error Recovery during backups for write errors
You can enable this option to indicate that the MediaAgent should perform error recovery by readjusting the tape position and re-write the last block when IO error occurs. This option maybe enabled when data protection jobs fail due to SCSI related write errors in the library.
However, note that extreme caution must be exercised while selecting this option as it severely impacts the performance of the MediaAgent.
As most write errors are due to hardware failures, steps must be taken to fix the hardware instead of enabling this option. This option may be temporarily enabled to ensure that the current data protection jobs are successful until the hardware is fixed.
Note that the error recovery attempts may not be successful if the hardware errors persists.
- Data Transfer
Optimize for Concurrent LAN Backups
This option can be enabled when the MediaAgent is used for concurrent data protection operations from a large number of clients. For example, if you have 25 clients concurrently using the MediaAgent for 50 or more data transfer streams in a specific operation window, it is recommended that you enable this option Enabling this option will help to optimize the Operating System resources on the MediaAgent.
See Maximum number of parallel data transfer operations for the maximum number of parallel read/write operations with the Optimize for Concurrent LAN Backups option enabled.
See MediaAgents - Supported Features, Agents and Devices for information on the MediaAgents that support this option.
See Optimize the MediaAgent for Concurrent LAN Backups for step-by-step instructions.
- Device Detection
Automatic Update of SCSI ID during live operation
In the SAN environment, the SCSI ID of a device may get changed due to a HBA failover or if the a hardware component in the SAN is reset. In such a situation, read/write requests to the media in the device may fail, resulting in job failures. However, if this option is enabled, the system will automatically scan the device and update the SCSI ID and the job will be re-tried in the established retry interval.
This option also includes the following sub-options:
- SCSI/SAN device scan interval n hour(s)
This option specifies the time interval that must be used for successive retry operations for SCSI ID updates. For example, if a SCSI ID update is performed after a read/write failure and a second read/write failure occurs almost immediately or within the specified time interval, the system will not perform the SCSI ID update. The system will scan for SCSI ID updates only when a error occurs after the specified time interval. It is recommended that the time interval be set to 30 minutes or more, as running jobs could go into pending, when the SCSI ID is updated.
- Mark drive inaccessible on error and perform status check
according to device scan interval
When enabled, this option marks the drive controller offline when the SCSI ID for a device is changed. (This can be viewed from the Drive Properties - Drive Controller tab, where the Drive Accessible will be displayed as No.)
The device detection will be performed once every 24 hours. This property can be modified using the SCSI/SAN device scan interval n hours(s) option in the MediaAgent Properties. Note that if the value established in MediaAgent Properties is less than 24 hours, the system automatically defaults to 24 hours.
If you want to perform this operation more frequently create the nDisabledDriveDetectIntervalMin registry key. Once created, this registry key will override the setting established in the MediaAgent Properties.
The device detection will be repeated for 7 days. If these drives are not accessible even after 7 days, the drives will be marked as accessible. (If the drive continues to have a problem, the subsequent job accessing the drive will once again cause it to be marked as inaccessible.) If necessary the nDisabledDriveMaxDetectionRetryHours registry keys can be created to change the number of days the device detection will be repeated.
On NetWare MediaAgents both these keys must be manually created with a value greater than 0 to enable this feature.
- SCSI/SAN device scan interval n hour(s)
- Native Driver Support
To communicate with the tape devices, you can use the pass-through driver provided by the MediaAgent, or the native drivers provided by the operating system. When this option is selected the native driver is used. This option is supported by all UNIX MediaAgents. By default, this option is enabled on all Unix MediaAgents. Disable this option, if you do not want to use the native drivers.
See Also:
- Tape Spanning failure on AIX MediaAgents with Native Drivers
- Job Failures in Solaris MediaAgents using Native Drivers
Send pass-thru commands to Atape
When using native driver support, use this option to enable MediaAgent to send pass-through commands to Atape device drivers.
- Automatically detect WORM Tape Media
When enabled, this option automatically detects WORM media when it is used in a drive. This option must be enabled if you plan to use WORM media in the libraries attached to the MediaAgent. (Check the drive manufacturer's documentation to ensure that both the drive model and firmware must support the usage of WORM media.)
- Enable retry on network errors
When enabled, this option allows you to set the retry options in case of network errors.
- Retry Frequency (seconds)
The interval (in seconds) at which the Job Manager will continuously check for network connectivity.
- Retry Count
The number of times the Job Manager will check for network connectivity.
See Enable/Disable Robust Network Layer for step-by-step instructions. See Robust Network Layer for more details.
- Retry Frequency (seconds)

Catalog
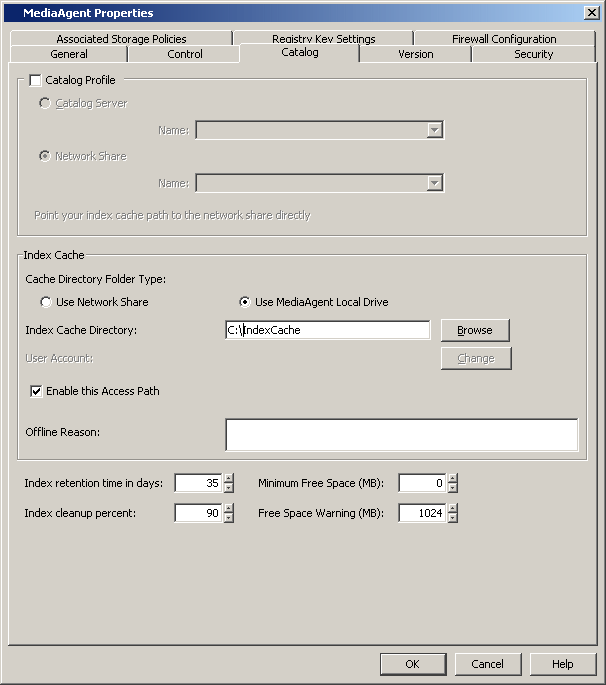
A MediaAgent’s Index cache information be viewed from the Catalog tab of the MediaAgent Properties dialog box. You can view or modify the following information associated with the MediaAgent’s index cache configuration:
- Catalog Profile
- Index Cache Directory
- Index Retention Criteria
For a detailed explanation of a MediaAgent's Index Cache, see Index Cache.
Version
The Version tab of the MediaAgent Properties dialog box displays the version number of the MediaAgent software that is installed on the MediaAgent computer. It also displays all post-release Service Packs and Automatic Updates that may have been installed on the MediaAgent. It also displays the location of the update information.
For a detailed explanation of the version information, see Version.
Security
Security allows you to associate the MediaAgent with one or more CommCell user groups.
For a detailed explanation of security, see User Administration and Security.

Associated Storage Policies
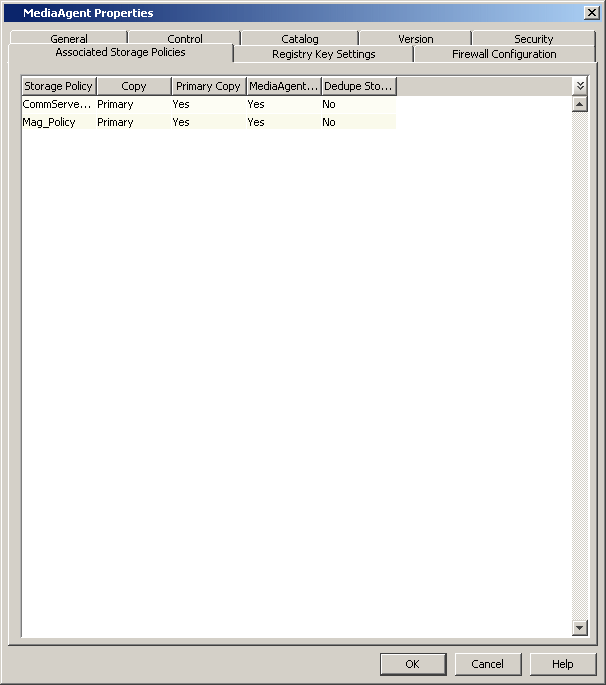
The Associated Storage Policies tab provides information about all the storage policy and their copies associated with a MediaAgent. This information is useful when you deconfigure a MediaAgent, as all the storage policy copies associated with the MediaAgent can be re-pointed or deleted prior to deconfiguring the MediaAgent.Registry Key Settings
The Registry Key Settings tab enables you to add, edit, or delete registry keys for Windows and unix MediaAgents. For Netware, you must use the manual process. See Managing Registry Keys From the CommCell Console for more information.
Firewall Configuration
If a firewall separates MediaAgent and other CommCell components it communicates, then you can specify the incoming and outgoing connectivity details between MediaAgent and the components in the Firewall Configuration tab. See Firewalls for more information on supported firewall various firewall scenarios and their configuration.