The following procedure describes the steps involved in creating, editing, or
deleting a user-defined Application Type. This can also be accomplished using
the Workflow Configuration Wizard.
Requirements
|
|
Required Capability: See
Capabilities and Permitted Actions |
To create, edit, or delete a user-defined Application Type
|
| 1. |
In the CommCell Browser, expand Recovery Director and select
from one of the following:
- To create a new Application Type, right-click Application Types,
and select Create New Application Type.
- To edit an existing Application Type, click Application Types,
right-click an existing Application Type, and select Edit Properties.
- To delete an existing Application Type, click Application Types,
right-click an existing Application Type, and select Delete.
In the confirmation dialog box, click OK.
|


|
| 2. |
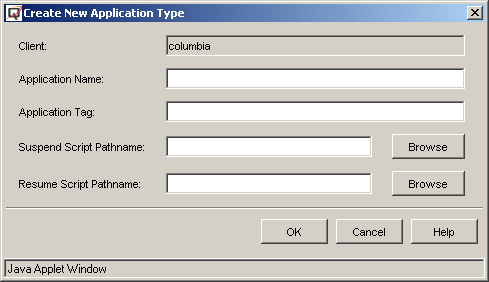
To create or edit an Application Type, enter the following
information:
- Application Name: The name of the application.
- Application Tag: A short name for the application.
- Suspend Script Pathname: The full path to the script or batch
file that will suspend/quiesce the application before a snapshot is
performed.
- Resume Script Pathname: The full path to the script or batch
file that will resume/unquiesce the application after a snapshot is
performed.
Click the Browse button to open a browse window to locate the
script or batch file.
Click OK.
|
 |
One of the distinguishing functionalities of the Quick Recovery Agent is application
awareness. The QR Agent currently has built-in support for Exchange, SQL, and Oracle,
but this list may not include the application you have and want to protect. Similar
in purpose to Generic Enablers as a means
of extending hardware support, Recovery Director extends support for user-defined
applications. When you configure an application name and the scripts (CLI) to quiesce/unquiesce
the application, Recovery Director will associate this application information with
the volumes and build up the requisite information, performing as if the application
is one for which the QR Agent has built-in support. When QR Volume Creation is launched,
the specified quiesce/unquiesce commands will be executed by the Job Manager in
the appropriate phase.
Two scripts are needed for customized application implementation: quiesce and
unquiesce. You should provide these scripts based on the application type and environment.
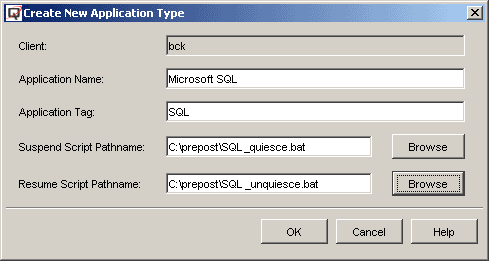
SQL is currently supported by QR. For the sake of this example, let�s assume
it is not supported. The following procedure describes the configuration procedure
of supporting SQL with QR as a user-defined application.
Requirements
|
|
Required Capability: See
Capabilities and Permitted Actions
|
To protect data volumes of an application not currently detected by
Quick Recovery Agent
|
| 1. |
Create a new application type.
- Select Recovery Director, then right-click Application
Types and select Create New Application Type.
- Fill in the Application Name and Application Tag.
These can be anything you like. The Application Name will be used to
identify this application by the QR Agent.
- Specify the quiesce and unquiesce scripts in the Suspend Script
Pathname and Resume Script Pathname fields.
NOTES
|
 |
| 2. |
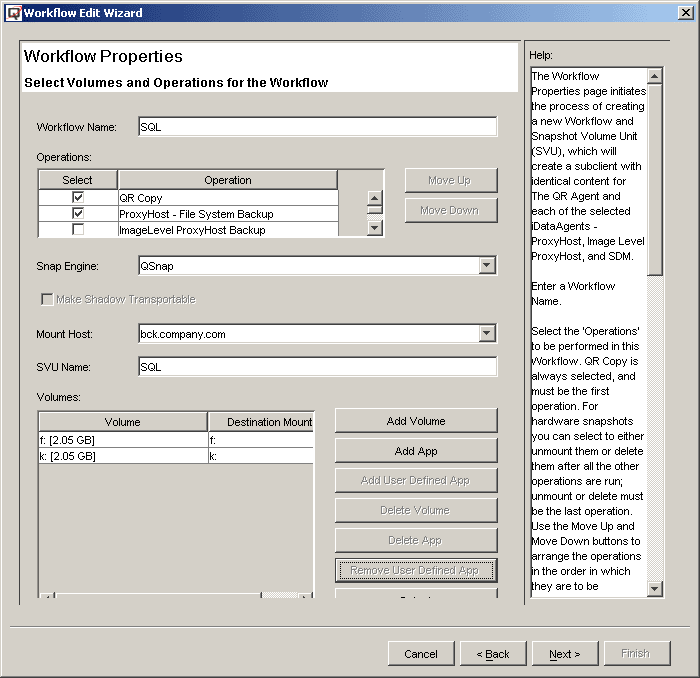
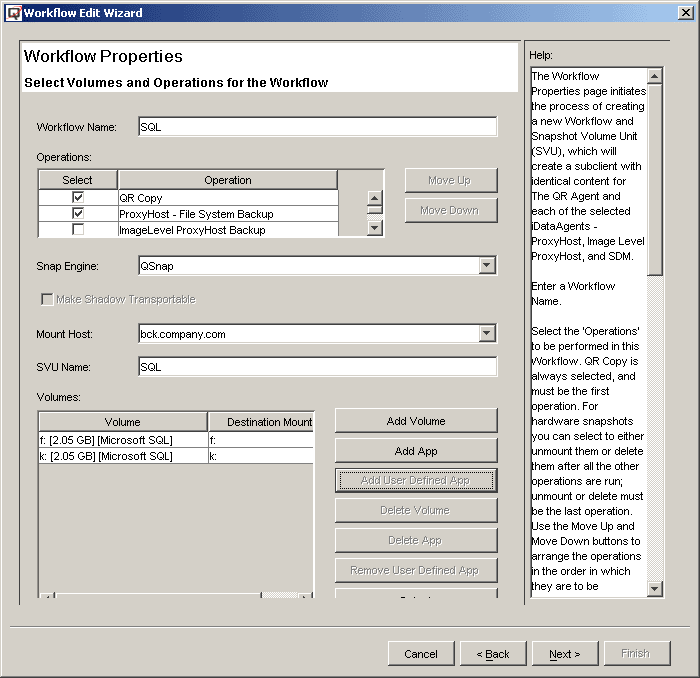
Create a new Workflow using the
Workflow Configuration Wizard.
Click Add Volume to populate source volumes and specify the destination
mount path.
Highlight all the source volumes (K and F in this case) and click
Add User Defined App.
|
 |
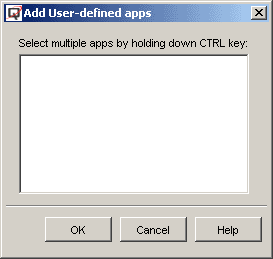
| 3. |
Select the application that resides on these source volumes (in this
example Microsoft SQL) and click OK. The application name
will be attached to the source volumes.
|
 |
| 4. |
Complete the balance of the Wizard sections as usual. Refer to
Use the Workflow Configuration Wizard.
NOTES
- To remove the association of the application with the volumes, select
Remove User Defined App.
|
 |
| 5. |
For those applications that are supported within the QR Agent, the application
(volumes) recovery is done through the database
iDataAgent Browse window.
For a user-defined application, you must manually bring down the application
and recover the volumes from the
Browse QR Volumes window.
|
|
The following procedure describes the steps involved in creating, editing, or
deleting a Snapshot Volume Unit.
Requirements
|
| Required Capability: See
Capabilities and Permitted Actions Creating a new SVU
|
To create, edit, or delete a Snapshot Volume Unit
|
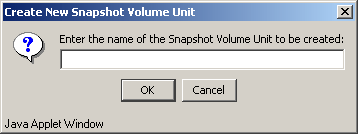
| 1. |
Select from one of the following:
- To edit an existing SVU, go to Step 3.
- To create a new SVU, in the CommCell Browser, expand Recovery Director,
right-click Snapshot Volume Unit and select Create New Unit.
- To delete an existing SVU, in the CommCell Browser, expand Recovery
Director, click Snapshot Volume Unit, right-click an existing
Application Type, and select Delete. In the confirmation dialog
box, click OK.
NOTES
- If you delete an SVU, the following will also be deleted:
- all Workflows that used the SVU
- all subclients associated with those Workflows that used the
SVU
|


|
| 2. |
To create a new SVU, enter a name for it.
Click OK.
|
 |
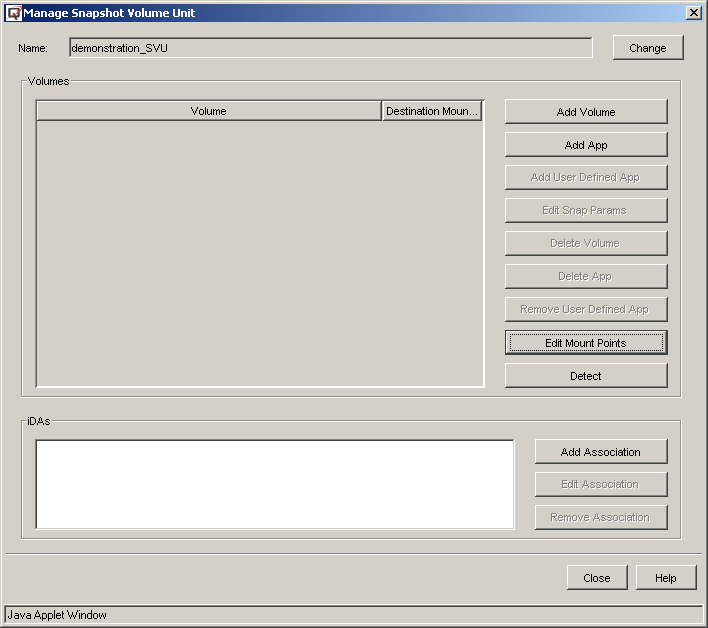
| 3. |
To edit a new or existing SVU, in the CommCell Browser,
expand Recovery Director, click Snapshot Volume Unit, right-click
an existing SVU, and select Manage Unit. |
|
| 4. |
To configure the SVU, see the following selections:
- Name: To edit the name of the SVU, click the Change
button.
- To add content to the subclients that will be created from this
SVU, select one or more of the following:
- Add Volume: Click to open the
Add Volume dialog box, and select from the list of available
volumes. Click OK. The
Add/Edit Destination Mount Points dialog box will be displayed;
type the drive letter (e.g., w:)
to which the snapshot will be mounted and click OK.
- Add App: Click to open the
Add Apps dialog box, and select from the list of supported applications
on all volumes. Click OK. The
Add/Edit Destination Mount Points dialog box will be displayed;
type the drive letter (e.g., w:)
to which the snapshot will be mounted and click OK.
- Add User Defined App: To specify a user defined application,
select a volume from the list, then click to open the
Add User-defined Apps dialog box to select from a list of previously
created user-defined Application
Types.
- Edit Snap Parameters: If necessary to edit the snapshot parameters,
click to open the
Advanced
Add/Edit Volume Options dialog box.
- To delete or edit items in the list of Volumes, select one or more
of the following:
- Delete Volume: Click to delete a selected volume from
the list.
- Delete App: Click to remove an associated application
from a selected volume.
- Remove User Defined App: Click to remove an associated
user-defined application from the list.
- Edit Mount Points: To edit the mount point for a selected
volume, click to open the
Add/Edit Destination Mount Points dialog box. See
Note below about editing existing mount points.
- Detect: If necessary to detect or configure volumes, click
to open
Volume Explorer. For more information, see also
Volume Explorer.
- Each associated Agent will have a subclient with the content and
configuration defined by this SVU. Select from the following:
- Add Association: Click to open a dialog box to select
iDataAgents for this
SVU, then click OK. Go to Step 5.
- Edit Association: Click to open the
Subclient Configuration dialog box for the selected
iDataAgent. Go to
Step 5.
- Remove Association: Click to remove the selected
iDataAgent from the list.
- When all volumes for this SVU have been selected and configured,
and all Agents have been associated and configured, click Close.
NOTES
- If you change an existing Destination Mount Point, you must also
change the Subclient Content for each associated
iDataAgent -- ProxyHost
and Image Level ProxyHost using the Edit Association button in
the
Snapshot Volume Unit dialog box.
|
 |
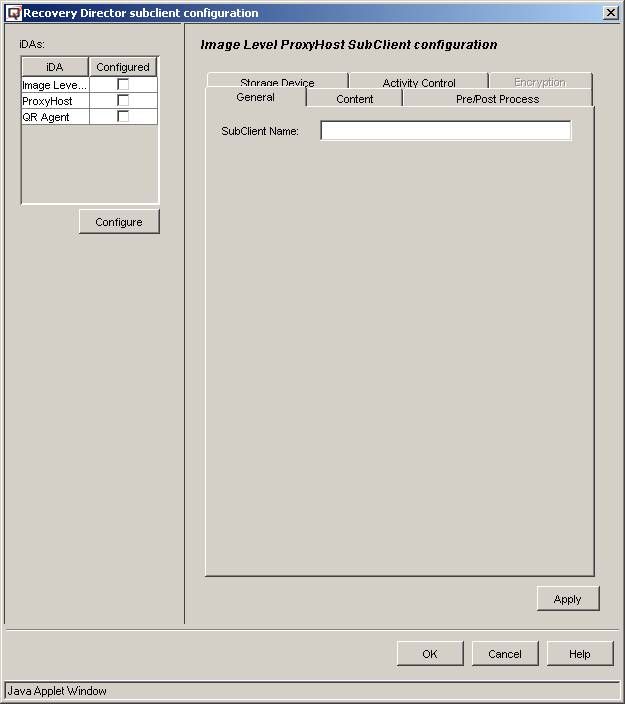
| 5. |
Configure the
Subclients for the Agents you have selected to associate with this SVU.
- To edit a subclient, select the Agent from the list and click the
Configure button. When you are done, click Apply.
- At minimum, you must specify a name and select a
Storage Policy
(or QR Policy for QR)
for each subclient.
The following tasks can be performed to configure the QR
Subclient (refer to
Subclients - Quick Recovery Agent):
General tab
- Enter a QR Subclient Name.
- Select a QR Policy.
- If a VSS hardware snapshot has been specified as the Snap Engine
for the selected QR Policy, either select Use Source Host as the
Default Import Host, or select a Default Import Host from
the list.
- Select Disable Incremental update of QR volumes if any of
the volumes contained in this subclient are also contained in another
subclient.
- Software Compression can be optionally enabled for the QR
subclient (this selection is only available when the selected QR Policy
is configured to use a
LAN Copy
Manager.)
Content tab
- No modifications to content are made here. Content for this subclient
was defined in Step 4.
Pre/Post Process tab
- Add optional Pre/Post
Processes for the QR Agent subclient. (These are batch files or
shell scripts that you can run before or after the Snap or Copy phases.)
Type the path of each file or shell script, or click Browse to
open a window to navigate to it. To run a PostSnap or PostCopy process
even if the Snap or Copy phase is killed, fails, completes with errors,
or is interrupted due to a media reservation issues, select the
appropriate option. Note that if a user suspends or stops the job
during the respective phase, or if the job is interrupted during that
phase due to Operation Window rules, the Post Process will not run,
even if the option has been selected. If either of these two conditions
are encountered, and the Post Process is designed to bring a database
online, release a snapshot, or execute some other critical process,
these tasks must be performed manually.
- Click Change to add or modify the
User Account that has permission to run these commands.
Generic Snap Scripts tab
- Create Script Pathname - the path of the user-created batch
file or shell script to initialize the hardware snapshot, manage the
BCV pair, and mount the snapshot.
- Delete Script Pathname - the path of the user-created batch
file or shell script to unmount the snapshot and delete the BCV pair.
- Recover Script Pathname - the path of the user-created batch
file or shell script to quiesce/unquiesce the application, or launch
a hardware-based recovery.
- Select an Execution Host from the list, where the user-created
batch files or shell scripts will be run.
- Change - add or modify the account that has permission to
run these commands.
The following tasks can be performed to configure the
iDataAgent
Subclients: (refer to
Subclients - SAN
iDataAgents):
General tab
Content tab
- No modifications to content are made here. Content for this subclient
was defined in the Workflow Properties screen with the selection of
Volumes and Applications for the SVU. This content can be modified after
completing this Wizard, using the Manage SVU command. See
Create/Edit/Delete a Snapshot Volume Unit (SVU).
Filters tab
- Make any desired changes. See
Filters for more information.
Pre/Post tab
- Add optional Pre/Post
Processes for the iDataAgent
subclient. (These are batch files or shell scripts that you can run
before or after the Snap or Copy phases.) Type the path of each file
or shell script, or click Browse to open a window to navigate
to it. To run a PostSnap or PostCopy process even if the Snap or Copy
phase is killed, fails, completes with errors, or is interrupted due
to a media reservation issues, select the
appropriate option. Note that if a user suspends or stops the job
during the respective phase, or if the job is interrupted during that
phase due to Operation Window rules, the Post Process will not run,
even if the option has been selected. If either of these two conditions
are encountered, and the Post Process is designed to bring a database
online, release a snapshot, or execute some other critical process,
these tasks must be performed manually.
Storage Device / Data Storage Policy tab
Storage Device / Software Compression tab
Activity Control tab
When you are done configuring all Subclients, click OK.
In the Manage Snapshot Volume Unit dialog box, click Close.
|
 |
| 6. |
You can now view the Subclients created for the QR Agent
and each of the associated iDataAgents
in the CommCell Browser. |
 |