| Overview | Setup | How To | Troubleshooting |
|
The following components must be installed to build Custom Reports:
Make note of the Apache Port Number during the Web Client installation.
The following Web browsers are supported for Custom Reports:
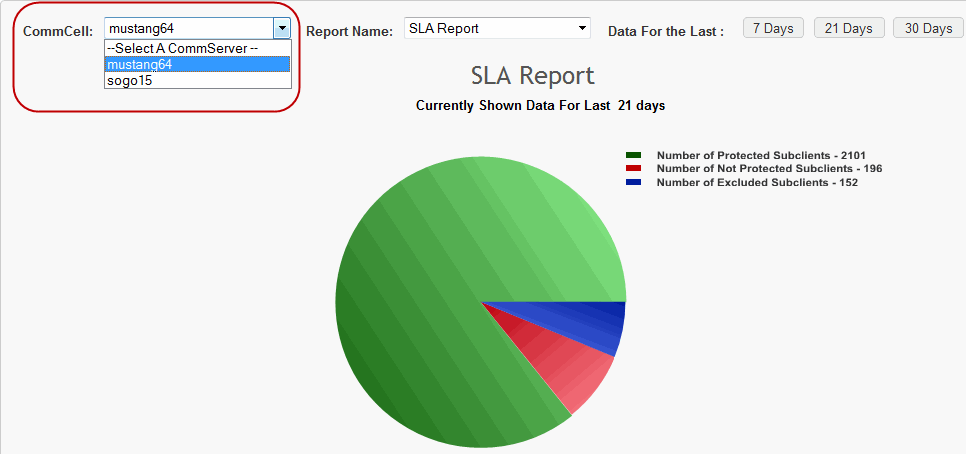
By default, you can view this report on the CommCell you setup for this report. You can also add more CommCells on which this report can be run.
Follow the steps below to link remote CommCells to the current CommCell for generating SLA report:
In the remote CommServe computer, do the following:
Note down the values of the remote CommCell from the following columns: <number>, <parentId>, <aliasName>, <flags>, <refTime>, <userName>, <userPassword>, <timeZone>, <ipAddress>, <modified>, <ccOpMode>, <drlpAddress>, <encNumber>, <csGUID> and <type>
| Use only the <sqlInstance> in commands where the '<sqlInstance>' parameter is required. The name of the remote CommServe and the backslash (\) are not required for this parameter. |
In the current CommServe computer, do the following:
insert into APP_CommCell values ( <number>, 0, <parentId>, '<aliasName>', <flags>, '<refTime>', '<userName>', '<userPassword>', '<smtpServer>', '<timeZone>', '<ipAddress>', <modified>, <ccOpMode>, '<drlpAddress>', '<encNumber>', '<csGUID>', <type>)
For example:
insert into APP_CommCell values ( 9000, 0, 1, 'rhode', 0, 0, '', 1, '', '(GMT-05:00) Eastern Time (US & Canada)', '230.230.230.230', 1332298395, 1000, '230.230.230.230', '2AL80LLUqLL', '23B0A63C-3B2E-44D8-90AE-3087FA48B099', 1)
insert into APP_CommCellInfo values ( <commcellId>, '<CCHostName>', '<sqlInstance>', '<sqlAccessInfo>', 0, NULL, NULL, 0)
For example:
insert into APP_CommCellInfo values ( 3, 'rhode', 'sql_instance_name', '2AAGeAAGeAAQGAAQeAAB9AABeAAB6AABfAABqAABtAAo4AABGAAQBAAGBAAGeAABbAABoAAGqAAonAAoBAAGAAABQAAohAAhKAAGoAAG4AAGLAAGeAAGeAAQ9AAGLAABMAAopAAGhAA', 0, NULL, NULL, 0)
http://<CommCell_Name>.<Domain_Name>.com:<Port_No>/customreports
From CommCell selection within the report, the newly added CommCell will be listed.
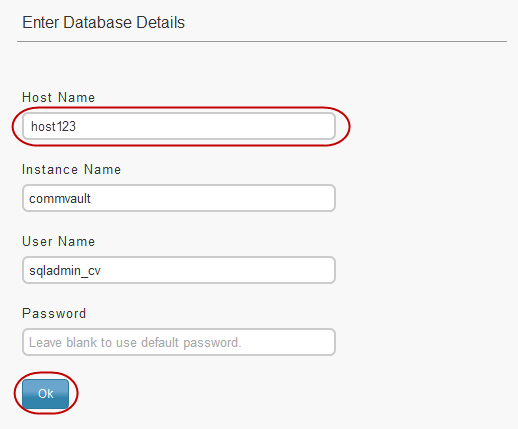
This step is for administrators. When you login to custom reports for the first time, a window appears that asks you to configure SQL server access information. You must provide information about the master CommServe in order to set up the Custom Reports site so that users can access it.
To set up the Custom Reports site:
| 1. | Open a supported Web Browser. See Supported Web Browsers. | |||
| 2. | In the address bar, enter the following URL: http://<Web_Client_Name>:<Apache_Port_No>/customreports where <Web_Client_Name> is the name of the Web client. <Apache_Port_No> is the Apache port number that is provided at the time of installing Web client. For example: http://rhode:80/customreports |
|||
| 3. |
In the Host Name box, enter the name of the master CommServe, and then click OK. This message does not appear again when you access Custom Reports in the future.
|
 |
|
|