The following page describes the agent-specific restore options. Additional restore options are accessible from the Related Topics menu.
The Image Level iDataAgent performs the following types of restore operations:
File Level Restore - You can browse the files/folders in your backup and
select the files/folders you want to restore.
Volume Level Restore -You can browse the volumes you have backed
up and select a volume to restore. The following restore options for volumes
are available for the Image Level iDataAgent. These options are
available from the
Restore
Options dialog box.
Physical Volumes - This option enables you to restore the selected
content as a physical volume.
VMDK files (Windows only) - This option enables you to restore the selected
volume as a virtual machine file.
Virtual Hard Disk file (Windows only) - This option enables you to restore the
selected content as a virtual hard disk file.
When restoring data, you can, if desired, restore the data to a file system type
that differs from the type in which it originated. For example, you can restore
NTFS data to a FAT file system and restore FAT data to an NTFS file system. FAT
file systems do not support Discretionary Access Control Lists (DACL); therefore,
any NTFS data that you restore to a FAT partition loses its original access privileges.
Conversely, when FAT file system data is restored to an NTFS file system, the restored
data inherits the DACL of the destination directory.
Since Image Level restores a portion of Volume Information to the MediaAgent
Index Cache, if encryption was enabled when the data was backed up, the Volume
Information will be encrypted as well. This requires a Pass-Phrase on the MediaAgent
to decrypt during the restore. There are two ways to handle this:
For increased logging of activities during data recovery operations, the
dEnableIRestoreLog
registry key can be created.
Although you can use the Image Level iDataAgent to back up volumes of a
clustered shared disk, you cannot use the Image Level iDataAgent to restore
directly to the volumes of a clustered shared disk.
You cannot restore any archived files and folders.
It is recommended that file-level restores from disk or volume-level
backups be performed only with small files. For example, restoring a 2GB
file from a disk-level backup is not recommended.
For a File Level Restore, you must select the File Level Browse
option in the Browse Options dialog box.
The Image Level iDataAgent on
HP-UX does not support file level restores.
Supported only for certain operating systems and file system types; see
Supported Data
Types.
The Image Level and Image Level ProxyHost iDataAgents
on Unix can
perform a File Level Restore
only when the OS of the Client computer and the MediaAgent are the same.
For a Windows MediaAgent, the Index Cache folder must reside on an NTFS
partition.
If metadata was not collected during a backup, a File Level restore cannot
be performed. This might result from having selected the
Skip
Metafile Creation option in the Advanced Backup Options screen, or as a
result of failure to collect metadata during the backup, in which case the system
generated an Event Message warning of the failure.
Do not restore:
hidden objects
system files
recycler files
Image Browse is not supported. A no-image browse operation returns the most
recent version of the data that existed back to the most recent full backup,
rather than returning an image of the specified entity (i.e., file system/directory).
To perform a File Level Restore of an entity to a point in time, you will need
to Browse back in time, to the point
in time you want to restore.
When a File Level restore is started, metadata is restored prior to the
actual restore of files, and during this time, a message might indicate the
Index Cache is being restored, although it already exists. Also, the media containing
this metadata will be mounted into the library even if this media does not contain
the data from the full backup.
As noted in the
Image Level
Backup Considerations, if the cluster size (allocation unit) on the disk
that you backed up was less than 1024 bytes, a file level restore job will not
complete successfully.
For a Volume Level Restore, you must select the Volume Level Browse
option in the Browse Options dialog box.
Do not run Volume Level restore if destination volume contains OS files.
For a Volume Level Restore from a Unix Checksum backup, volume detection
must be run from Volume Explorer prior to the restore. The Restore
Options dialog box will display the list of volumes available for the restore.
When performing a Volume Level Restore, the destination volume will adopt
the file system type of the restored data. Thus, for instance, if you restore
an NTFS volume to a FAT destination volume, the destination volume will be NTFS
as a result of the Volume Level Restore.
When restoring a volume changes its file system type (see
Supported Data
Types), sometimes Windows Explorer may still show the volume having the
same file system type as before the restore, even though Computer Management
shows the new (correct) type. After a reboot, Windows Explorer will show the
correct file system type.
The destination volume must be at least as large as the volume from which
the data was backed up. This is true regardless of the amount of data that is
actually restored. For example, if you back up a 10 GB volume that contains
100 MB of data, you can only restore that data to a volume that is 10 GB or
larger. The restore operation will fail if the destination volume is smaller
than the source volume. We recommend that you restore data to a volume that
is at least 1 MB larger than the source volume.
Windows Logical Disk Manager
(LDM) displays the size of a volume in round numbers. Consequently, LDM may
display the same size for two volumes with slightly different block counts.
To get the exact size of a volume, open the Windows Explorer, right-click the
volume, and select Properties. The volume's capacity in bytes is its
exact size.
If no destination volume is specified, the system attempts to restore to
a volume on the Destination Computer with the same name as the one being
restored. If no such volume exists, the restore operation fails.
By default, the Image Level iDataAgent
restores a volume or file(s) to the client from which it originated; this is referred
to as an in-place restore. If desired, you can also restore the data to a different
Image Level client. Keep in mind the following considerations when performing such
restores:
The destination client must reside in the same CommCell as the client whose
data was backed up.
Each of these restore destination types are available for both Volume Level
restores as well as File Level restores, both for Windows and Unix.
The following section enumerates the types of restore destinations that are supported
by the Image Level iDataAgent. See
Restore/Recover/Retrieve Destinations - Support for a list of Agents supporting each restore destination
type.
For File Level Restores only, besides restoring data to a client computer�s local
drive, you can also restore data to a UNC path (Windows) or an NFS-Mounted File
System (Unix). (See
Restore to Network Drive/NFS-Mounted File System for comprehensive information.)
If the Image Level backup contains the Metadata information, you can perform
a File Level restore operation on the
Image Level Backup. By default, files are restored to the same folder. However,
while restoring the files related to system state, it is recommended to perform
an Out-of-Place restore. This will ensure that the existing files are not
overwritten.
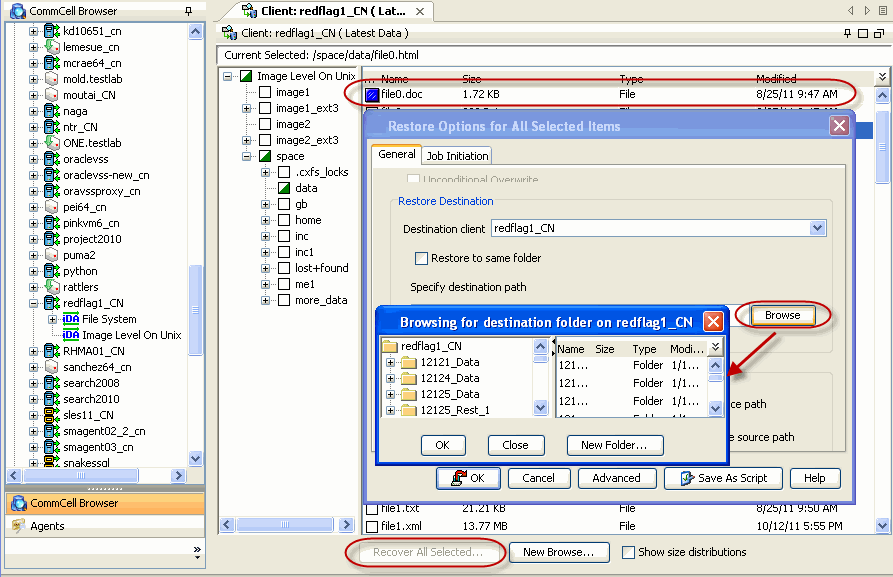
Use the following steps to perform a file level restore on
an Image Level backup:
From the CommCell Browser, navigate to Client Computers |
<Client>.
Right-click <Image Level>, point to All Tasks,
and then click Browse Backup Data.
Click OK.
Navigate to the folder you want to restore and then select the
files to be restored.
Click Recover All Selected.
Clear the Restore to same folder checkbox.
Specify the destination path by clicking the Browse
button.
This will ensure that the existing files are not
overwritten.
Click OK.
Click the Job Initiation tab.
Click OK.
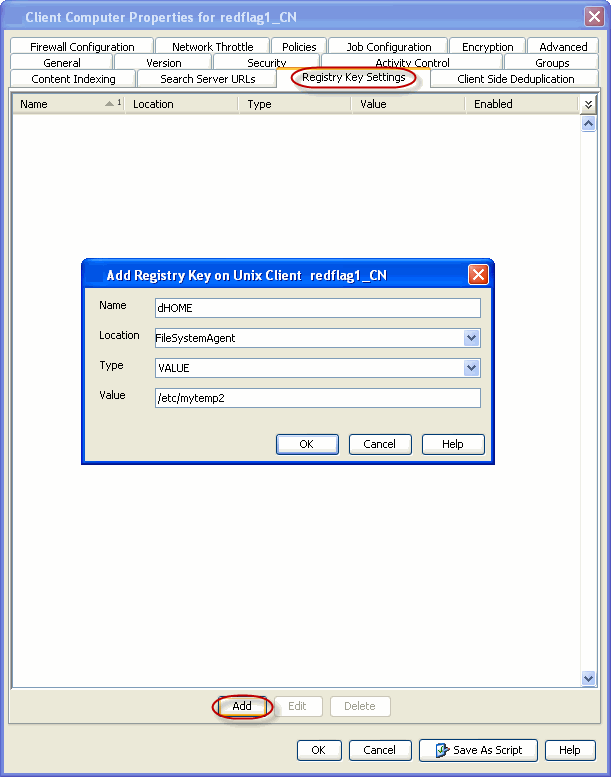
Changing the Temporary Directory for File Level Restore
By default, the extents (blocks) are restored to the default temporary location,
for example: C:\Program
Files\Company\Product\iDataAgent\FileSystemAgent.
Based on the available size of recovery space on the target client, you can
move the temporary directory to a new location using the following steps:
From the CommCell Console, navigate to Client Computers.
Right-click the <Client>, and then click Properties.
In the Value field, type the path to the new directory.
For example (on UNIX):
/etc/mytemp2
For example (on Windows):
D:\mytemp2
Click OK.
Click OK.
Restore from Backup Copies
The Image Level on Unix iDataAgent restores file(s) to the client from which
it originated by default; this is referred to as an in-place restore. If
desired, you can also restore the data to a different Image Level client.
Keep in mind the following considerations when performing such restores:
The destination client must reside in the same CommCell as the client
whose data was backed up.
The Image Level on Unix iDataAgent can perform a file level restore only
when the operating systems of the client computer and the MediaAgent are the
same.
File Level Restore from a Primary Backup Copy
From the CommCell Console, navigate to Client Computers |
<Client>.
Right-click the Image Level on UnixiDataAgent, and then
click All Tasks | Browse Backup Data.
From the BrowseOptions dialog box, select the
MediaAgent from the UseMediaAgent list, on which the
primary copy of data is backed up.
Click OK.
Select the file/s you want to restore, and then click Recover
All Selected.
In the Destination Client list, select the client with
the same operating system as the MediaAgent.
Click OK.
File Level Restore from an Auxiliary Backup Copy
Please note that if the operating systems of the client computer and the
MediaAgent to which the primary backup copy is directed are different then you
can perform a file level restore using the auxiliary backup copy.
From the CommCell Console, navigate to Client Computers |
<Client>.
Right-click the Image Level on UnixiDataAgent, and then
click All Tasks | Browse Backup Data.
From the BrowseOptions dialog box, select the
MediaAgent from the UseMediaAgent list, on which the
primary copy of data is backed up.
Click Advanced.
Select the Browse from copy precedence check box, and
then in the Copy Precedence box, type or select 2 as the copy
precedence number.
Click OK to close the Advanced Browse Options
dialog box.
Click OK.
Select the file/s you want to restore, and then click Recover
All Selected.
In the Destination Client list, select the client with
the same operating system as the MediaAgent.
File Level restores are carried out as extractions of content
from the Image Level backup. The following
sequence of events takes place during a File Level Restore:
During Browse, if the
index is not available in the cache, a request is sent to the Media Agent to index the objects selected for
restore.
The Master File Table of the backup is scanned to determine the number
of blocks (extents) that contain the files to be restored.
The MediaAgent restores the selected files to the designated client and
places them in the temporary directory.
The Restore process on the client extracts the file data from the
restored extents and then restores file(s) from them.
Once the restore operation is complete, it will clean up the
temporary directory to which the extents were
restored.
While restoring large number of files, you may
not see the data being restored instantly as the files need to be
extracted from the disk image.
How to Estimate the Free Space Required for Extent Recovery Location?
The temporary space required for the extent recovery location would be the
size of the files being restored with a small amount of overhead (10% - 20%). If
the disk was highly fragmented at the time of backup, this may require
additional temporary space. See examples below:
Example 1: If the default Extent size is 1 MB, in order to restore a 4 KB
file, a 1 MB extent is restored on the client to allow the extraction of the 4
KB file.
Example 2: When the disk is not highly fragmented at the time of backup, if
you try to restore files that are collectively 1 GB in size, then 1.2 GB
temporary space is required to hold the extents.
Example 3: If a 400 KB file is highly fragmented and scattered in 100
different extents, then all the 100 extents (100 MB) will need to be restored to
the machine to restore the 400 KB file.
NTFS volumes allocate hard disk space using increments of cluster sizes. A cluster
is a smallest fixed unit of
disk space that can be allocated to a file. For file sizes that are not an exact
multiple of the cluster size, additional space must be allocated as the next
largest multiple of the cluster size.
If the cluster size is not specified when formatting a partition, defaults
are used according to the size of the partition, to reduce the amount of unused
space and reduce fragmentation. You can override the default settings when
formatting a partition.
For example, the default maximum cluster size for NTFS under Windows NT 4.0 and later is
four kilobytes and NTFS file compression is not supported on drives with a
larger cluster size.
When restoring volumes, the backed up cluster size determines the maximum cluster
size for the destination volume. For larger volumes, use a larger cluster size.
The following table shows the default cluster sizes for NTFS.
Default cluster sizes for NTFS
Volume size
Windows NT 3.51
Windows NT 4.0
Windows 7, Windows Server 2008 R2,
Windows Server 2008, Windows Vista, Windows Server 2003, Windows XP, Windows
2000
7 MB�512 MB
512 bytes
4 KB
4 KB
512 MB�1 GB
1 KB
4 KB
4 KB
1 GB�2 GB
2 KB
4 KB
4 KB
2 GB�2 TB
4 KB
4 KB
4 KB
2 TB�16 TB
Not Supported*
Not Supported*
4 KB
16TB�32 TB
Not Supported*
Not Supported*
8 KB
32TB�64 TB
Not Supported*
Not Supported*
16 KB
64TB�128 TB
Not Supported*
Not Supported*
32 KB
128TB�256 TB
Not Supported*
Not Supported*
64 KB
> 256 TB
Not Supported
Not Supported
Not Supported
* Not supported because of the limitations of the master boot record (MBR).
Windows limits the size of an NTFS volume to that addressable with
32-bit clusters, which is slightly less than 256 TB (using 64-KB
clusters).
For more information, refer to Microsoft KB article
140365.
File Level Restores and Metadata Collection on AIX
Consider the following when doing a file level restore:
If the volume has a large number of small files (>5 million) to be restored,
then turn off metadata collection, do a volume level restore, and copy the
desired files back instead of running a file level restore job.
If the volume has a mixture of large and small files then use Scan
Optimization for metadata collection.
If you are backing up multiple disks from the same subclient then use
multi-streaming to improve performance.
If there will never be a file level restore then it is recommended to
turn off metadata collection.