Getting Started - Outlook Add-In - Administrator

Install Using AD Group Policies Install From CommCell Console Prepare Exchange Environment Configuration Test Outlook Add-In

Once the Outlook Add-In software has been installed, perform the following configuration steps:

  1. Configure the Active Directory Server
  2. Configure Domain Information in the CommCell Console
  3. Configure User Groups in the CommCell Console
  4. Prepare User Accounts
  5. Perform an Archive

Configure the Active Directory Server

1. Log on to the Active Directory Server using the Domain Administrator credentials.  
2. Install the Resource Pack on the Active Directory Server Refer to Resource Pack - Install on Windows for step-by-step instructions on installing the Resource Pack.
3. Navigate to the <software_installation_path>\Base folder and copy the following file:

CVOutlookAddin.adm

 
4.
  • Start Group Policy Management.
  • Right-click the GPO you want to edit and click Edit.
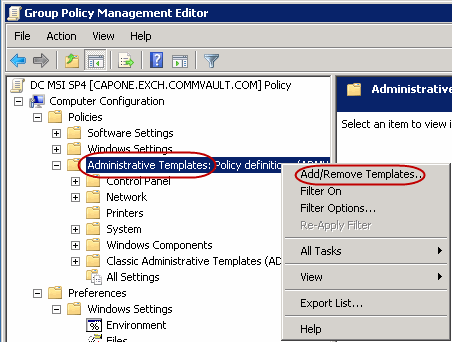
5. Right-click Administrative Templates and select Add/Remove Templates.
6.
  • You will see a list of currently installed policy templates. Click Add.
  • Select the CVOutlookAddin.adm template and click Open. The template will be added and appear in the list.
  • Click OK.
7. When Installing Outlook Add-In for Outlook 2013, enable the following:
  • Login to Outlook.
  • Navigate to File| Info| Manage Add-Ins.
  • Select the Always Enable this Addin button.

Configure Domain Information in the CommCell Console

8.
  • From the CommCell Browser, click Security.
  • Right-click Name Servers and select Add New Domain | Active Directory.
9.
  • Enter the NetBios Name (IP address) of the external domain.
  • Enter the fully qualified Domain Name, e.g., company.com.
  • Click Edit to enter a User Account for the external domain.
  • Click Enable SSO.
  • Click OK.

Configure User Groups in the CommCell Console

10.
  • From the CommCell Browser, click Security.
  • Right-click CommCell User Groups | New User Group.
11.
  • Type the name you want to assign to the user group (up to 32 characters; do not include trailing spaces) and some descriptive information that characterizes the user group.
  • Click Enabled.
12.
  • Click the Capabilities tab.
  • From the Available Capabilities pane, select End User Search and click > to move it under the Assigned Capabilities pane.
  • Click OK.
13.
  • Click Users
  • Assign users to the group as necessary. You can click Create New User to create a user to be associated with this user group.
  • Click OK.
14.
  • From the CommCell Browser, click Security.
  • Click on the external domain controller for which you want to add a user group.
  • Right-click on the External Groups and select Add New Group.


15.
  • Click Browse.
  • Select the user group you want to add.
  • Click OK.


Prepare User Accounts

16.
  • Click Browse.
  • Select the user group you want to add.
  • Click OK.

Perform an Archive

1.
  • From the CommCell Console, navigate to Client Computers | <Client> | Exchange Mailbox Archiver | defaultArchiveSet.
  • Right-click the default subclient and click Archive.
2.
  • Click Immediate.
  • Click OK.
3. You can track the progress of the job from the Job Controller.
4. Once the job is complete, view the details of job by right-clicking the Subclient and selecting Archive History.
5. Click OK.
6. Right-click the job to:
  • View items that failed, if any, during the job.
  • Resubmit the job.
  • View job details, such as the number of mailboxes archived.
  • View events associated with the job.
  • Send the log file that is associated with the job.