[root@celerra_cs_admin]# fs_dhsm -connection FS6 -info
In this example:
FS6 refers to file system volume.
The stub recall operations should now complete successfully.
| Archive | Recover |
The following section provides information on some of the troubleshooting scenarios related to Windows file archiving:
The space quota for an object such as volume, directory or user is set lower than the amount already in use. Doing so may cause improper results for data protection or recovery operations.
Do not set a quota for an object such as a volume, directory, or user that is lower than the amount that has already been used.
In case the archived files are MAC files and their metadata has been archived then previewing them will cause the entire file and its metadata to be recalled.
When the volume where the proxy stub folder resides runs out of space, you
can move the proxy stub folder to a new location in another volume where more
space is available.
Follow the procedure given below to move the Celerra proxy stub folder to a new
location:
If archiving is completing without stubbing, follow the steps given below to troubleshoot:
When you double click a stub to perform a recall, the recall operation fails with the message Access Denied. You will receive an error in the CommCell Console which says Recall abort due to exported media. Afile-Data=[number].
This happens because the Archiver Services perform a pre-check to see if the required media is available in the library.
Import the required media into the library. We recommend you to have a latest backup cycle available always so that the stubs can be recalled from that cycle. Backup operations performed on disk libraries enable faster recalls as they are not bound by the read and seek rules binding to the tape drives.
[root@celerra_cs nasadmin]# server_http server_4 -append dhsm -hosts 172.19.97.208
In this example:
server_4 refers to the server name and 172.19.27.208 is the IP of the new proxy computer to be registered.
Follow the steps given below if you are using a proxy on http:
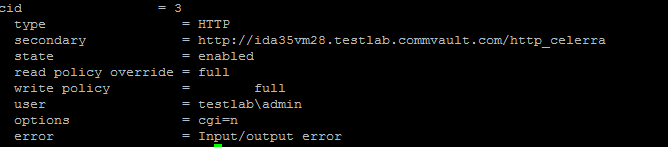
[root@celerra_cs_admin]# fs_dhsm -connection FS6 -info
In this example:
FS6 refers to file system volume.
The stub recall operations should now complete successfully.
If you want to change the location of the proxy stub folder, enter the new location in the Proxy Stub Path box in the Subclient Properties dialog box.
If you have PGP Disk Encryption tool used by SAP installed on your computer, you might find that the stubs (archived data) are recalled automatically without triggering a recall operation.
This is because certain permissions might be enabled in the PGP Options dialog box.
To resolve this issue, make sure that the Overlay PGP icon on secured files and folders and Protect individual files options are disabled in the PGP Options (Netware tab) dialog box.

During recalls the File Archiver recall popup message is not being sent even though the Enable Recall Popup Message has been selected from the system tray settings of the notification enabler.
The following procedure describes the steps involved in recovering data associated with the following entities:
This procedure can be performed when the following are available:
See License Administration for more details.
If you regularly run and have copies of the Data on Media and Aging Forecast report you can check them to see if the appropriate media is available.
| When you start the Command Line Interface to capture data, use the name of the standby CommServe in the -commcell argument. |
This will bring back the entity in the CommServe database and the entity will now be visible in the CommCell Browser. (Press F5 to refresh the CommCell Browser if the entity is not displayed after a successful merge.)
|
As a precaution, mark media (tape and optical media) associated with the source CommCell as READ ONLY before performing a data recovery operation in the destination CommCell. |
If you terminate a stub recall job while it is still running, the stub is rendered useless and that data can never be recalled from the stub.
In case of such scenario, when data cannot be recovered from the stub, it is recommended to browse and restore the data.
Use the following registry keys to modify the default behavior of the Migration Archiver Agent:
| Topic | Registry Key(s) | Description | |||
| Access and Modified Times | GXHSMSERVICEKEEPTIMES | Migration archiving and stub recovery operations change the access and modified time on files. An enhancement that allows the recovery administrator to preserve the original file access time and modified time during migration archiving and stub recovery. See Registry Keys (GXHSMSERVICEKEEPTIMES and GXHSMSTUBKEEPTIMES) for more information on enabling this feature for all instance types except Celerra. | |||
| GXHSMSERVICEKEEPTIMES | Stub pruning looks at the modified time of the file to determine eligibility for pruning stubs. If you use the GXHSMSERVICEKEEPTIMES and GXHSMSTUBKEEPTIMES registry keys, the modified time will be preserved. This means that when you run a migration with these registry keys enabled, the preserved modified time will always be older than the time that the file was stubbed. As such, if you use the Prune stub only after n days option, you should ensure that the modified time is not being preserved. Therefore, be sure to disable the GXHSMSERVICEKEEPTIMES and GXHSMSTUBKEEPTIMES registry keys (which are enabled by default) when you use this option. | ||||
| Stub Recalls | GXHSMSERVICEMINRECALLFREESPACE | If you would like to ensure that there is sufficient free space on a volume before initiating stub recalls, you can use the GXHSMSERVICEMINRECALLFREESPACE registry key to enable this feature. | |||
| nRETRY_RECALL_TIMEOUT | Two registry keys are available for administering the timing of recalls. The nRETRY_RECALL_TIMEOUT registry key allows you to set the time of duration for a recall attempt. Once this time expires, the recall attempt will stop. The nRETRY_RECALL_DELAY key indicates the delay time for a recall attempt. Once this time expires, the recall attempt will resume. These keys work hand-in-hand with each other, and they are especially useful if the CommServe goes down. | ||||
| EVMGRC_REMOTE_PORT_OVERRIDE | For File Archiver for Windows, you can override the stub file port number by using the EVMGRC_REMOTE_PORT_OVERRIDE registry key. Use this key when the port number changes. Keep in mind that using this key defeats the benefit of being able to recall data using different port numbers for multiple Agents. When the key does not exist, the File Share Archiver client uses the stub content to determine port number. For 7.0 stubs, refer to the EVMGRC_REMOTE_PORT registry key. | ||||
| GXHSM_DISABLE_ARCHIVE_FILE_RECALL_AND_RESTORE | This registry key disables stub recalls at the driver level and allows
service to send custom popup messages. This key should be used with a service
level key
GXHSM_DISABLE_ARCHIVE_FILE_RECALL_AND_RESTORE_MESSAGE.
It is created in computers which has File Share Archiver Client installed. |
||||
| DMReadMaxMountRetryVal | By default no failure message is displayed when a recall job waits for the media to be imported. This key allows for setting a finite number of mount retries during restore. | ||||
| Stub Recall History | nDMRSendFileStatus |
The stub recall history is viewable at the client and agent levels in the Commcell Console and is associated with the first instance, which was created in the Migration Archiver agent. Stub recall history can be turned on by creating nDMRSendFileStatus key and setting the value to 1.
|
|||
| GXHSM_ENABLE_INPLACE_RESTORE | By default the recalls occur on a staged path, and then the recalled files are copied to the target path. This is a user defined key which allows the user to direct the recalls in place rather than the staging path. | ||||
| GXHSM_ALTERNATE_GXHSMCACHE_PATH | By default at the time of stub recall the stubs are stored in a stub cache path, which is generally in the root volume path. The Maximum supported path length for it is 1000. Any path longer than this specified length will get proportionately reduced if this key is specified. This user defined key allows the user to specify the path for all recalls. | ||||
| Persistent Pipelines | nDMRSIDLETIMEOUT |
To change the default value of how long the persistent pipeline of this Archiver Agent will stay open during idle periods of a recovery operation, you can use the nDMRSIDLETIMEOUT registry key to accomplish this task. The pipeline stays persistent for 24 hours by default.
|
|||
| nDMRMaxRestoreThreads | If you would like to spawn multiple persistent pipelines when stub recall requests are from different archive file IDs, the nDMRMaxRestoreThreads registry key can be used to accomplish this task. | ||||
| Recall Messages and Pop-Ups | GXHSM_MAGNETIC_MSG_NAME | You can use the GXHSM_MAGNETIC_MSG_NAME key to replace the default "MAGNETIC" key word for a recall message with a message of your choice. | |||
| GXHSMNOPOPUP | To enable the display of a pop-up message for stub recoveries indicating
that the recovery operation has completed and showing the location of the
file that was recovered, change the
GXHSMNOPOPUP
registry key value to N. To disable
the pop-up, create the
GXHSMNOPOPUP
registry key and set the value to Y.
This is enabled by default on the local client for the File Archiver for Windows Agent when configured for NAS archiving.
|
||||
| GXHSM_DISABLE_ARCHIVE_FILE_RECALL_AND_RESTORE_MESSAGE | This is a service level key used in conjunction with the driver level
key
GXHSM_DISABLE_ARCHIVE_FILE_RECALL_AND_RESTORE on computers where
File Share Archiver Cleint is installed. The key allows for customizing
the popup message when
GXHSM_DISABLE_ARCHIVE_FILE_RECALL_AND_RESTORE is used to disallow
the recall. The key can be used with the following to get desirable popup messages:
|
||||
| GXHSM_MAX_DISPLAY_TIME_FOR_DISABLERECALLRESTORE_MESSAGE | The key is used in conjunction with GXHSM_DISABLE_ARCHIVE_FILE_RECALL_AND_RESTORE_MESSAGE as it allows the user to set a desired popup message display time. | ||||
| Log Files | GXHSMSTUBLOGFAILFILESTRUNCATE | For File Archiver for Windows, you can determine whether the existing log file associated with your job should be truncated or appended to. See GXHSMSTUBLOGFAILFILESTRUNCATE in Registry Keys for more information. | |||
| Sparse Files | GXHSMSTUBCREATESPARSE | If you have enabled the archive option to create stub files that are not sparse files (using the GXHSMSTUBCREATESPARSE registry key), you must use WordPad — not Notepad — to open the resulting text files. | |||
| GXHSM_NAS_REMOVESPARSE_ON_RECALL | In case of archiving FPolicy and Network File Share data, use GXHSM_NAS_REMOVESPARSE_ON_RECALL to remove the sparse attribute upon recall if the stub has been created as a sparse file. |