Agent
Facilitates Oracle instance discovery.
Instance
Defines the Oracle database to be backed up.
Subclient
Defines the Oracle database objects to be backed up.
The Oracle iDataAgent
uses the following logical entities to manage backup and restore
operations from the CommCell Console.AgentFacilitates Oracle instance discovery. InstanceDefines the Oracle database to be backed up. SubclientDefines the Oracle database objects to be backed up. |
|
In the CommCell Console each instance references an Oracle database. Hence it is necessary to discover the instances which can then be used to backup data. You can discover or add an instance as described in the following sections:
When automatic instance discovery is enabled, the existing Oracle database instances are discovered as follows:
This capability ensures that all instances are accounted for on a regular basis for backups.
Automatic instance discovery will not detect the manually created databases in an instance. Make sure that there is an entry in /etc/oratab for manually created oracle instance which contains manually created databases. Then, this instance is automatically discovered when you enable instance discovery.
Use the following steps to enable automatic instance discovery:
|
 |
When instance discovery is enabled, Oracle instances are automatically discovered every 168 hours or whenever the Communications Service (GxCVD) is restarted. Use the following steps to modify the default discovery time interval.
|
|
If you have manually created an Oracle database, then you must manually discover the corresponding instance. Automatic instance discovery will not detect the manually created databases.
In addition, you can also use the manual discovery process to discover the Oracle databases at any point in time. Use the following steps to manually discover instances:
|
 |
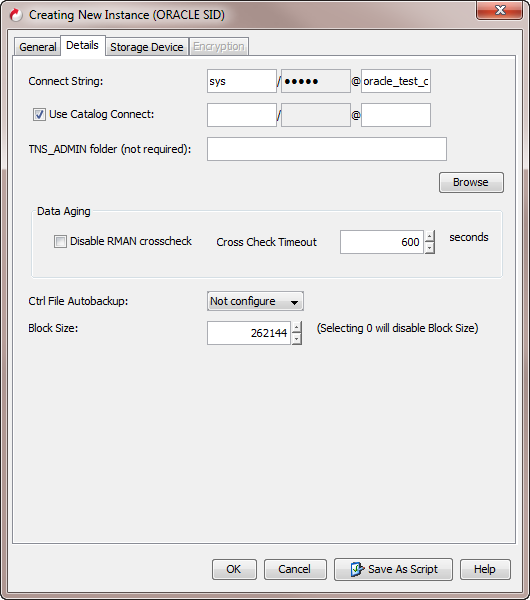
During automatic instance discovery, options such as oracle home path and user account, connect string are preset. When instances are manually added, these options can be customized. Use the following steps to manually add an instance:
|
|
|
 |
|
 |
You need to create an On Demand instance to perform on demand backup operations. When creating an On demand instance, a default subclient is automatically created for the instance. The content for the default subclient will be specified in the RMAN script that is run through the Command Line Interface.
| Once an On Demand Instance is created, it cannot be changed into a traditional instance. |
|
 |
Oracle HOME directory refers to the location where the Oracle application resides. When instances are discovered, the home path is automatically assigned to the instance. However, you can modify the home path location for an instance at any point of time. Use the following steps to configure the Oracle HOME directory:
|
 |
When an instance is configured, by default, the TNS_Admin directory is created in the Oracle HOME\network\admin path. Use the following steps to change the path for the TNS_ADMIN directory:
|
 |
In the CommCell Console each Oracle 12c container database (CDB) maps to an instance. Once you have added an instance for the container database, you can create subclients and backup sets as you would for any Oracle database instance.
|
|
|
 |
|
 |
In order to perform backup and restore operations, you need to create and configure the following user accounts on the Oracle client:
On Unix clients, the user should be part of the user group assigned during the iDataAgent install. You can also use the operating system user account to verify the rights to perform all backup and restore operations for the associated Oracle instance.
On Windows clients, the user should be part of local administrator group and also part of the ora_dba group with read/write permissions on Calypso folder. You can use the Impersonate user account to verify the rights to perform all backup and restore operations for the associated Oracle instance.
The user account for standard database should have the following privileges:
Alternatively, instead of using administrator user account with SELECT ANY TABLE privilege, you can also create user accounts with lesser privileges for accessing specific objects:
For example:
The Recovery Catalog database user account must have recovery catalog owner privileges.
Additional accounts (except Impersonate User) should be established by Oracle database administrator.
Use the following steps to configure the user account to access the Oracle application:
|
|
|
 |
|
 |
Use the following steps to configure the user account privileges to access the Oracle database:
|
 |
By default, during a data aging operation, an Oracle CROSSCHECK is performed by the system to synchronize the entries in the CommServe database with the RMAN catalog. Use the following steps to disable the cross check operation:
|
 |
When you create an instance, a default subclient is automatically created. The default subclient includes the entire database associated with that instance, which includes all components, such as the log files and control files. However, you can create user-defined subclients to backup the specific components or conditions, such as the following:
If a new database object is added to the database, and if none of the subclients contain that database object , then that object is automatically assigned to the content of the default subclient.
During an offline backup, the database is shutdown and is not available for use. Since incremental backups require access to various tablespaces and datafiles, it is always recommended that you perform a full backup of the database when it is offline. The full backup includes all the datafiles, tablespaces, and control file of the Oracle database. Note that, offline backups do not include the archived log files.
Offline backups can be performed when the database is in offline or online mode. If the database is online, it shuts down the database, performs the backup and then brings up the database back.
In order to backup the Oracle database when it is offline, you need to create a separate user-defined subclient for offline backup. Make sure that the database is in the MOUNT mode during the backup.
A static listener must be configured for offline backups with lights out script when the Oracle database is in open mode. See When do we configure a static listener for additional information.
Use the following steps to create a subclient for offline backups:
|
 |
In some environments, it may not be possible to bring down the entire database to perform an offline backup. In such situations, you can choose online backups, where the database will be up and running during the backup.
You can perform either a full backup or incremental backup of the Oracle database when it is online. Since full backups includes all the datafiles, tablespaces and logs, it is very time consuming, hence you can plan for a full online backup less frequently (say, on weekly basis). On the other hand, incremental backups includes the data and logs that have been changed after the last full backup, they are faster and can be performed more frequently (say, on a daily basis).
If a new database object is added to the database, and if none of the subclients contain that database object , then that object is assigned to the content of the default subclient
Use the following steps to create a subclient for online backups:
|
 |
You can also create subclients to backup specific datafiles and tablespaces, which undergo frequent changes in the Oracle database.
Use the following steps to create a subclient to backup individual datafiles and tablespaces:
|
 |
Selective Online Full backup is a full backup performed when an Oracle
database is online and is copied to a selective copy (during an auxiliary copy
operation) from which it can be restored.
The advantage of this type of backup is that both the data and logs use the same
storage policy, which means that they reside together on the same media. They
are completely self-contained for restore and long term archiving purposes. This
is especially useful in disaster recovery situations by alleviating the need to
locate different offsite media from various jobs to gather the necessary data
and logs to recover the database. Also, the data aging rules for selective
online full backups are different from regular full backups, as both data and
logs are aged together under the same storage policy.
When performing the selective online full backup, note the following:
Use the following steps to create a subclient for performing selective online full backups:
|
 |
See Data Aging Rules for Selective Online Full Backups for more data aging rules for selective online full backups.
| If you want to create a subclient for selective online full backup on multiple instances or clients instead of navigating to each client and creating the subclients, then, use this qscript. |
Use the following steps to create a subclient for selective online full backups from the command line using qscript:
| 1. | From the command prompt, logon to the CommServe using the qlogin command. | Example: To log on to CommServe
leonard64.devemc.com with user
name user1: qlogin -cs leonard64.devemc.com -u user1 Password: |
| 2. | Run the command to create a subclient for Oracle Selective Online Full backup. | D:\>qcreate sub client -cs leonard64.devemc.com -c dbserve4 -a Q_ORACLE -i auto -n "NEWSUB" -sp "ying_data" -f "auto |
| 3. | Run the command to execute the qscript. | D:\>qoperation execscript -sn SetSubClientProperty.sql -si 'c=dbserve4' -si 'a=Q_ORACLE' -si 'i=auto' -si 'b=default' -si 's=NEWSUB' -si 'Oracle Online Selective Full' -si '1' -si '2' |
For more information about the parameters and arguments, see qscript.
When performing selective online incremental backups, note the following:
You can enable and disable selective online incremental backup using sql scripts.
Enable selective online incremental backup:
qoperation execscript -sn SetKeyIntoGlobalParamTbl.sql -si JMSOFIncrSupport -si y -si 1
Disable selective online incremental backup:
qoperation execscript -sn SetKeyIntoGlobalParamTbl.sql -si JMSOFIncrSupport -si n
Archive logs are required to recover database transactions that have been lost due to an operating system or disk failure. You can apply these archive logs to an online backup in order to recover a database.
Though online full backups can include both data and logs, because of their importance in recovering data, it is recommended that you create separate subclients to backup archive log files.
|
 |
| If you want to create a subclient for Log backups on multiple instances or clients instead of navigating to each client and creating the subclients, then, use this qscript. |
Use the following steps to create a subclient for Log backups from the command line using qscript:
| 1. | From the command prompt, logon to the CommServe using the qlogin command. | Example: To log on to CommServe
leonard64.devemc.com with user
name user1: qlogin -cs leonard64.devemc.com -u user1 Password: |
| 2. | Run the command to create a subclient. | D:\>qcreate sub client -cs leonard64.devemc.commvault.com -c dbserve4 -a Q_ORACLE -i auto -n "NEWlog" -sp "ying_data" -f "auto" |
| 3. | Run the command to disable Data option. | D:\>qoperation execscript -sn SetSubClientProperty.sql -si 'c=dbserve4' -si 'a=Q_ORACLE' -si 'i=auto' -si 'b=default' -si 's=NEWlog' -si 'Oracle Backup Mode' -si '1' -si '2' |
| 4. | Run the command to disable Backup Control File option. | D:\>qoperation execscript -sn SetSubClientProperty.sql -si 'c=dbserve4' -si 'a=Q_ORACLE' -si 'i=auto' -si 'b=default' -si 's=NEWlog' -si 'Backup Control Files' -si '0' -si '2' |
| 5. | Run the command to disable Delete Archive log option. | D:\>qoperation execscript -sn SetSubClientProperty.sql -si 'c=dbserve4' -si 'a=Q_ORACLE' -si 'i=auto' -si 'b=default' -si 's=NEWlog' -si 'Archive Log Deleting' -si '0' -si '2' |
For more information about the parameters and arguments, see qscript.
Standby databases can be backed up when they are in offline or online state. If the database is online, the iDataAgent detects the standby database mode by checking the database role and automatically disables the log switch operation.
Use the following steps to configure backups for standby database:
|
 |
When you backup archive logs, you can specify the locations from where the log backups should be performed. This capability enables you to schedule backup operations from different log destinations on the same subclient. If necessary, you can also delete the logs after the backup. For more information, see Deleting the Logs after a Backup
|
 |
| Ensure that the logs in the specified location are backed up. This may cause data loss if those archive logs are not backed up. |
|
 |
When performing archive log backups, the current redo log file is closed (even if it is not filled up completely) and the next redo log file is used for writing using a log switch. The closed redo log file is then archived during the log phase. Use the following steps to disable the log switch:
|
 |
When backing up archive logs, by default the logs are not deleted after the backup operation. Use the following steps to enable deletion of logs soon after the backup.
|
 |
See Deleting Archive Logs After a Specific Backup for more information.
As the Control file stores the status of the physical structure of the database. It is required when you want to recover the database to the current state. Hence it is important to include control files in your backups. By default, control files are included in the subclient for selective online full backups. You can also include/exclude control files for online or offline backups. The following sections describe the methods by which you can backup control files.
You can configure the instance to automatically backup Control Files whenever you a backup the subclient in that instance.
Use the following steps to enable automatic backup of control files for all the subclients in the instance.
|
 |
If the control file backup is enabled at the instance level, you can also include/exclude control files for backups from a specific subclient. Use the following steps to enable control file backups for a specific subclient.
|
 |
By default, all data is backed up which includes tablespaces. If you want to restore individual tables, you need to enable table level backup.
In order to backup and restore database tables, you need to enable table level backups for the subclient. Use the following steps to enable backups at table level.
|
 |
By default, when you restore database tables to a target instance, the system automatically duplicates the source database to an auxiliary instance in a temporary staging location specified during the restore operation. The database will be automatically imported from this auxiliary instance after the restore.
Use the following steps to set up a specific database as an auxiliary instance. This is useful when you want to restore a table to a specific failure point.
| 1. | Copy the init<SID>.ora file from the source database to the auxiliary database instance. | |
| 2. | Update the database name and the database file locations in the init<SID>.ora file for the auxiliary database instance. | |
| 3. | Add the DB_FILE_NAME_CONVERT and LOG_FILE_NAME_CONVERT parameters in the init<SID>.ora file. These parameters will redirect the datafiles, temp files, and log files to the auxiliary instance. |
Windows
Clients: DB_FILE_NAME_CONVERT=('sourcE_of_df_path/','dup_of_df_path/','source_of_temp_path/','dup_of_temp_path/',...) LOG_FILE_NAME_CONVERT=('source_of_log_path/redo','dup_of_log_path/redo') Unix Clients: DB_FILE_NAME_CONVERT=(source_of_df_path/,dup_of_df_path/,source_of_temp_path/,dup_of_temp_path/,...) LOG_FILE_NAME_CONVERT=(source_of_log_path/redo,dup_of_log_path/redo) |
| 4. | Add the log_archive_dest_1 parameter is added to the init<SID>.ora file on the auxiliary instance. | |
| 5. | Restart the Oracle Services, if using Windows clients. | |
| 6. | Add the destination instance name in the Listener.ora and Tnsnames.ora files. If using a different host, add the duplicate database instance name in the Listener.ora file on the destination host and Tnsnames.ora files on the destination and source hosts. Also, add the original database name in the Tnsnames.ora file on the destination host. |
DUPDB = (DESCRIPTION =
(ADDRESS = (PROTOCOL = TCP)(HOST = powerpc02)(PORT = 1521)) (CONNECT_DATA = (SERVER = DEDICATED) (SERVICE_NAME = dupdb) (UR=A) ) ) |
| 7. | Restart the Listener. | $lsnrctl reload |
| 8. | Ensure that the auxiliary instance is in NOMOUNT mode. | sql> startup nomount; |
In order to perform offline backups of the Oracle database, all users must be logged out of the database and it must be completely shut down. When the database is online, you can enable a graceful shutdown of the database using lights out script that will notify the users about the shutdown and set a specific wait time for the users to logout of the database. Use the following steps to configure lights out script for offline backups:
|
 |
The Server Parameter file (SPFile) contains the database startup information. By default, the backups do not include the SPFile.
Use the following steps to include SPFile during backups:
|
 |
Flash Recovery Area is a specific area in the disk storage that exclusively holds a copy of all backup-related components, such as image copies, redo logs, and control file auto backups. This facilitates faster restores of backup data and minimizes restores from tapes during restore operations. Use the following steps to enable backup of flash recovery area:
|
 |
By default, recovery catalog is not used for backup and restore. As the recovery catalog contains metadata about RMAN operations for each registered database, it is recommended to include recovery catalog in backups. The metadata information is useful when you want to restore and recover the database after a crash. Use the following steps to use the Recovery Catalog for backups:
|
 |
It is a good practice to synchronize the recovery catalog with the control file, as the control file contains the latest backup information, which is need to perform restores.
Use the following steps to synchronize the control file with the recovery catalog:
|
 |
By default, backup data is sent to media in two streams. This means that a database is sent to media during a backup in two parallel waves. This results in backup taking about half the time to complete as it otherwise would if only one stream is used.
You can increase the number of streams used for backups for a particular subclient provided the number of streams does not exceed the maximum number configured in the subclient's storage policy. Increasing the number of streams for a subclient further reduces the amount of time a backup takes to complete. For example, increasing the number of streams from 2 to 3 enhances backup time from one-half that of a single stream to one-third.
Keep in mind that the same number of streams used for performing a backup will be needed to restore the data.
|
 |
|
 |
Several options are available for enhancing backup performance and reduce the network bandwidth used for performing backups. These options include:
In addition to the above configurations, you can also enable distribution of data across disks during backup operations. See Enhancing Backup Performance for more details
Use the following steps to enhance the backup performance:
|
 |
|
 |
You can assign unique identification tags for all backup operations from a specific subclient. These tags can be used during a restore operation to easily identify a particular backup. Use the following steps to assign unique identification tag for backups.
|
 |
You can configure a subclient to skip the following data during backup operations:
Use the following steps to exclude data during backup operations:
|
 |
Prior to running backup operations, you can validate a backup job, which will cause RMAN to simulate the backup for the purpose of determining whether the backup can be successfully restored. Once a validate job is completed, you can view the log files of the job to identify and correct any validation issues.
During validation, the backup jobs are simulated without the media, you can view the log files of the job to identify and correct any validation issues.
Use the following steps to enable validation of backup jobs:
Prior to running a backup, you can check the following:
|
 |
You can add, modify, or delete several configurable properties for the Oracle iDataAgent from the command line interface.
Command line configuration enables you to:
The following sections describe the available command line configurations:
To run command line operations you must first login to the CommServe as follows:
qlogin -cs <commserve name> -u <user name>
qlogin -cs server1 -u user1
qcreate instance -c client -a iDataAgent -n instance -dsp defaultstoragepolicy -csp cmdlinestoragepolicy -lsp logstoragepolicy -hu Host User (Windows|Unix) [-ntp ntpassword] -oh oracleHome -ocu connectUser -ocp connectPassword -ocs connectService -ct usecatalog [-ctu catalogUser] [-ctp catalogPassword] [-cts catalogService] [-tns tnsadmin]
Example for creating an instance on the Unix client:
[root@client1 Base]# ./qcreate instance -c client1 -a Q_ORACLE -n instance1 -dsp sp1 -csp sp2 -lsp sp3 -hu oracle -oh /oracle/oracle10g ocu sys -ocp sys -ocs dctmdb -ct yes -ctu snap -ctp snap -cts test
Created instance successfully.
[root@client1 Base]#
You can execute a CreateOracleInstance qscript too using qoperation execscript qcommand to create an instance.
qoperation execscript -sn SetOracleInstanceProperties.sql -si 'clientname' -si 'Q_ORACLE' -si 'instancename' -si �instanceprop� -si �instancevalue� -si �instanceproptype�
Examples:
[root@client1 Base]# ./qmodify instance -c client1 -a Q_ORACLE -i instance1 -csp sp2 -lsp sp3
Modified instance successfully.
[root@client1 Base]#
qoperation execscript -sn SetOracleInstanceProperties.sql -si 'client1' -si 'Q_ORACLE' -si 'instance1' -si 'Oracle Home' -si '/oracle/oracle10g'
qoperation execscript -sn SetOracleInstanceProperties.sql -si 'client1' -si 'Q_ORACLE' -si 'instance1' -si 'TNS admin path' -si '/oracle/oracle10g/network/admin'
qoperation execscript -sn SetOracleInstanceProperties.sql -si 'client1' -si 'Q_ORACLE' -si 'instance1' -si 'Oracle RMAN Cross Check' -si '1' -si 2
qoperation execscript -sn SetOracleInstanceProperties.sql -si 'client1' -si 'Q_ORACLE' -si 'instance1' -si �Auto Backup Control File� -si '1' -si 10
to disable Auto backup of control file, use �si �2� for instancevalue(0-for Not Configure, 1- Configure On, 2- Configure OFF)
qoperation execscript -sn SetOracleInstanceProperties.sql -si 'client1' -si 'Q_ORACLE' -si 'instance1' -si 'Oracle block size' -si 1048576 -si 10
qopetation execscript -sn setOraclecredentials.sql -si c=clientName|allclients -si t=Catalog|DB|Impersonate| [username] -p2 <password> -si <username>
qoperation execscript -sn SetOracleCredentials.sql -si allclients -si t=DB -p2 passwd -si sys
qoperation execscript -sn SetOracleCredentials.sql -si c=client1 -si t=Impersonate -p2 passwd -si domainname\username
qoperation execscript -sn SetOracleCredentials.sql -si c=client1 -si t=Catalog -p2 passwd -si rman
qmodify instance -c client -a dataagenttype -i instance -csp cmdlinestoragepolicy -lsp logstoragepolicy
qcreate subclient -c client -a dataagenttype -i instance -n subclient -sp storagepolicy -f content
Example to create subclient with default options:
[root@client1 Base]# ./qcreate subclient -c client1 -a Q_ORACLE -i instance1 -n subclient1 -sp sp1 -f " "
Created subclient successfully.
qoperation execscript -sn SetSubClientProperty.sql -si 'c=<client name>' -si 'a=<agent type>' -si 'i=<instance name>' -si 'b=<backup set name>' -si 's=<subclient name>' -si <subclient property> -si <subclient property value> -si <subclient property type >
Examples:
qcreate subclient -c client1 -a Q_ORACLE -i instance1 -n "SOF" -sp "ora_data" -f " "
qoperation execscript -sn SetSubClientProperty.sql -si 'c=client1' -si 'a=Q_ORACLE' -si 'i=instance1' -si 'b=default' -si 's=SOF' -si 'Oracle Online Selective Full' -si '1' -si '2'
qcreate subclient -c client1 -a Q_ORACLE -i instance1 -n "OFFLINE" -sp "ora_data" -f " "
qoperation execscript -sn SetSubClientProperty.sql -si 'c=client1' -si 'a=Q_ORACLE' -si 'i=instance1' -si 'b=default' -si 's=OFFLINE' -si 'Oracle Backup Mode' -si '2'
qoperation execscript -sn SetSubClientProperty.sql -si 'client1' -si 'a=Q_ORACLE' -si 'i=instance1' -si 'b=default' -si 's=OFFLINE' -si 'Light out Script� -si �1� -si '2'
qcreate subclient -c client1 -a Q_ORACLE -i instance1 -n "LOGONLY" -sp "ora_data" -f " "
qoperation execscript -sn SetSubClientProperty.sql -si 'c=client1' -si 'a=Q_ORACLE' -si 'i=instance1' -si 'b=default' -si 's=LOGONLY' -si 'Oracle Backup Mode' -si '1'
qoperation execscript -sn SetSubClientProperty.sql -si 'c=client1' -si 'a=Q_ORACLE' -si 'i=instance1' -si 'b=default' -si 's=LOGONLY' -si 'Archive Log Deleting' -si '0' -si '2�
qoperation execscript -sn SetSubClientProperty.sql -si 'c=client1' -si 'a=Q_ORACLE' -si 'i=instance1' -si 'b=default' -si 's=command_test1' -si �Oracle Data FPS� -si '10' -si '7'
qoperation execscript -sn SetSubClientProperty.sql -si 'c=client1' -si 'a=Q_ORACLE' -si 'i=instance1' -si 'b=default' -si 's=command_test1' -si �Arch per bfs� -si '12' -si '8'
Execute the following command from the <Software_Installation_Directory>/Base folder after substituting the parameters and attributes:
qoperation execscript -sn SetSubClientProperty.sql -si c=<client_name> -si 'a=Q_ORACLE' -si i=<instance_name> -si 'b=default' -si s=<subclient_name> -si 'Oracle Data backup streams' -si '<stream_value>� -si '7'
Example:
Example to set the number of data streams to 4:
qoperation execscript -sn SetSubClientProperty.sql -si c=client1 -si 'a=Q_ORACLE' -si i=orcl -si 'b=default' -si s=FullSc -si 'Oracle Data backup streams' -si '4' -si '7'
qdelete subclient -c client -a dataagenttype -i instance -s subclient
Example:
[root@client1 Base]# ./qdelete subclient -c client1 -a Q_ORACLE -i instance1 -s subclient1
Deleted subclient successfully.
You can take multiple copies of the data or log backups using RMAN command line. During restores, even if one of the copies is missing or corrupted, the restore operation will automatically failover to the other copy and restore the data.
| 1. | To utilize the PARALLELISM option, you need to set the initial parameter in pfile or spfile. | Example: BACKUP_TAPE_IO_SLAVES=TRUE |
| 2. | Configure device type. | Example: RMAN> CONFIGURE DEVICE TYPE DISK PARALLELISM 2 BACKUP TYPE TO BACKUPSET; |
| 3. | Specify two copies of data. | Example: RMAN> CONFIGURE DATAFILE BACKUP COPIES FOR DEVICE TYPE 'SBT_TAPE' TO 2; |
| 4. | Specify two copies of log backups. | Example: RMAN> CONFIGURE ARCHIVELOG BACKUP COPIES FOR DEVICE TYPE 'SBT_TAPE' TO 2; |
| 5. | Add the environmental variables for the client and instance on which the iDataAgent is installed. | Example: allocate channel ch1 type 'sbt_tape' PARMS="<software_install_path>/Base/libobk.so, ENV=(CvClientName=<client_name>, CvInstanceName=<instance_name>)" |
| 6. | Once you set the parameters, restart the Oracle database and perform backup operations from the CommCell Console. | Example: To restart the database,
|
There are several configurable properties available for your agent that can be modified from the agent, instance, or subclient level as per need.
It is recommended that that you do not modify the properties of a subclient when a job is in progress for that specific subclient. If a job is in progress, either wait for the job to complete or kill the job from the Job Controller.
The following table describes the properties that can configured from the agent, instance, and subclient levels.
| Option | Description | Related Topics |
| Change Storage Policies |
You can modify the
storage policies in any of the following situations:
You can change the storage policies from the subclient level.
|
Refer to Storage Policies. |
| Rename a Subclient |
You can rename a subclient:
|
|
| Rename an Instance |
You can rename a subclient.
|
|
| Data Transfer Options |
You can efficiently configure the available resources for transferring data secured
by data protection operations from the subclient level. This includes the following:
You can configure the data transfer options.
|
Refer to Data Compression and Network Bandwidth Throttling. |
| View Data Paths |
You can view the data paths associated with the primary
storage policy copy of the selected storage policy or incremental storage
policy. You can also modify the data paths including their priority from
the subclient level.
|
|
| Configure a Subclient for Pre/Post Processing of Data Protection |
You can add, modify or view Pre/Post processes for the
subclient. These are batch files or shell scripts that you can run before
or after certain job phases.
|
Refer to Pre/Post Processes. |
| Configure Activity Control |
You can enable backup and restore operations from the agent and subclient level.
However, you can enable restore operations only from the agent level.
|
Refer to Activity Control. |
| Configure User Security |
You can configure user security from the agent or subclient
level.
You can perform the following functions:
|
Refer to User Administration and Security. |
| Enable/Disable Data Encryption |
You can enable data encryption from the suclient level.Encryption must be enabled at the client level prior to configuring any
instances residing on that client.
|
Refer to Data Encryption. |
| Enable/Disable Encryption for Third-party Command Line Operations |
You can enable data encryption for the command line operations from
instance properties:
|
|
| View Software Version and Installed Updates |
The Version tab, at the Agent level displays the
software version of
the component.
|
|
| CommCell Configuration Report |
The CommCell Configuration Report provides the properties of the
CommServe, MediaAgents, clients, agents, SRM agents, subclients, and
storage policies within the CommCell based on the selected filter
criteria.
|
Refer to CommCell Configuration. |
The following sections describe the steps involved in deleting an agent, instance, or subclient.
|
When you delete an instance or backupset, the associated data is logically deleted and you can no longer access the corresponding data from CommCell Console for recovery purposes. Refer to the troubleshooting article on Recovering Data Associated with Deleted Clients and Storage Policies for information on how to recover data if you accidentally delete an entity. |
You need to uninstall or DeConfigure the agent software from the client computer before deleting from CommCell Browser. After you delete the client software, you can either leave the corresponding data intact for appropriate action or you can remove the data immediately. If you choose to remove the data immediately, you must delete the agent from the CommCell Browser. If you delete the agent, all of the agent's data is irretrievably lost.
This operation will permanently delete the data backed up from this level and it cannot be restored.
Consider the following before deleting an instance:
Consider the following before deleting a subclient:
Click No to cancel the deletion and retain the subclient, or click Yes to continue the deletion.