Advanced Configuration - SQL Server iDataAgent

Table of Contents

Understanding the CommCell Console

Creating User-Defined Subclients

For Databases

For Files and Filegroups

Managing Instances

Manually Discovering New Instances

Enable / Disable Automatic Discovery

Setting the Discovery Frequency

Enabling/Disabling Automatic Database Discovery

Manually Discovering Databases

Automatically Discovering Databases in Offline States

For All Clients

For Individual Clients

Excluding Databases from Backups

Managing Databases Deleted from SQL Server

In the Default Subclient

In User-Defined and Default Subclients

Specifying Databases for OnDemand Backup

Selecting Backup types for On Demand Backups and Executing the Backups

Specifying File and Filegroups for OnDemand Backup

Setting Up Backup Conversion Rules

For Default and Database Subclients

For File/Filegroup Subclients

Enhancing Performance During Backups

Configuring the Number of Log Backups to Run Before a Full Backup

Configuring Log Backups to Run Without Full Backups

Performing Backups using VSS

Configuring Data Streams

Configuring User Accounts for Backups

At the CommCell Level

At the Client Computer Group Level

At the Agent Level

At the Instance Level

Modifying an Agent, Instance, or Subclient

Deleting an Agent, Instance, or Subclient

Deleting an Agent

Deleting an Instance

Deleting a Subclient

Command Line Operations

Log on to the CommServe

Configure Instances

Configure Subclients

Perform Command Line Operations from Microsoft SQL Management Studio

Understanding the CommCell Console

The Microsoft SQL Server iDataAgent uses the following logical entities to manage backup and restore operations from the CommCell Console.

Agent

Facilitates SQL instance discovery.

Instance

Defines the SQL Server instance to be backed up.
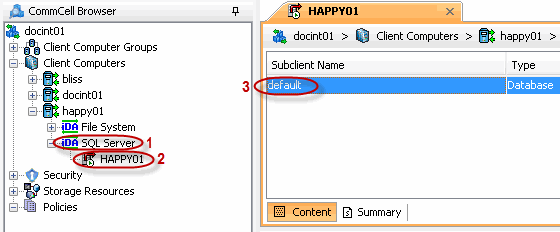
Subclient

Defines the SQL databases to be backed up.


Creating User-Defined Subclients

By default, all databases within each SQL Server instance are automatically assigned to the default subclient. This subclient backs up the entire instance.

If you want to divide your backups into smaller groups, you can do so by creating user-defined subclients as described in the following sections.

for Databases

If you want to back up groups of specific databases, you can do so by creating a user-defined subclient containing any number of databases that exist within the instance. This is useful if you want to back up a subset of databases at certain times or with a particular frequency.

  When you create a user-defined subclient, the contents of the user-defined subclient will be excluded from the Default Subclient.
  1. From the CommCell Browser, navigate to Client Computers | <Client> | SQL Server | <Instance>.
  2. Right-click the Instance, point to New Subclient, and then click Database.
  3. In the Subclient Name box, type a name.
  4. Click the Storage Device tab.
  5. From the Data Storage Policy sub-tab, click a storage policy name from the Storage Policy list.
  6. From the Log Storage Policy sub-tab, click a storage policy name from the Storage Policy list.
  7. Click the Content tab and then click Configure.
  8. Click Discover.
  9. From the Subclient Name list in the Database Configuration window, select the name of this subclient for each database you want to include.
  10. Click OK to save the content.
  11. Click OK.

for Files and FileGroups

In many cases, large databases may contain portions of data that require more frequent backups than others. For example, tables consisting of records entered on a daily basis may require nightly backups, whereas tables consisting of records entered on a quarterly basis may require only monthly backups. You can group such elements together by creating a user-defined subclient for files or filegroups.

  1. From the CommCell Browser, navigate to Client Computers | <Client> | SQL Server | <Instance>.
  2. Right-click the Instance, point to New Subclient, and then click Files and Filegroups.
  3. In the Subclient Name box, type a name.
  4. Click the Storage Device tab.
  5. From the Data Storage Policy sub-tab, click a storage policy name in the Storage Policy list.
  6. From the Log Storage Policy sub-tab, click a storage policy name in the Storage Policy list.
  7. Click the Content tab and then click Configure.
  8. From the File/FileGroup Configuration window, select the database containing the files or filegroups you want to back up from the Database list.
  9. Click Discover.
  10. Expand the nodes in the Name list.
  11. In the Subclient Name list, select the name of this subclient for each file or filegroup you want to include.
  12. Click OK to save the content.
  13. Click OK.
  It is recommended that filegroups be configured rather than individual files. Filegroups require less overall maintenance and reduce the need to manually add or remove individual files to the subclient.

Managing Instances

Manually Discovering New Instances

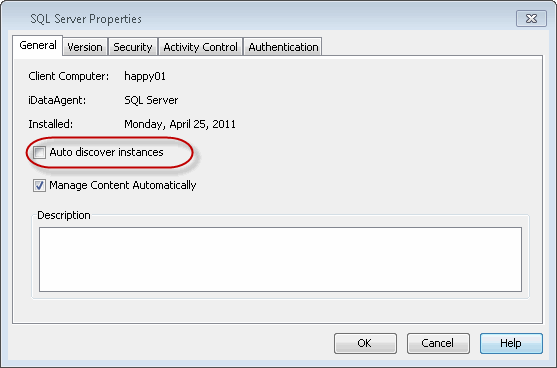
By default, new instances added to the SQL Server are automatically discovered if the option to do so was enabled during the SQL Server iDataAgent installation. If this option was not enabled during installation, you can discover new instances at any time as follows:

  1. Ensure you have a user account with sufficient privileges to create a new instance. Refer to the Configuring User Accounts for Backups section on this page for information on required account privileges.
  2. From the CommCell Browser, navigate to Client Computers | <Client> | SQL Server.
  3. Right-click SQL Server and click New SQL Server.
  4. In the Server Name list, select the name of the SQL Server instance you want to assign to this instance.
  5. In the Server Type area, check the Override higher levels settings check box.
  6. Click OK.

Enable / Disable Automatic Discovery

If you enable automatic discovery new SQL Server instances will be discovered as follows:

This capability ensures all instances are accounted for on a daily basis for backups.

If you want to enable or disable automatic instance discovery, you can do so as follows:

  1. From the CommCell Browser, navigate to Client Computers | <Client> | SQL Server.
  2. Right-click SQL Server and click Properties.
  3. Check or clear the Auto discover instances check box.
  4. Click OK.

Setting the Discovery Frequency

If you want instances to be automatically discovered on a more or less frequent basis, you can do so as follows:

  1. From the CommCell Browser, navigate to Client Computers.
  2. Right-click the <Client> and then click Properties.
  3. Click the Registry Key Settings tab.
  4. Click Add.
  5. In the Name field, type nAutoDiscoverSQLInstanceTimeout.
  6. In the Location list, select CVD from the dropdown list.
  7. In the Type list, select REG_DWORD.
  8. In the Value field, type the number of minutes to discover instances.

    For example, to discover instances every two hours, type 120.

  9. Click OK.

Enabling/Disabling Automatic Database Discovery

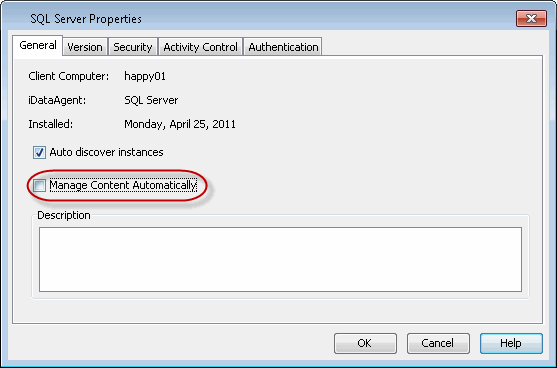
By default, new databases created on the SQL Server are automatically discovered and assigned to the default subclient. You can disable this functionality as follows:

  1. From the CommCell Browser, navigate to Client Computers | <Client> | SQL Server | <Instance>.
  2. Right-click the default subclient and click Properties.
  3. Enable or clear the Disable Automatic Discovery check box.
  4. Click OK.

Manually Discovering Databases

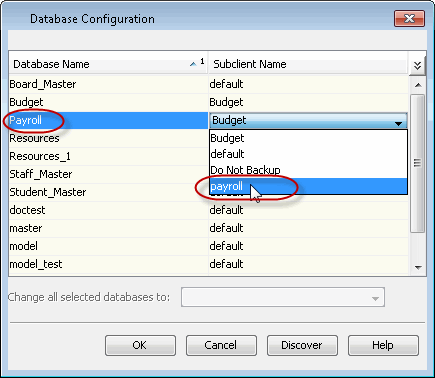
If automatic discovery of databases is disabled, you can manually add databases to a subclient as follows:

  1. From the CommCell Browser, navigate to Client Computers | <Client> | SQL Server | <Instance>.
  2. Right-click the default subclient and click Properties.
  3. Click the Content tab.
  4. Click Configure.
  5. Click Discover.
  6. In the Subclient Name list, select the subclient to which the database you want to add should be assigned.
  7. Click OK to save your settings.
  8. Click OK.

Automatically Discovering Databases in Offline States

By default, offline databases in the following states are not automatically discovered:

You can configure automatic discovery of offline databases for one or all clients as described below.

For All Clients

  1. Log on to the CommServe computer.
  2. From the command prompt, navigate to <software_installation_path>\base.
  3. Run the following command:

    qoperation execscript -sn SetKeyIntoGlobalParamTbl.sql -si DatabaseStateString -si y -si <database_state>

    where <database_state> is the database state(s) to be discovered.

    If entering more than one state, separate each with a semicolon.

Example:

qoperation execscript -sn SetKeyIntoGlobalParamTbl.sql -si DatabaseStateString -si y -si suspect;shutdown;standby

In this example, databases in the suspect, shutdown, and standby states will be automatically discovered.

For Individual Clients

  Configuring this option will override the configuration at the CommServe level described in the For All Clients section above.
  1. From the CommCell Browser, navigate to Client Computers.
  2. Right-click the <Client> and then click Properties.
  3. Click the Registry Key Settings tab.
  4. Click Add.
  5. In the Name field, type sDiscoverDatabaseStates.
  6. In the Location list, type MSSQLAgent.
  7. In the Type list, select REG_MULTI_SZ.
  8. In the Value field, type the databases state or states that will be discovered. If entering more than one state, separate each with a semicolon.

    For example, to discover databases in the Suspect, Shutdown, and Standby states, enter the following:

    suspect;shutdown;standby

  9. Click OK.

Excluding Databases from Backups

In some cases, it may be necessary to exclude certain databases from backups for a period of time. For example, you may have configured an entire SQL Server to back up using a particular schedule, but do not require all databases to be backed up according to that schedule. You can exclude databases from backups by following the steps below.

  1. From the CommCell Browser, navigate to Client Computers | <Client> | SQL Server | <Instance>.
  2. Right-click the database subclient and click Properties.
  3. Click the Content tab.
  4. Click Configure.
  5. Click Discover.
  6. In the Subclient Name list, select the subclient to which the database you want to add should be assigned.
  7. Click OK to save your settings.
  8. Click OK.

Managing Databases Deleted from SQL Server

Databases that are deleted from the SQL Server are handled differently during backups depending on how the database was discovered and the type of subclient the database was originally assigned to.

Specifically:

The following sections provide information on managing databases that have been deleted from the SQL Server.

in the Default Subclient

Automatically Discovered Databases

By default, when automatically discovered databases are deleted from the SQL Server, they are removed from the default subclient content during the subsequent backup.

In some cases, it may be desirable to manage all databases deleted from the SQL Server manually. For example, if a database is accidentally deleted from the SQL Server, it may not be desirable for it to be removed from the subclient during the next backup, especially if the next backup may occur while attempting to bring the deleted database back. Follow the steps below to manage deleted databases manually for the default subclient:

  1. From the CommCell Browser, navigate to Client Computers | <Client> | SQL Server.
  2. Right-click SQL Server and click Properties.
  3. Clear the Manage Content Automatically check box.
  4. Click OK.

Manually Discovered Databases

Databases that have been manually added to the default subclient are not automatically removed from the subclient if deleted from the SQL Server. To ensure that the subsequent backup jobs complete without any errors, deleted databases from the server should be removed from the subclient.

  1. From the CommCell Browser, navigate to Client Computers | <Client> | SQL Server | <Instance>.
  2. Right-click the default subclient and click Properties.
  3. Click the Content tab.
  4. Select the database you want to delete from the Database List.
  5. Click Delete.
  6. Click OK.
  To automatically delete the databases from the subclient, set registry key nIgnoreNonExistentDB to 1.

In User-Defined and Default Subclients

By default, databases are not automatically removed from subclients when deleted from the SQL Server. If a database is deleted from the SQL Server, the next backup performed on its associated subclient will not complete successfully.

You can also configure the subclient to automatically remove such databases as follows:

  1. From the CommCell Browser, navigate to Client Computers.
  2. Right-click the <Client>, and then click Properties.
  3. Click the Registry Key Settings tab.
  4. Click Add.
  5. In the Name field, type nIgnoreNonExistentDB.
      A global parameter IgnoreNonExistentDB can be used to configure all  SQL clients. You can use the Command Line Interface to do so, see qcommand execscript for details.
  6. In the Location list, type MSSQLAGENT from the dropdown box.
  7. In the Type list, select REG_DWORD.
  8. In the Value field, type 1.
  9. Click OK.

Specifying Databases for OnDemand Backup

OnDemand backup allows content to be specified as an external input at the time of initiating a data protection operation. Whereas traditional backups operations are performed on subclients, which have fixed content configured prior to performing the operation. On Demand backup allows you the flexibility of specifying content each time you perform a backup operation.

Use the following procedure to configure and perform OnDemand backup for Database subclients:

  1. Download the CreateOnDemandDBSub.xml file and save it on the computer from where the command will be executed.
  2. Execute the following command from the <Software_Installation_Directory>/Base folder after substituting the parameter values.

    qoperation execute –af CreateOnDemandDBSub.xml –clientName client1 –instanceName client1\instance1 –subclientName subclient1 -dataBackupStoragePolicy/storagePolicyName SPdata -logBackupStoragePolicy/storagePolicyName SPlog

    where

    clientName = client1,

    instanceName = client1\instance1,

    subclientName = subclient1,

    dataStoragePolicy = SPData,

    logStoragePolicy = SPLog.

  3. Create a database list file (as a text file) for the databases you plan to backup. This database list file must be located on the Client computer, for which subclient needs to be created.
      You may specify any databases to be backed up using the Database File List. There must be one entry per line in the file.
  4. Download the backup_template.xml file and save it on the computer from where the command will be executed.
  5. Execute the following command from the <Software_Installation_Directory>/Base folder after substituting the parameter values.

    qoperation execute -af c:\backup_template.xml -clientName client1 -instanceName client1\instance1 -subclientName subclient1 –ondemandinputfile c:\DatabaseFile.txt –backupLevel FULL

Selecting Backup types for On Demand Backups and Executing the Backups

You can modify the argument file (xml file) to perform different types of backups such as Full, Transaction Log and Differential backups, you can do so as follows:

  1. The xml file will have the backup type parameter available, for example the Full backup parameter of the xml file (SQLbackup.bat):

    <backupLevel>FULL</backupLevel>

    can be changed to

    <backupLevel>INCREMENTAL<backupLevel>

    for Transaction Log backup

    or to

    <backupLevel>DIFFERENTIAL<backupLevel>

    for Differential backup.

  2. Execute the batch file using the following query in SQL Server Management Studio:

    exec master..xp_cmdshell 'C:\SQLbackup.bat'

Specifying File and Filegroups for OnDemand Backup

OnDemand backup allows content to be specified as an external input at the time of initiating a data protection operation. Whereas traditional backups operations are performed on subclients, which have fixed content configured prior to performing the operation. On Demand backup allows you the flexibility of specifying content each time you perform a backup operation.

Use the following procedure to configure and perform OnDemand backup for File and Filegroup Subclients:

  1. Download the CreateOnDemandFFGSub.xml file and save it on the computer from where the command will be executed.
  2. Execute the following command from the <Software_Installation_Directory>/Base folder after substituting the parameter values.

    qoperation execute –af CreateOnDemandFFGSub.xml –clientName client1 –instanceName client1\instance1 –subclientName subclient1 -dataBackupStoragePolicy/storagePolicyName SPdata -logBackupStoragePolicy/storagePolicyName SPlog

    where

    clientName = client1,

    instanceName = client1\instance1,

    subclientName = subclient1,

    dataStoragePolicy = SPData,

    logStoragePolicy = SPLog.

  3. Create a file and file group list file (as a text file) for the files you plan to backup in the following format. Also ensure that the list file must be located on the Client computer, for which subclient needs to be created.

    DatabaseName<\tab>FileGroupName<\tab>LogicalFileName

      You may specify any files belonging to the same database only. There must be one entry per line in the file.
  4. Download the backup_template.xml file and save it on the computer from where the command will be executed.
  5. Execute the following command from the <Software_Installation_Directory>/Base folder after substituting the parameter values.

    qoperation execute -af c:\backup_template.xml -clientName client1 -instanceName client1\instance1 -subclientName subclient1 –ondemandinputfile c:\FileList.txt –backupLevel FULL

Setting Up Backup Conversion Rules

Backup conversion rules provide the facility to convert certain types of backups to another backup type under specific circumstances. This functionality helps ensure all SQL data is protected regardless of circumstances that may cause a failure.

for Default and Database Subclients

By default, database backups are converted as depicted in the following table.

Backup Conversion Type Conditions for Conversion Benefit of Conversion
Log Backup to Differential Backup The database recovery model is set to Simple. Because the Simple recovery model does not support log backups, converting to a differential backup ensures both logs and data are properly backed up. This, in turn, provides the facility to restore the logs.
Differential Backup to Full Backup A full backups was performed using other software. For first-time users, starting with a full backup provides complete protection as a baseline for future backups.
All Backups to Full Backups
  • You are running your first backup using this software.
  • Database creation time is newer than the last backup performed using this software.
  • The last restore performed was a Point-in-Time or Transaction Mark restore.
  • Any system database (i.e., master, model, msdb) was restored after the last backup.
Converting to full backups in these scenarios ensure you have complete protection of the latest state of each database. In the case of system databases, a full backup will ensure the restored database is backed up at the most recent point-in-time.

If you want to disable this functionality, you can do so using the steps below.

  Keep in mind that disabling this option for one scenario disables the option for all scenarios listed above. As such, it is recommended this option remain enabled to ensure no data is unintentionally left out of a backup.
  1. From the CommCell Browser, navigate to Client Computers | <Client> | SQL Server | <Instance>.
  2. Right-click the default subclient and click Properties.
  3. Click the Backup Rules tab.
  4. Disable the Convert check box.
  5. Click OK.

Conversion Options for Log Backups

By default, log backups performed outside of the system (for example, using SQL Enterprise Manager) are automatically converted to full backups. This provides a baseline for future backups.

If necessary, you can preserve the log backups performed by previous software packages as follows:

  1. From the CommCell Browser, navigate to Client Computers | <Client> | SQL Server | <Instance>.
  2. Right-click the default subclient and click Properties.
  3. Click the Backup Rules tab.
  4. Enable the Convert check box.
  5. Select the Do Not Convert Log Backups to Full if a Log Backup Was Performed Using Other Software option.
  6. Click the SQL Settings tab.
  7. Select the Disable Log Consistency Check check box.
  8. Click OK.

Disabling Conversion of Transaction LOg BAckups to Differential

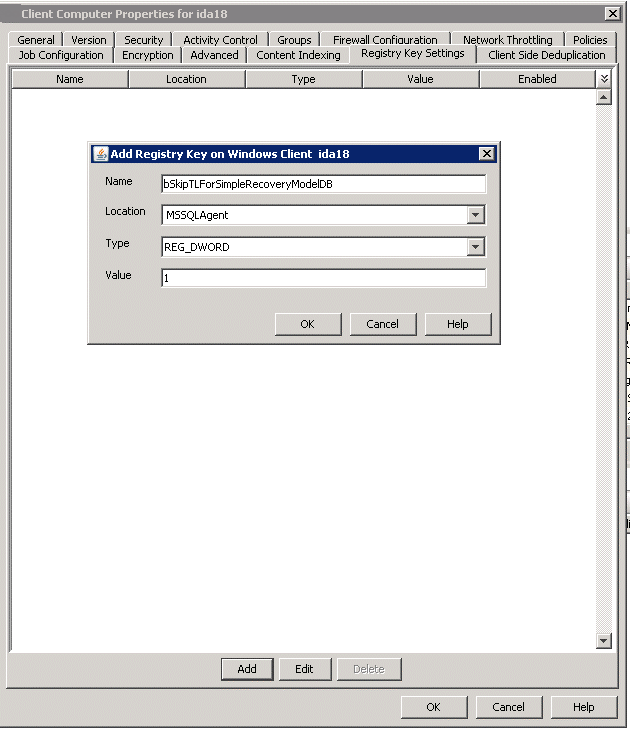
If the Convert checkbox is selected, all backups convert as specified in the rules of the dialog box. However, if you want to skip the conversion of Transaction Log Backups to differential backups for subclients with databases set to simple recovery model, you can do so by configuring additional settings to set bSkipTLForSimpleRecoveryModelDB.

  1. From the CommCell Browser, navigate to Client Computers.
  2. Right-click the <Client> in which you want to add the registry key, and then click Properties.
  3. Click the Registry Key Settings tab.
  4. Click Add.
  1. Enter bSkipTLForSimpleRecoveryModelDB in the Name field.
      A global parameter SkipTLForSimpleRecoveryModelDB can be used to configure all  SQL clients. You can use the Command Line Interface to do so, see qcommand execscript for details.
  2. Enter MSSQLAgent in the Location field.
  3. From the Type list, select REG_DWORD.
  4. In the Value field type 1.
  5. Click OK.


Conversion Options for Files and FileGroups in a Database

By default, if files or filegroups have been added to a database since the previous backup, the next backup will automatically be converted to a full backup. This ensures the new files or filegroups are given proper protection as quickly as possible, regardless of the type of backup originally intended.

If you do not require this functionality, you can disable it as follows:

  1. From the CommCell Browser, navigate to Client Computers | <Client> | SQL Server | <Instance>.
  2. Right-click the default subclient and click Properties.
  3. Click the Backup Rules tab.
  4. Enable the Convert check box.
  5. Clear the File or Filegroups are added check box.
  6. Click OK.

for File/FileGroup Subclients

By default, all backups performed on File/Filegroup subclients are automatically converted to full backups as depicted in the following table:

Backup Conversion Type Conditions for Conversion Benefit of Conversion
All Backups to Full Backups
  • First backup using this software.
  • Database creation time is newer than the last backup performed using this software.
  • Subclient content is modified.
Converting to full backups in these scenarios ensure you have complete protection of the latest state of each file/filegroup.

If you do not want backups to convert to full backups under these circumstances, you can disable this option by following the steps below.

  Keep in mind that disabling this option for one scenario disables the option for all scenarios listed above. As such, it is recommended this option remain enabled to ensure no data is unintentionally left out of a backup.
  1. From the CommCell Browser, navigate to Client Computers | <Client> | SQL Server | <Instance>.
  2. Right-click the file or filegroup subclient and click Properties.
  3. Click the Backup Rules tab.
  4. Clear the Convert check box.
  5. Click OK.

Enhancing Performance During Backups

Several options are available for enhancing backup performance reducing network bandwidth overhead. These options include:

You can configure these options as follows:

  1. From the CommCell Browser, navigate to Client Computers | <Client> | SQL Server | <Instance>.
  2. Right-click the default subclient and click Properties.
  3. Click the SQL Settings tab.
  4. Enter the desired number of data blocks to use during backups in the Block Size box.
      All data transfers are in integral multiples of this value. The default value being 65,536 bytes (i.e., 64KB) or any value between 512 bytes and 65,536 bytes (inclusive) may be entered.
  5. Enter the desired number of buffers to use during data transfer in the Buffer Count box.

    The default value is 20.

  6. Enter the maximum number of bytes to transfer at a time in the Maximum Transfer Size box.

    The default value (in bytes) is 2097152.
     
    • Make sure the Application Read Size value on the Data Transfer Option tab has the same or greater value as the Maximum Transfer Size; otherwise, backups may fail.
    • The default value being 2,097,152 bytes (i.e., 2,048KB) or enter a value in multiples of 64 KB ranging between 65,536 bytes and 4,294,967,296 bytes (i.e., 4 MB)

  7. Click OK.

Configuring the Number of Log Backups to Run Before a Full Backup

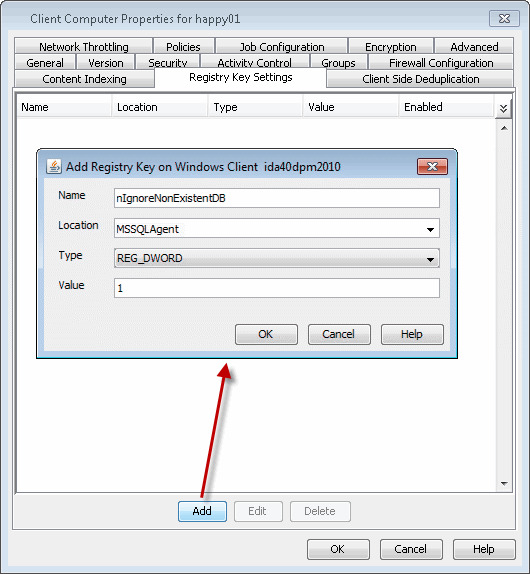
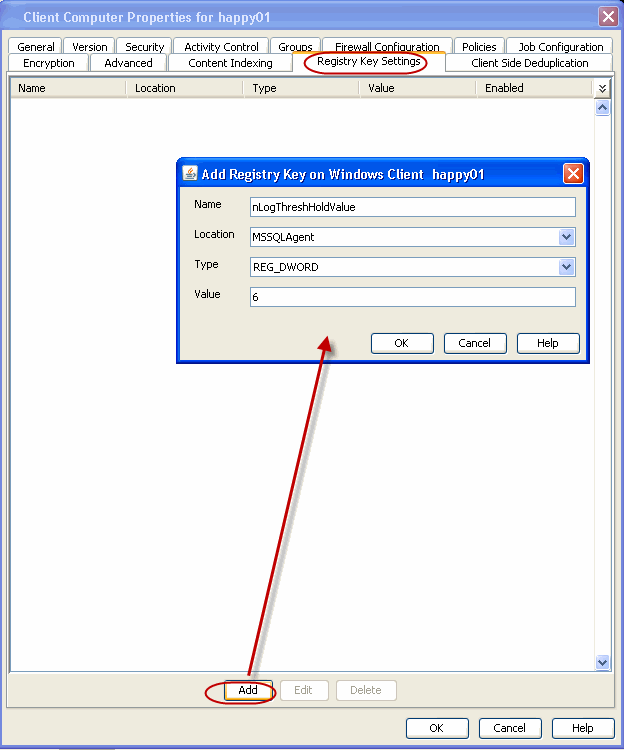
Full backups are necessary at regular intervals as it reduces the chance of data loss if one of log backup becomes corrupted as it will invalidate (not restorable) all other log backups performed after that. This key is used for the purpose of re-enforcing the need of a full backup after certain number of transaction log backups have run.

When this registry key is configured, a minor event will be generated in the Event Viewer to remind users to run a full backup after the configured number of transaction log backups have run.

Use the following steps to configure the number of log backups:

  1. From the CommCell Browser, navigate to Client Computers.
  2. Right-click the <Client> in which you want to add the registry key, and then click Properties.
  3. Click the Registry Key Settings tab.
  4. Click Add.
  1. Enter nLogThreshHoldValue in the Name field.
  2. Enter MSSQLAgent in the Location field.
  3. From the Type list, select REG_DWORD.
  4. Enter a number in the Value field. Range is [1 - <max_integer>].
      This value specifies the number of transaction log backups that will be taken before a minor event is issued to remind users to run a full backup.
  5. Click OK.

Configuring Log Backups To Run Without Full Backups

By default, a full backup is required after performing a log backup. If you do not require a full backup at the time you want to back up the logs (for example, a full backup was performed outside of the system), you can do so as follows:

  1. From the CommCell Browser, navigate to Client Computers | <Client> | SQL Server | <Instance>.
  2. Right-click the subclient and click Properties.
  3. Click the SQL Settings tab.
  4. Enable the Disable Log Consistency Check check box.
  5. Click OK.

Performing Backups using VSS

In some cases, it may be desirable to allow write operations on SQL databases being backed up to continue while the backup runs. This is especially critical in environments where data entry to a SQL database is constant (such as databases being used daily in different parts of the world). Enabling VSS for backups provides this capability.

VSS can be enabled for backups of local volumes in both clustered and non-clustered environments. If the operating system fails to create a shadow copy of the data a traditional backup of the data will be performed, and a corresponding message will appear in the Event Viewer.

When VSS backups are performed, the following will automatically occur:

  During a VSS backup, the total amount of free space depends on the size of the backup data. As such, make sure to have sufficient disk space when you perform VSS backups.
  1. Navigate to Client Computers | <Client> | SQL Server | <Instance>.
  2. Right-click the instance and click Properties.
  3. Enable the Use VSS check box.
  4. Click OK.

Configuring Data Streams

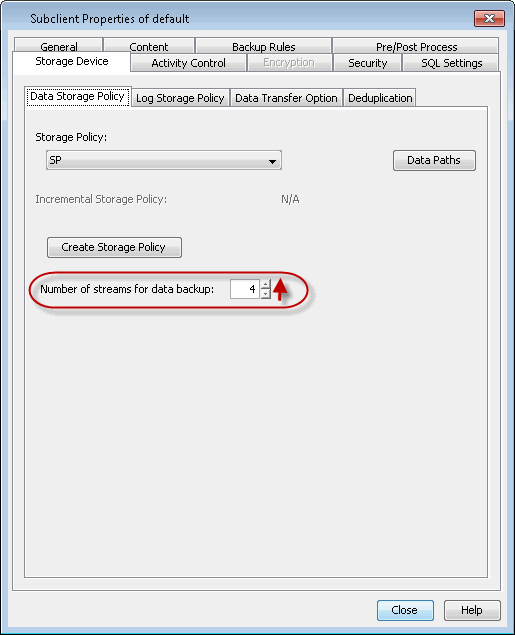
By default, backup data is sent to media in two streams. This means that a database, or a portion thereof, is sent to media during a backup in two parallel waves. This results in the backup taking about half the time to complete as it otherwise would if only one stream is used.

You can increase the number of streams used for backups for a particular subclient provided the number of streams does not exceed the maximum number configured in the subclient's storage policy. Increasing the number of streams for a subclient further reduces the amount of time a backup takes to complete. For example, increasing the number of streams from 2 to 3 enhances backup time from one-half that of a single stream to one-third.

  Keep in mind that the number of streams configured for backups must also be used when restoring data. For example, if you configure a subclient to use 4 streams, you must also use 4 streams to restore the data.
  1. From the CommCell Browser, navigate to Policies | Storage Policies.
  2. Right-click the storage policy associated with the subclient you want to increase the streams for and click Properties.
  3. Ensure the number in the Device Streams box is greater than the number of streams you want to configure for the subclient.

  1. Navigate to Client Computers | <Client> | SQL Server | <Instance>.
  2. Right-click the subclient and click Properties.
  3. Click the Storage Device Tab tab.
  4. Increase (or decrease) the number of streams in the Number of Streams for data backup box.
  5. Click the Log Storage Policy tab.
  6. Increase (or decrease) the number of streams in the Number of Streams for transaction log box.
  7. Click OK.

Configuring User Accounts for Backups

The SQL Server iDataAgent requires a Windows user account that has sufficient privileges for the software to:

The following table illustrates the requirements for the user account you will need to provide:

If the SQL Server Is: The user account Should Be:
On a non-Domain Controller
  • Local Administrator of the computer on which the SQL Server resides.
  • Member of the SQL sysadmin fixed server role.
  • User account from which SQL Server services are running. If this account differs from the Local Administrator account, you must provide the credentials of the account used by the SQL Server services.
On a Domain Controller An account other than the Domain Administrator account that has Administrator and SQL sa privileges.

By default, the local system administrator account is used for all components. You can change the user account to be used for backups at the CommCell, Client Computer Group, Agent, and Instance levels. Accounts configured at each level will be used for all entities within that level as described in the following sections.

In order to access the SQL Server databases to perform data protection and recovery operations, the SQL sysadmin rights are required.

At the CommCell Level

This user account will be used for all SQL Server iDataAgents in your CommCell. Configure the user account at this level if one person will be conducting all backup and restore operations in your organization.

  1. Navigate to Control Panel.
  2. Double-click the SQL iDataAgent Configuration icon.
  3. Select the following:

    Use Local System Account if the computer's Administrator account contains the required privileges.

    Impersonate User if you want to use a different account that contains the required privileges. Enter the User Name and Password for this account in the space provided.

  4. Click OK.

At the Client Computer Group Level

This user account will be used for all computers within a Client Computer Group. Configure the user account at this level if different people will be conducting backup and restore operations for each Client Computer Group in your organization. This user account will override the user account configured at the CommCell level.

  1. Navigate to Client Computer Groups.
  2. Verify that all the SQL Server clients for which you wish to configure the user account is included in the Client Computer Groups.
  3. Right-click the Client Computer Group and click Properties.
  4. Enable the Override higher levels settings check box.
  5. Select the following:

    Use Local System Account if the computer's Administrator account contains the required privileges.

    Impersonate User if you want to use a different account that contains the required privileges. Enter the User Name and Password for this account in the space provided.

  6. Click OK.

At the Agent Level

This user account will be used for all instances and associated subclients. Configure the user account at this level if one person will be conducting all backup and restore operations on the client on which the SQL Server iDataAgent is installed. This user account will override the user account configured at the CommCell and Client Computer Group levels.

  1. Navigate to Client Computers | <Client>.
  2. Right-click SQL Server and click Properties.
  3. Click the Authentication tab.
  4. Enable the Override higher levels settings check box.
  5. Select the following:

    Use Local System Account if the computer's Administrator account contains the required privileges.

    Impersonate User if you want to use a different account that contains the required privileges. Enter the User Name and Password for this account in the space provided.

  6. Click OK.

At the Instance Level

This user account will be used for all subclients within the instance. Configure the user account at this level if backup and restore operations will be conducted by a different person for each instance. This user account will override the user account configured at the CommCell, Client Computer Group, and Agent levels.

  1. Navigate to Client Computers | <Client> | SQL Server | <Instance>.
  2. Right-click the instance and click Properties.
  3. Click the Accounts tab.
  4. Enable the Override higher levels settings check box.
  5. Select the following:

    Use Local System Account if the computer's Administrator account contains the required privileges.

    Impersonate User if you want to use a different account that contains the required privileges. Enter the User Name and Password for this account in the space provided.

  6. Click OK.

Command Line Operations

You can add, modify or delete several configurable properties for SQL iDataAgent from command line.

Command line configuration enables you to:

The following sections describe the available command line configurations:

Log on to the Commserve

To run command line operations you must first login to the CommServe as follows:

Configure Instances

Create an Instance

  1. Download the CreateSQL_Instance_Template.xml file and save it on the computer from where the command will be executed.
  2. Execute the following command from the <Software_Installation_Directory>/Base folder after substituting the parameter values.

    qoperation execute -af CreateSQL_Instance_Template.xml -appName 'SQL Server' -clientName xxxxx -instanceName xxxxx

Modify an Instance

  1. Download the ModifySQL_Instance_Template.xml file and save it on the computer from where the command will be executed.
  2. Execute the following command from the <Software_Installation_Directory>/Base folder after substituting the parameter values.

    qoperation execute -af ModifySQL_Instance_Template.xml -appName 'SQL Server' -clientName xxxxx -instanceName xxxxx

Get Instance Properties

  1. Download the GetSQL_Instance_Properties_Template.xml  file and save it on the computer from where the command will be executed.
  2. Execute the following command from the <Software_Installation_Directory>/Base folder after substituting the parameter values.

    qoperation execute -af GetSQL_Instance_Properties_Template.xml -appName 'SQL Server' -clientName xxxxx -instanceName xxxxx

Delete an Instance

  1. Download the DeleteSQL_Instance_Template.xml file and save it on the computer from where the command will be executed.
  2. Execute the following command from the <Software_Installation_Directory>/Base folder after substituting the parameter values.

    qoperation execute -af DeleteSQL_Instance_Template.xml -appName 'SQL Server' -clientName xxxxx -instanceName xxxxx

Available Command Parameters for Instances

The following table displays all the parameters that you can use with the commands mentioned in the above sections. To add a parameter to your command, use the following syntax: (An example is provided at the end of the table.)

qoperation execute -af <template XML file> -<parameter name> <value>

Parameter Description of Parameter Values
description A general description of the instance if needed.
clientName Name of the client computer.
appName Name of the application. In this case it would be 'SQL Server'.
instanceName Name of the SQL instance. If you are specifying an instance other than the default instance, the name must be entered along with the client name, e.g. client1\instance1.
vDITimeOut The time the system must wait for the SQL server to become ready. Time value is in seconds.
useVss Option to enable/disable VSS.

Valid values are True/False.

overrideGlobalAuthentication Option to override Global Authentication.

Valid values are True/False.

useLocalSystemAccount Option to use Local Administrator account.

Valid values are 0/1.

userName Name of the database administrator who has permissions to perform jobs.
password Password for the database user
propertyLevel Properties to be retrieved for the instance.

Valid values are:

  • ListOnly - List the instance names
  • BasicProperties - Retrieves the basic properties, such as description, version, etc.,
  • ExtendedProperties - Retrieves all the properties for the instance.
  • AllProperties - Retrieves all the properties for the instance.

The following example shows how to add a parameter for a command:

Enable VSS To enable VSS for the instance, add the 'useVSS' parameter to the following command:

qoperation execute -af ModifySQL_Instance_Template.xml -appName 'SQL Server' -clientName client1 -instanceName client1\instance1 -useVSS true

For detailed information on the instance parameters see Instance Properties.

Configure Subclients

Create Subclient

  1. Download the CreateSQL_Subclient_Template.xml file and save it on the computer from where the command will be executed.
  2. Execute the following command from the <Software_Installation_Directory>/Base folder after substituting the parameter values.

    qoperation execute –af CreateSQL_Subclient_Template.xml -appName 'SQL Server' -clientName xxxxx -instanceName xxxxx –subclientName xxxxx -dataBackupStoragePolicy/storagePolicyName xxxxx -logBackupStoragePolicy/storagePolicyName xxxxx

Get Subclient Properties

  1. Download the GetSQL_Subclient_Properties_Template.xml file and save it on the computer from where the command will be executed.
  2. Execute the following command from the <Software_Installation_Directory>/Base folder after substituting the parameter values.

    qoperation execute –af GetSQL_Subclient_Properties_Template.xml -appName 'SQL Server' -clientName xxxxx -instanceName xxxxx –subclientName xxxxx

Modify Subclient

  1. Download the ModifySQL_Subclient_Template.xml file and save it on the computer from where the command will be executed.
  2. Execute the following command from the <Software_Installation_Directory>/Base folder after substituting the parameter values.

    qoperation execute –af  ModifySQL_Subclient_Template.xml -appName 'SQL Server' -clientName xxxxx -instanceName xxxxx –subclientName xxxxx

Delete Subclient

  1. Download the remove_subclient_template.xml file and save it on the computer from where the command will be executed.
  2. Execute the following command from the <Software_Installation_Directory>/Base folder after substituting the parameter values.

    qoperation execute –af remove_subclient_template.xml -appName 'SQL Server' -clientName xxxxx -instanceName xxxxx -subclientName xxxxx

Available Command Parameters for Subclients

The following table displays all the parameters you can use with the commands mentioned in the above sections. To add a parameter to your command, use the following syntax: (Some examples are provided at the end of the table.)

qoperation execute -af <template XML file> -<parameter name> <value>

Parameter Description of Parameter Values
appName Name of the application. In this case it would be 'SQL Server'.
backupsetName Name of the backupset. In this case, it would be 'defaultBackupSet'.
clientName Name of the client computer.
subclientName Name of the SQL subclient.
instanceName Name of the SQL instance. If you are specifying an instance other than the default instance, the name must be entered along with the client name, e.g. client1\instance1.
enableBackup Option to enable backup of Subclient.

Valid values are True/False.

encryptionFlag Option to set the encryption points during backups. Valid values are:
  • ENC_MEDIA_ONLY, to encrypt the backup data after transmission and prior to storage on the media.
  • ENC_NETWORK_AND_MEDIA, to encrypt the backup data before transmission. The data is stored encrypted on the media.
  • ENC_NETWORK_ONLY, to encrypt the backup data for transmission and then decrypt the data prior to storage on the media.
  • ENC_NONE, to disable data encryption.
readBuffersize This is used for tuning SQL Server performance.

Valid values are 64, 128, 256, 512, 1024, 2048 and 4096.

onDemandSubClient Use this option during creation of a subclient.

Valid values are True/False.

networkAgents Number of Network Agents.
softwareCompression Option to enable compression on the Client or MediaAgent computer. Valid values are:
  • ON_CLIENT, to enable software compression on the client.
  • ON_MEDIAAGENT, to enable software compression on the MediaAgent.
  • OFF, to disable software compression.
throttleNetworkBandwidth Enhancing backup performance by reducing network bandwidth overhead.

Valid values are 0/1.

storagePolicyName Name of Storage Policy to be associated for Backup.
enableDeduplication Option to enable deduplication on subclient.

Valid values are True/False.

generateSignature A component of deduplication performed on the client or MediaAgent computer. Valid values are:
  • ON_CLIENT, to enable signature generation on the client.
  • ON_MEDIA_AGENT, to enable signature generation on the MediaAgent.
  • OFF, to disable signature generation.
backupRules Option to set Backup conversion rules. Valid values are:
  • CONVERT_WITH_FILE_FILEGROUPS_NOT_ADDED, to convert log backups to full if a log backup was performed using other software with file or file group not added.
  • CONVERT_WITH_FILE_FILEGROUPS_ADDED, to convert log backups to full if a log backup was performed using other software with file or file group added.
  • DONOT_CONVERT_WITH_FILE_FILEGROUPS_NOT_ADDED, do not convert log backups to full if a log backup was performed using other software with file or file groups are not added.
  • DONOT_CONVERT_WITH_FILE_FILEGROUPS_ADDED, do not convert log backups to full if a log backup was performed using other software with file or file groups are added.
  • CONVERT_DISABLED, to disable backup conversion rules.
bufferCount Number of data blocks to use during backups to improve performance.
maxTransferSize Maximum number of bytes to transfer at a time to tune performance.

Valid values in bytes are 65536, 131072, 262144, 524288, 1048576, 2097152, and 4194304.

numberOfBackupStreams Number of Backup Streams.
numberOfTransactionLogStreams Number of Transaction Log Streams.
runPostBackup Option to run a process after backup completes.

Valid values are Yes/No.

postBackupCommand Path to the post process script that will be run after the backup.
preBackupCommand Path to the pre process script that will be run before the backup.
runAs Option to specify the user name who has permissions to run the pre/post process scripts. Valid values are:
  • USE_IMPERSONATION, to specify a user with enough privileges to run the scripts. When using this value, you also need to provide the user credentials:

    -prepostUserName/userName <user name> -prepostUserName/password <password>

  • USE_LOCAL_SYS_ADMIN, to use the administrator account to run the scripts.
sqlSubclientType Type of SQL subclient. Valid values are:
  • DATABASE, to back up groups of specific databases.
  • FILE_FILEGROUP, to back up portions of data from large databases.
contentOperationType Modification type. Valid values are
  • ADD, to add content to the subclient
  • OVERWRITE, to overwrite contents to the subclient.
  • DELETE, to delete the contents from the subclient.
disableLogConsistencyCheck Option to disable log consistency check.

Valid values are True/False.

The following examples show how to add an parameter for a command:

Enable Backup To enable backup for a subclient, add the 'enableBackup' parameter to the following command:

qoperation execute –af  ModifySQL_Subclient_Template.xml -appName 'SQL Server' -clientName client1 -instanceName client1\instance1 –subclientName subclient1 -enableBackup true

Setting a Storage Policy To assign a storage policy to a subclient, add the 'storagePolicyName' parameter to the following command:

qoperation execute –af modify_storage_policy.xml -appName 'SQL Server' -clientName client1 -instanceName client1\instance1 –subclientName subclient1 -dataBackupStoragePolicy/storagePolicyName SPdata -logBackupStoragePolicy/storagePolicyName SPlog

Creating an On Demand Database Subclient To create an on demand database subclient, add the 'onDemandSubClient' and 'sqlSubclientType' parameters to the following command:

qoperation execute –af CreateSQL_Subclient_Template.xml –appName ‘SQL Server’ –clientName client1 –instanceName client1\instance1 –subclientName subclient1 –onDemandSubClient true –sqlSubclientType DATABASE –dataBackupStoragePolicy/storagePolicyName SPData –logBackupStoragePolicy/storagePolicyName SPLog

Creating an On Demand File/FileGroup Subclient To create an on demand file/filegroup subclient, add the 'onDemandSubClient' and 'sqlSubclientType' parameters to the following command:

qoperation execute –af CreateSQL_Subclient_Template.xml –appName ‘SQL Server’ –clientName client1 –instanceName client1\instance1 –subclientName subclient1 –onDemandSubClient true –sqlSubclientType FILE_FILEGROUP –dataBackupStoragePolicy/storagePolicyName SPData –logBackupStoragePolicy/storagePolicyName SPLog

Adding Content to a Subclient To add content to a subclient, add the 'contentOperationType' parameter to the following command:

qoperation execute -af modify_subclient_content.xml -appName 'SQL Server' -clientName client1 -instanceName client1\instance1 -subclientName subclient1 -sqlSubclientType DATABASE -mssqlDbContent/databaseName DB1 -contentOperationType ADD

Overwriting Content to a Subclient To overwrite content to a subclient, add the 'contentOperationType' parameter to the following command:

qoperation execute -af modify_subclient_content.xml -appName 'SQL Server' -clientName client1 -instanceName client1\instance1 -subclientName subclient1 -sqlSubClientType DATABASE -mssqlDbContent/databaseName DB1 -contentOperationType OVERWRITE

For detailed information on the Subclient parameters see Subclient Properties.

Perform Command Line Operations from Microsoft SQL Management Studio

Besides using the operating system's command line interface, you can also perform the command line operations from MSSQL Management Studio interface by integrating the commands within the SQL scripts. Registration of stored procedure and execution of commands should be done from SQL Server version 2008 or higher.

Use the following steps to run command line operations from SQL Management Studio:

  1. Execute the query to register the stored procedure to a specific SQL database (eg., msdb) in MSSQL Management Studio.

    In order to do this, make sure the trustworthy database property for the SQL database is set to ON.

  2. Log in to the CommServe using the SQL scripts. For example,

    You can login to the CommServe using an encrypted or open password.

  3. Execute the command line operation using SQL scripts.

    Examples:

    Creating an Instance

    DECLARE @return_value int,

    @response nvarchar(max)

    EXEC @return_value = [dbo].[cv_cmdshell]

    @input = N'qlist instance -c client1 -a Q_MSSQL',

    @response = @response OUTPUT

    IF RTRIM(@response) LIKE N'client1\instance1%'

    Print 'Instance already exists'

    ELSE

    Print 'Creating instance client1\instance1'

    EXEC @return_value = [dbo].[cv_cmdshell]

    @input = N'qoperation execute -af e:\MyFolder\createSQL_Template.xml -instanceName client1\instance1 -clientName client1',

    @response = @response OUTPUT

    where, e:\MyFolder is the location where the template XML is saved.

    Performing a full backup

    DECLARE @return_value int,

    @response nvarchar(max)

    EXEC @return_value = [dbo].[cv_cmdshell]

    @input = N'qoperation execute -af e:\MyFolder\full.xml -subClientName subclient1 -clientName client1 -instanceName client1\instance1 -ondemandinputfile C:\MyTest\myDBsContent.txt',

    @response = @response OUTPUT

    where, myDBsContent.txt is the content file that list the databases to be backed up and

    e:\MyFolder is the location where the template XML is saved.

    Perform a restore

    DECLARE @return_value int,

    @response nvarchar(max)

    EXEC @return_value = [dbo].[cv_cmdshell]

    @input = N'qoperation execute -af e:\MyFolder\restore_template.xml -clientName client1 -instanceName client1\instance1 -toTimeValue 2011-11-28 15:40:00 -restoreSource DB1 -database DB1',

    @response = @response OUTPUT

    where

    e:\MyFolder is the location where the template XML is saved and the –toTimeValue is the backup finish date.

Un-registering the SQL Database

You can un-register the stored procedure from the SQL database by executing the below query:

Modifying an Agent, Instance, or Subclient

There are several configurable properties available for your agent that can be modified from the agent, instance, or subclient level as per need.

It is recommended that you do not modify the properties of a subclient when a job is in progress for that specific subclient. If a job is in progress, either wait for the job to complete or kill the job from the Job Controller.

The following table describes the properties that can configured from the agent, instance, and subclient levels.

Option Description Related topics
Change Storage Policies You can modify the storage policies in any of the following situations:
  • To include a different media for the backup operation.
  • To use a storage policy with a different retention criteria.

You can change the storage policies from the subclient level.

  1. From the CommCell Browser, right-click the subclient.
  2. Click Properties.
  3. Click Storage Device.
  4. Select the Storage policy from the drop-down menu.
  5. Click OK.
Refer to Storage Policies.
Rename a Subclient

You can rename a subclient:

  1. From the CommCell Browser, right-click the subclient.
  2. Click Properties.
  3. Type the new name in the  Subclient name field.
  4. Click OK.
 
Data Transfer Options You can efficiently configure the available resources for transferring data secured by data protection operations from the subclient level. This includes the following:
  • Enable or disable Data Compression either on the client or the MediaAgent.
  • Configure the transfer of data in the network using the options for Network Bandwidth Throttling and Network Agents.

You can configure the data transfer options.

  1. From the CommCell Browser,right-click the subclient.
  2. Click Properties.
  3. Click Storage Device.
  4. Click Data Transfer Option tab.
  5. Choose the appropriate software compression option for this subclient.
  6. Select Throttle Network Bandwidth and set the required bandwidth.
  7.  Click OK.
Refer to Data Compression and Network Bandwidth Throttling.
View Data Paths You can view the data paths associated with the primary storage policy copy of the selected storage policy or incremental storage policy. You can also modify the data paths including their priority from the subclient level.
  1. From the CommCell browser, right-click the subclient.
  2. Click Properties.
  3. Click Storage Device.
  4. Select Storage Policy from the drop-down menu.
  5. Click Data Paths.
 
Configure a Subclient for Pre/Post Processing of Data Protection You can add, modify or view Pre/Post processes for the subclient. These are batch files or shell scripts that you can run before or after certain job phases.
  1. From the CommCell browser, right-click the subclient.
  2. Click Properties.
  3. Click Pre/Post Process.
  4. Click one of the following phases and type the full path of the process that you want to execute during that phase. Alternatively, click Browse to locate the process (applicable only for paths that do not contain any spaces).
    • PreBackup Process
    • PostBackup Process
  5. Click OK.
  6. Select Run Post Backup Process for all attempts to run a post backup process for all attempts.
  7. For subclients on Windows platforms, Run As displays Not Selected.

    If you want to change the account that has permission to run these commands, click Change.

    1. In the User Account dialog box, select Use Local System Account, or select Impersonate User and enter the user name and password. Click OK.
    2. If you selected Local System Account, click OK to the message advising you that commands using this account have rights to access all data on the client computer.
Refer to Pre/Post Processes.
Configure Activity Control You can enable backup and restore operations from the agent and subclient level. However, you can enable restore operations only from the agent level.
  1. From the CommCell browser, right-click the subclient.
  2. Click Properties.
  3. Click Activity Control, select or clear option(s) as desired.
  4. Click OK.
Refer to Activity Control.
Configure User Security You can configure user security from the agent or subclient level.

You can perform the following functions:

  • Identify the user groups to which this CommCell object is associated.
  • Associate this object with a user group.
  • Disassociate this object from a user group.
  1. From the CommCell browser, right-click the subclient.
  2. Click Properties.
  3. Click Security.
  4. Select the appropriate user groups to which you want to associate to the CommCell object from the Available Groups pane, and then move the user group to the Associated Groups pane.
  5. Click OK.
Refer to User Administration and Security.
Enable/Disable Data Encryption You can enable data encryption from the suclient level.Encryption must be enabled at the client level prior to configuring any instances residing on that client.
  1. From the CommCell browser, right-click the subclient.
  2. Click Properties.
  3. Click Encryption.
  4. Select the desired encryption.
  5. Click OK.
Refer to Data Encryption.
View Software Version and Installed Updates The Version tab, at the Agent level displays the software version of the component.
  1. From the CommCell browser, right-click the agent.
  2. Click Properties.
  3. Click Version.
  4. Click OK.
 
CommCell Configuration Report The CommCell Configuration Report provides the properties of the CommServe, MediaAgents, clients, agents, SRM agents, subclients, and storage policies within the CommCell based on the selected filter criteria.
  1. From the CommCell browser, click Reports icon.
  2. Select CommCell Configuration.
  3. Click Run.
Refer to CommCell Configuration.

Deleting an Agent, Instance, or Subclient

The following sections describe the steps involved in deleting an agent, instance, or subclient.

When you delete an instance or backupset, the associated data is logically deleted and you can no longer access the corresponding data from CommCell Console for recovery purposes.

Refer to the troubleshooting article on Recovering Data Associated with Deleted Clients and Storage Policies for information on how to recover data if you accidentally delete an entity.

Deleting an Agent

You need to uninstall or DeConfigure the agent software from the client computer before deleting from CommCell Browser. After you delete the client software, you can either leave the corresponding data intact for appropriate action or you can remove the data immediately. If you choose to remove the data immediately, you must delete the agent from the CommCell Browser. If you delete the agent, all of the agent's data is irretrievably lost.

  1. From the CommCell Browser, navigate to Client Computers | <Client>.
  2. Right-click the <Agent>, and then click Delete.
  3. A confirmation message is displayed with the following message:

    This operation will permanently delete the data backed up from this level and it cannot be restored.

  4. Click OK to continue with the deletion operation., or click No to abort the deletion.

Deleting an Instance

Consider the following before deleting an instance:

  1. From the CommCell Browser, right-click the instance that you want to delete, click All Tasks and then click Delete.
  2. Click Yes to confirm the deletion. (Clicking No cancels the deletion and retains the node.)
  3. Type the requested phrase in the Enter Confirmation Text dialog box and click OK. This should delete the instance.

Deleting a Subclient

Consider the following before deleting a subclient:

  1. From the CommCell Browser, navigate to Client Computers | <Client> | <Agent> | <Instance>
  2. Right-click the <subclient> that you want to delete, and then click Delete.
  3. A confirmation message is displayed, asking if you want to delete the subclient.

    Click No to cancel the deletion and retain the subclient, or click Yes to continue the deletion.