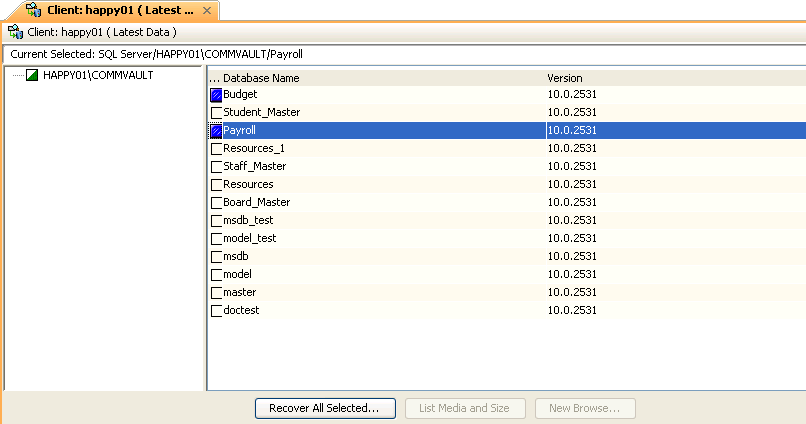
- From the CommCell Browser, navigate to Client Computers | <Client> | Sybase.
- Right-click the <Instance> point to All Tasks and then click Restore Sybase Server.
- Select Sybase Create Devices.
- Click OK to start the restore.

When the Sybase server is corrupted or lost, you can restore and recover it from the latest full backup. When restoring an entire server, make sure to perform either of the following:
sp_configure ’enable xact coordination’, 0
sp_configure "enable job scheduler", 0
Set the ‘enable xact coordination = 0’ under “DTM Administration” section
Set the ‘enable job scheduler = 0’ under “SQL Server Administration” section
Prior to restoring an entire server, make sure that the Sybase server is offline. Use the following steps to restore an entire Sybase server:
|
|
When you restore an entire Sybase server or a master database, it is highly recommended to select Sybase create devices. However, you can also create a master database manually and then perform a restore without selecting Sybase create devices. See Manually Creating a Master Database for a detailed information.
| If the dataserver is configured with a password for a default user sa, follow Manually Creating a Master Database to create a new master device with an empty password. |
Prior to restoring the master database, make sure that the Sybase server is offline. Use the following steps to restore a master database without selecting Sybase create devices:
|
 |
|
 |
System databases are essential for the operation of the Sybase Server instance. If you need to restore the Sybase Server in the event of a system failure, the system databases (model, sybsystemdb and sybsystemprocs) must be backed up.
Make sure to disable the following parameter in Sybase configuration file which usually resides in Sybase ASE home directory:
sp_configure ’enable xact coordination’, 0
By default, system databases are restored in the same location from where they were backed up and their data files are overwritten. Follow the steps given below to restore the system databases:
|
 |
If any undesired transaction occurs in the database, you can revert the database to a state just before the transaction. The point in time option enables you to restore the database to a specific point-in-time. This option is useful in the following scenarios:
Before performing the point-in-time restore of a database, ensure that transaction logs for the database are backed up. Follow the steps given below to restore a database(s) to a point in time:
The database(s) will be restored to the selected date and the next scheduled backup for that database will automatically convert to a Full backup. |
 |
You can restore the transaction logs along with the database to a specific point in time. The point in time should be in between the start and end point of a transaction logs. The database backup job along with the most recent transaction log after a point in time will be restored.
For example:
Let us assume that you have performed a Full backup (F1) and transaction log backup (L1) for the first time at 1 P.M. Subsequently you have performed L2 at 3 P.M. Later, you have performed L3, F2, L4,L5 etc at subsequent intervals. If you perform a point in time restore for the transaction log backups at 2 P.M, the Full backup (F1) along with the log backups of L1 and L2 (transaction log after point in time) will be restored.
Follow the steps given below to restore transaction logs along with the database(s) to a point in time:
The transaction logs along with the database(s) will be restored to a selected point in time. |
|
By default, a database is left in the online state after a restore. you can restore the data and then recover the database at a later point-in-time after performing any post operations.
If you want to recover the database after the restore, follow the steps given below:
|
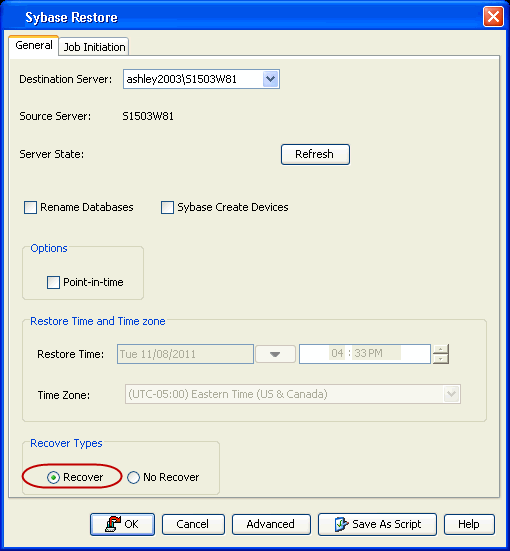 |
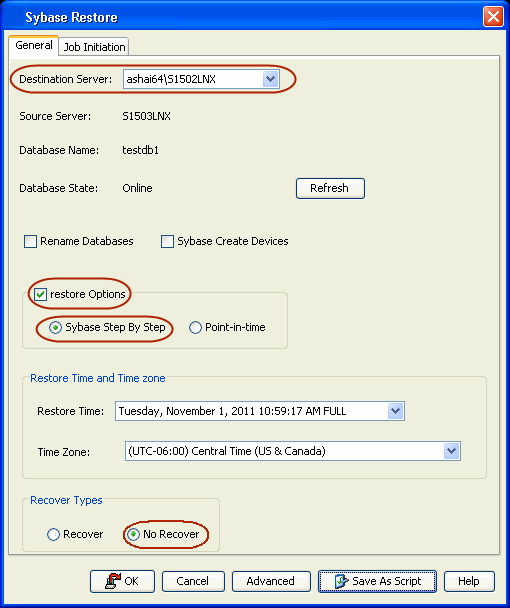
Follow the steps given below to restore the database without recovery:
|
 |
When you want to restore an event in the database but do not know the exact time of the event, you can first restore the database to the last full backup and then run a Step-by-Step restore to apply the logs. Step-by-Step Restore is performed on individual database. This is a controlled restore and applicable for restoring a single database.
Use the following steps to run a Step-by-Step restore:
|
 |
You can rename user databases. Ensure that the new database names are unique and conform to the Sybase Identifier rules. When you rename databases, make sure that the tables in the databases are not referencing to or referenced by table (s) in any other databases.
Use the following steps given to rename a database:
|
 |
While restoring the Sybase databases to a new device, you can also change the size of the device. However, you need to drop the existing device to change the size and then perform the restore. Use the following steps to restore the selected databases to a new device:
|
 |
If the Sybase data and logs are on the same device, use the following steps to set the data and logs and then perform a restore:
|
 |
By default, when restoring to a different Sybase Server instance, a database is restored to the same location as in source server in the destination server.
Prior to restoring the database to a different server, note the following:
Follow the steps below to restore a database to a different destination server.
|
 |
Make sure that you have a Sybase Database Administrator privileges when you restore a Sybase server to a different path. Also, make sure that the device should be able to hold the database being restored.
If an entire server needs to be restored to a different path, then perform the following before restoring the server:
Modify the RUN_File with the new master device path.
Use the following steps to restore individual databases to a different path:
|
|
You can perform restores of one of more databases from the command line interface.
Command line restores enable you to perform restore operations on multiple clients at the same time. It also allows you to reuse the command line scripts for additional restores.
When performing command line restores, note that backups taken from the CommCell Console can be restored using Command Line and vice versa. However, backups taken from a previous version of the CommCell Console can be restored only from the Command Line.
In order to run the restores from command line, you need an input xml file which contains the parameters for configuring the restore options. This input xml file can be obtained using one of the following ways:
To run command line operations you must first login to the CommServe as follows:
qlogin -cs <commserve name> -u <user name>
qlogin -cs server1 -u user1
qoperation execute -af restore_template.xml -clientName xxxxx -instanceName xxxxx -destinationInstance/clientName xxxxx -destinationInstance/instanceName xxxxx -databaseId/name xxxxx
qlist job –j JOBID
qlogout [-cs commserver] [-all] [-tf tokenfile] [-tk token] [-h]
| Restoring from a Current Backup |
qoperation execute -af restore_template.xml --appName 'Sybase Database' -clientName client1 -instanceName instance1 -destinationInstance/clientName client1 -destinationInstance/instanceName instance1 -databaseId/name db1 |
| Restoring Databases to a Different Client/Instance |
qoperation execute -af restore_template.xml -appName 'Sybase Database' -clientName client1 -instanceName instance1 -databaseId/name db1 -destClient/clientName client2 -destinationInstance/clientName client2 -destinationInstance/instanceName instance2 -destinationServer/name instance2 |
| Restoring Databases to a Point in Time (date and time) |
qoperation execute -af restore_template.xml -appName 'Sybase Database' -clientName client1 -instanceName instance1 -databaseId/name db1 -toTimeValue "yyyy-mm-dd hh:mm:ss" -destClient/clientName client2 destinationInstance/clientName client2 -destinationInstance/instanceName instance2 -destinationServer/name instance2 |
qoperation execute -af rename_restore_template.xml -sourceclientName xxxxx -sourceSybaseinstanceName xxxxx -destinationInstance/clientName xxxxx -destinationInstance/instanceName xxxxx -databaseId/name xxxxx - devices <source subclientId>:<source dbId>:<source device Id >:<source device name>:<renamedDeviceName>:<renamed device Path>:<size of the device in bytes>:<renamed Database name> -renameDatabases true –databaseChain -sybaseCreateDevices false [-fromTimeValue <timeValue> -toTimeValue <timeValue>]
Where
-devices is a colon( : ) separated field and is comprised of 8 fields
1. Source subclient Id: This is an internal field for subclientId and need to be passed as 0 in qcommand
2. Source dbId: database Id of the Sybase dataserver (can be got from Sybase sysdatabases table)
3. Source device Id: device id of the source device, can be passed as 0 in qcommand
4. Source device Name: source Sybase device name can be got from Sybase sysdevices table
5. Renamed device Name: Device name on destination (new name for the Sybase device)
6. Renamed device Path: Destination server Device Path
7. Size of the device in bytes: If device is already created, this can be passed as 0
8. Renamed Database Name: New name for the database on destination server. Restore will be performed on this database. Please note if DB is already created size should at least match the source
Here if the given database has more than one device then –device needs to be repeated for each of the database devices.
For cross-machine and rename database restores, it is recommended to create alFor cross-machine and rename database restores, it is recommended to create all the devices on the destination server before performing the restore.
qlist job –j JOBID
qlogout [-cs commserver] [-all] [-tf tokenfile] [-tk token] [-h]
Login as Sybase SA user and execute the following SQL script:
isql -Usa –P<password>-S<Sybase server name> use master go select name, dbid from sysdatabases where name = ‘<dbname>’ go exit go
Use the following command to find an end time of the job for Point-in-time restore:
./qoperation execscript -sn getjoblist.sql -si <clientName>
You will receive the list in the following format:
JOb ID |
level |
Status |
StoragePolicyName |
Retention Days |
AppType Name |
Subclient Name |
Start Time/End Time |
Active |
| 12774 | Full | Success | SP_Sybase | -1 | Sybase Database | CRA | 2012-08-28 20:06:37.00 |
No |
The command output returns the UTC time and you need to convert this into CommServe (CS) time zone before using it in restore command.
The following are the examples executed from your base directory for clientName - sybserver3, instance - S155syb3 database - db8 restored to the same server with the database renamed as test. Here we presume the devices are already created and only restore needs to be performed.
| Renaming a Database Restore without specifying a new device |
qoperation execute -af rename_restore_template.xml -clientName sybserver3 -instanceName S155syb3 -databaseId/name db1 -destClient/clientName sybserver3 -destinationInstance/clientName sybserver3 -destinationInstance/instanceName S155syb3 -destinationServer/name S155syb3 -devices "0:0:0:0:0:0:0:new_db1" -renameDatabases true -databaseChain "0:0:db1:0" -sybaseCreateDevices false |
| Renaming a Database Restore |
qoperation execute -af rename_restore_template.xml -clientName sybserver3 -instanceName S155syb3 -databaseId/name cross1 -destClient /clientName sybserver3 -destinationInstance/clientName sybserver3 -destinationInstance/instanceName S155syb3 -destinationServer/name S155syb3 -devices "345:14:238:db1:new_db1:/sybase/syb155/data/new_db1.dat:125829120:new_db1" -devices "345:14:239:db1_log:new_db1_log:/sybase/syb155/log/new_db1_log.dat:31457280:new_db1" -renameDatabases true -databaseChain "345:14:db1:128" -sybaseCreateDevices true |
| Renaming and Restoring Databases to a Point in Time |
qoperation execute -af rename_restore_template.xml -clientName sybserver3 -instanceName S155syb3 -databaseId/name db8 -destClient/clientName sybserver3 -destinationInstance/clientName sybserver3 -destinationInstance/instanceName S155syb3 -destinationServer/name S155syb3 -devices "0:11:0:db8:test:/Sybase/data/test.dat:0:test" -devices "0:11:0:db8_log:test_log:/ sybase/ log /test_log.dat:0:test" -renameDatabases true -databaseChain "0:11:db8:0" -sybaseCreateDevices false -fromTimeValue "yyyy-mm-dd 08:40:12" -toTimeValue "yyyy-mm-dd 10:48:16" |
| Renaming and Restoring to a different client (Cross Server restore) |
qoperation execute -af rename_restore_template.xml -clientName sybserver3 -instanceName S155syb3 -databaseId/name db8 -destClient/clientName sybserver3 -destinationInstance/clientName sybserver3 -destinationSybaseclientName sybserver3 -destinationInstance/instanceName S155syb3 -destinationServer/name S155syb3 -destinationSybaseinstanceName S155syb3 -devices "0:11:0:db8:test:/Sybase/data/test.dat:0:test" -devices "0:11:0:db8_log:test_log:/ sybase/ log /test_log.dat:0:test" -renameDatabases true -databaseChain "0:11:db8:0" -sybaseCreateDevices false -fromTimeValue "yyyy-mm-dd 08:40:12" -toTimeValue "yyyy-mm-dd 10:48:16" |
In the above examples, the following names are presumed:
rename_restore_template.xml is the XML template file
| sybserver3 | Source Sybase client name (configured on CS) |
| sybserver3 | Destination Sybase client name (configured on CS) |
| S155syb3 | Source Sybase instance name |
| db8 | Source database name |
| S155syb3 | Destination Sybase instance name |
| db8, db8_log | Source devices name for database db8 |
| test , /Sybase/data/test.dat | Renamed device name, device path for source device name db8 |
| test_log, / sybase/ log /test_log.dat | Renamed device name and device path for source device name db8_log |
| test | Renamed database name |
| Step-by-step restores should be performed from the CommCell Console.mmCell Console. |
In addition to the parameters provided in the template xml file, if you want to include additional options for the restore, you can do so by selecting the required options from the CommCell Console and generate the command line xml script for the restore operation.
Follow the steps given below to generate a script which you can use to perform a restore from the command line interface:
|
 |
|
 |
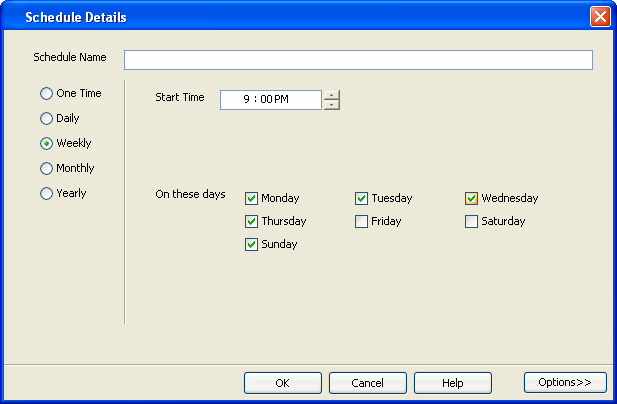
Follow the steps given below to schedule a restore job:
| 1. |
|
 |
| 2. |
|
 |
| 3. |
Select the required restore options. Click OK. |
|
| 4. |
|
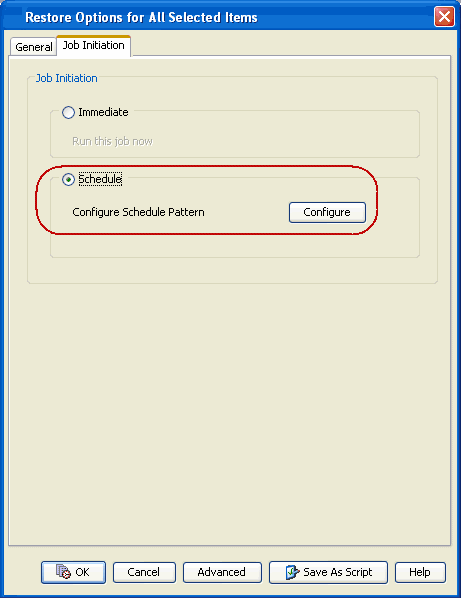 |
| 5. |
Select the appropriate scheduling options. For example:
The restore job will execute as per the schedule. |
 |
See Scheduling for a comprehensive information on scheduling jobs.
Once you initiate the restore operation, a restore job is generated in the Job Controller. Jobs can be managed in a number of ways. See Job Management for a comprehensive information on managing jobs.
The following sections provide information on the different job management options available:
Jobs that fail to complete successfully are automatically restarted based on the job restartability configuration set in the Control Panel. Keep in mind that changes made to this configuration will affect all jobs in the entire CommCell.
To Configure the job restartability for a specific job, you can modify the retry settings for the job. This will override the setting in the Control Panel. It is also possible to override the default CommServe configuration for individual jobs by configuring retry settings when initiating the job. This configuration, however, will apply only to the specific job.
| Backup jobs for this Agent are resumed from the point-of-failure. |
|
 |
The following controls are available for running jobs in the Job Controller window:
Suspend |
Temporarily stops a job. A suspended job is not terminated; it can be restarted at a later time. |
Resume |
Resumes a job and returns the status to Waiting, Pending, Queued, or Running. The status depends on the availability of resources, the state of the Operation Windows, or the Activity Control setting. |
Kill |
Terminates a job. |
Several additional options are available to further refine your restore operations. The following table describes these options, as well as the steps to implement them.
Be sure to read the overview material referenced for each feature prior to using them.
| Option | Description | related topic |
| Startup Options |
The Startup Options are used by the Job Manager to set priority for resource allocation. This is useful to give higher priority to certain jobs. You can set the priority as follows:
|
Refer to Job Priority and Priority Precedence. |
| Copy Precedence |
By default, the system retrieves data from the storage policy copy with
the lowest copy precedence. If the data was pruned from the primary
copy, the system automatically retrieves data from the other copies of
the storage policy in the lowest copy precedence to highest copy
precedence order. Once the data is found, it is retrieved, and no
further copies are checked. You can retrieve data from a specific storage policy copy (Synchronous Copy or Selective Copy). If data does not exist in the specified copy, the data retrieve operation fails even if the data exists in another copy of the same storage policy. Follow the steps given below to retrieve the data from a a specific storage policy copy:
|
Refer to Recovering Data From Copies. |
| Data Path Options |
The data recovery operations use a default Library, MediaAgent, Drive Pool, and Drive as the Data Path. You can use this option to change the data path if the default data path is not available. Follow the steps given below to change the default data path:
|
Refer to Change Data Path. |
| Encryption |
If the client's data is encrypted with a pass phrase, you must enter the pass-phrase to start the data recovery operation. Follow the steps given below to enter the pass-phrase:
|
Refer to Data Encryption. |
| Alerts |
This option enables users or user groups to get automatic notification on the status of the data recovery job. Follow the steps given below to set up the criteria to raise notifications/alerts:
|
Refer to Alert. |
| CommCell Readiness Report |
The CommCell Readiness Report provides you with vital information, such as
connectivity and readiness of the Client, MediaAgent and CommServe. It is useful
to run this report before performing the data protection or recovery job. Follow the steps
given below to generate the report:
|
Refer to CommCell Readiness Report. |
| Restore Job Summary Report |
The Restore Job Summary Report provides you with information about all the data recovery jobs that are run in last 24 hours for a specific client and agent. You can get information such as failure reason, failed objects, job options etc. It is useful to run this report after performing the restore. Follow the steps given below to generate the report:
|
Refer to Restore Job Summary Report. |