

|
|
Skip this page if you are not installing this agent on a Non-Microsoft cluster.
Click  to begin
Configuration.
to begin
Configuration.
Installation |
Related Topics |
||
|
Download the latest software package to perform the install. Verify that the computer in which you wish to install the software satisfies the System Requirements. Provides comprehensive information on firewall. |
Install the software in a VERITAS Clustered Environment, by locating the active node that is hosting the cluster resources and perform the installation from this node to the virtual node.
Follow the steps given below to install the Windows File System iDataAgent in a VERITAS Clustered environment
| 1. | Create bIgnoreClusterVMCheck registry key to detect that the agent is being installed on a virtual node in a non-Microsoft cluster. | To create the registry key, see the following steps:
|
||
| 2. | Run Setup.exe from the Software Installation Package. | |||
| 3. |
Select the required language. Click Next. |
 |
||
| 4. |
Select the option to install software on this computer.
|
 |
||
| 5. |
Select I accept the terms in the license agreement. Click Next. |
 |
||
| 6. |
Select Configure a Virtual Server. Click Next. |
 |
||
| 7. |
|
 |
||
| 8. | Specify the hosts node in the Preferred Nodes and
click Add to add in the Nodes on which Virtual Group is configured
to run. Specify the name of active node in Current Owner Node box. Click Next. |
 |
||
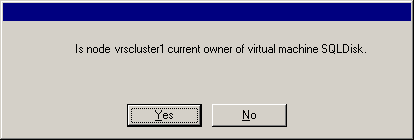
| 9. | Click Yes if it is the Active node.
NOTES
|
 |
||
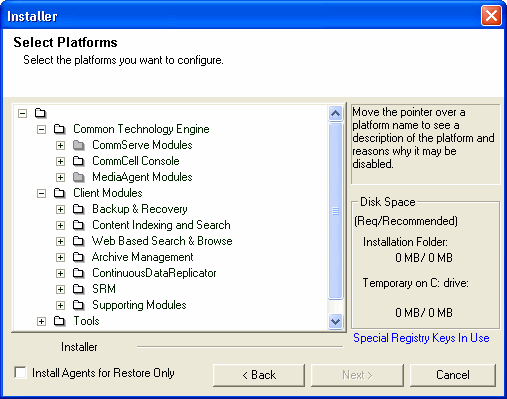
| 10. | Expand Client Modules | Backup & Recovery
| File System and select Windows File System
iDataAgent Click Next. |
 |
||
| 11. |
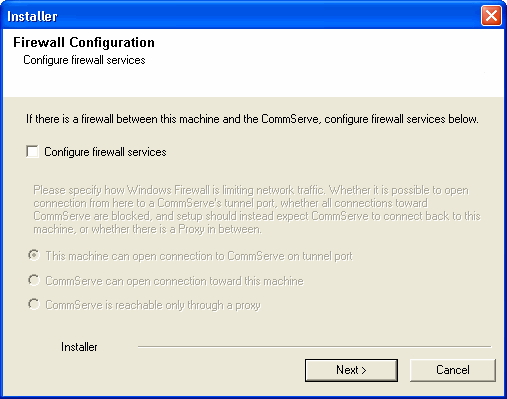
If this computer and the CommServe is separated by a firewall, select the Configure
firewall services option and then click Next.
For firewall options and configuration instructions, see Firewall Configuration and continue with the installation. If firewall configuration is not required, click Next. |
 |
||
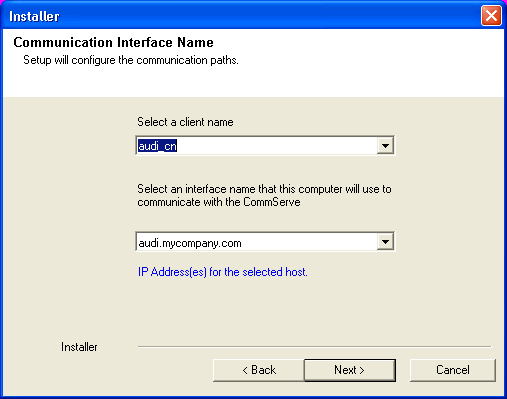
| 12. |
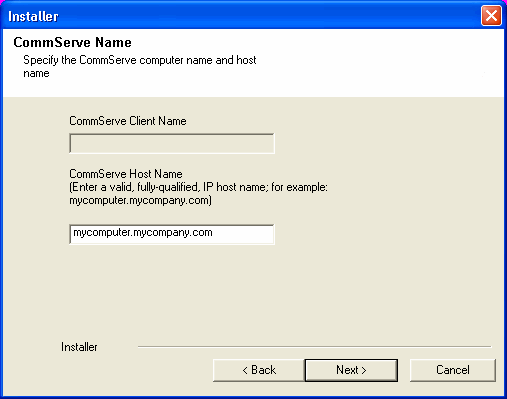
Enter the fully qualified domain name of the CommServe
Host Name. Click Next.
|
 |
||
| 13. | Click Next. |
 |
||
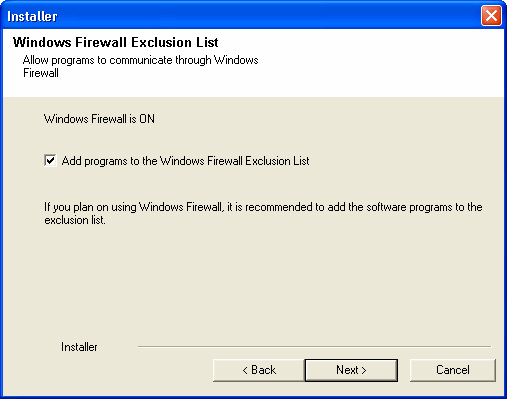
| 14. |
Select Add programs to the Windows Firewall Exclusion
List, to add CommCell programs and services to the Windows Firewall
Exclusion List. Click Next.
|
 |
||
| 15. |
Verify the default location for software installation. Click Browse to change the default location. Click Next.
|
 |
||
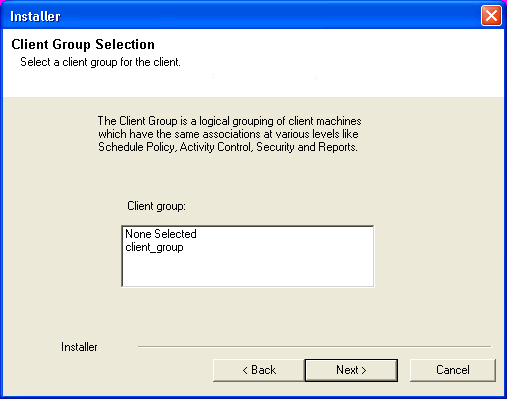
| 16. |
Select a Client Group from the list. Click Next.
|
 |
||
| 17. | Click Next. |
 |
||
| 18. | Click Next. |
 |
||
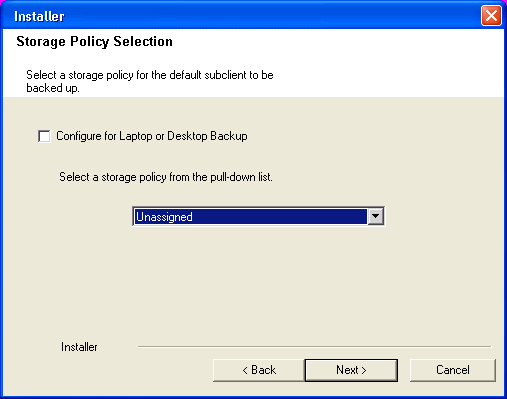
| 19. | Select a Storage Policy from the drop-down list. Click Next. |
 |
||
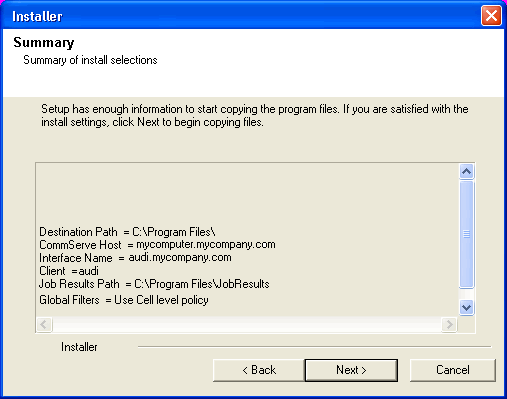
| 20. | Click Next. |
 |
||
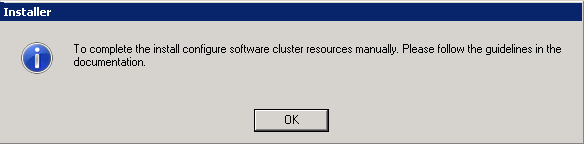
| 21. | Click OK and manually configure the cluster resources.
|
 |
||
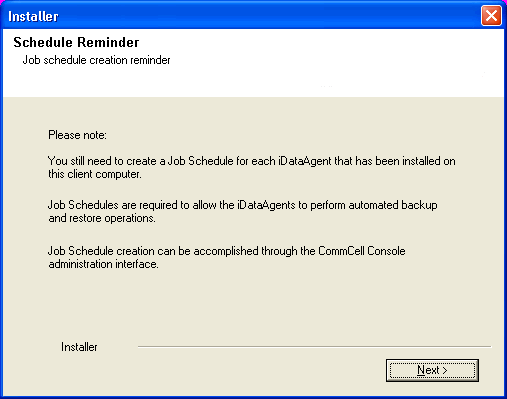
| 22. | Click Next. |
 |
||
| 23. | Click Finish. |
 |
In case of VERITAS Cluster you must manually install the software on all the available Nodes. For installs on the VERITAS Cluster, complete the following procedures for the agent. These procedures can be completed using the VERITAS Cluster Administrator.
| 24. | Once the physical nodes and the virtual machine are installed,
services should be added as generic services. Also, you may want to designate the services as "critical" if you want to cause the virtual machine to fail over if the associated service stops. |
|
||
| 25. | Create Service Dependencies |
|
||
| 26. | Associate Services with the Current Active Node |
|
Install the software in HP Scalable NAS/Polyserve Cluster environment from the active host to virtual server.
The software must be installed on each passive node available to the virtual host. During install, you will be asked to provide the name of the active host for each passive host installation. See Manually Installing the Software on a Passive Node for step-by-step instructions.
Follow the steps given below to install the Windows File System iDataAgent in a HP Scalalable NAS/Polyserve Clustered environment:
| 1. | Create bIgnoreClusterVMCheck registry key to detect that the agent is being installed on a virtual node in a non-Microsoft cluster. | To create the registry key, see the following steps:
|
||
| 2. |
|
|||
| 3. | From the Virtual Hosts tab in the PolyServe Matrix Server dialog box, locate the primary node for the virtual server you are installing, and perform the installation from the active (primary) host to the virtual server. | |||
| 4. | Run Setup.exe from the Software Installation Package. | |||
| 5. |
Select the required language. Click Next. |
|
||
| 6. |
Select the option to install software on this computer.
|
|
||
| 7. |
Select I accept the terms in the license agreement. Click Next. |
|
||
| 8. |
Select Configure a Virtual Server. Click Next. |
|
||
| 9. |
|
|
||
| 10. | Specify the hosts node in the Preferred Nodes and
click Add to add in the Nodes on which Virtual Group is configured
to run. Specify the name of active node in Current Owner Node box. Click Next. |
|
||
| 11. | Click Yes if it is the Active node.
|
|
||
| 12. | Expand Client Modules | Backup & Recovery
| File System and select Windows File System
iDataAgent Click Next. |
|
||
| 13. |
If this computer and the CommServe is separated by a firewall, select the Configure
firewall services option and then click Next.
For firewall options and configuration instructions, see Firewall Configuration and continue with the installation. If firewall configuration is not required, click Next. |
|
||
| 14. |
Enter the fully qualified domain name of the CommServe
Host Name. Click Next.
|
|
||
| 15. | Click Next. NOTES
|
|
||
| 16. |
Select Add programs to the Windows Firewall Exclusion
List, to add CommCell programs and services to the Windows Firewall
Exclusion List. Click Next.
|
|
||
| 17. |
Verify the default location for software installation. Click Browse to change the default location. Click Next.
|
|
||
| 18. |
Select a Client Group from the list. Click Next.
|
|
||
| 19. | Click Next. |
|
||
| 20. | Click Next. |
|
||
| 21. | Select a Storage Policy from the drop-down list. Click Next. |
|
||
| 22. | Click Next. |
|
||
| 23. | Click OK and manually configure the cluster resources.
|
|
||
| 24. | Click Next. |
|
||
| 25. | Click Finish. |
|
For installs on the HP Scalable NAS/PolyServe Cluster, complete the following procedures for the agent.
| 26. | Create and Use Scripts to Administer Virtual Machine Services. | You should create and use three scripts to administer virtual
machine services:
Create a probe script to have the status of both the Bull Calypso Communications Service (GxCVD) and the Bull Calypso Event Manager Service (GxEvMgrC) checked. In the probe script, include the GxSCMCmd.exe utility by name in the appropriate command. (This utility is available from the Resource Pack. See Tools and Utilities for more information.) Create a folder (e.g., m:\GxSCMCmd) on a shared disk that the virtual host you created has access to. Copy the GxSCMCmd.exe utility and the script files you created (probe.bat, start.bat, stop.bat) to this folder. The utility will return the state of the specified services: '0' if the services are running or '1' if services are stopped. For an error condition, '-1' is returned. Note that the service name includes the name of the client and the name of the instance. To avoid error in providing the vhost name and instance name in the path of scripts, copy the key name from here: HKEY_LOCAL_MACHINE\SYSTEM\CurrentControlSet\Services\GXClusPlugIn (vhostname) (Instance00x)
The command syntax is: GxSCMCmd.exe -IsRunning <list of service name> For example, your probe script (e.g., m:\GxSCMCmd\gxprobe.bat) may appear as follows: @echo off if'%MX_ACTIVE_STATE%'='INACTIVE' exit 0 m:\GxSCMCmd\GxSCMCmd.exe -IsRunning "GxClusPlugIn (virtualpolyserve) (Instance001)" if ERRORLEVEL 0 exit 0 exit 1 Be sure to copy the GxSCMCmd.exe utility to the shared disk resource. Also, be sure to include the probe script on the shared disk. The stop and start scripts must also contain the registry entry for the virtual machine service names. Your start script (e.g., m:\GxSCMCmd\gxstart.bat) may appear as follows: @echo off C:\WINDOWS\system32\net.exe start "GxClusPlugIn (virtualpolyserve) (Instance001)" exit 0 Your stop script (e.g., m:\GxSCMCmd\gxstart.bat) may appear as follows: @echo off C:\WINDOWS\system32\net.exe stop GxClusPlugIn (virtualpolyserve) (Instance001) exit 0 |
||
| 27. | Add the Customer Service Monitor |
Add the custom service monitor to the virtual host configuration in the PolyServe Matrix Server console.
The monitor should now start, and the primary node should now be active. Failover will occur if services are disabled on the primary node, and services in such a case will move to a secondary node. |
|
|