Overview
 The
CommServe and the Microsoft SQL Server Database Engine can be installed
on separate computers.
The
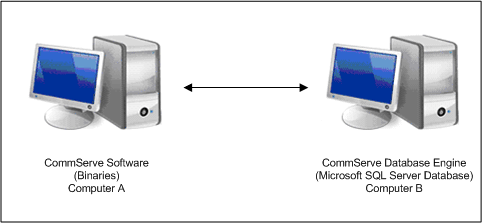
CommServe and the Microsoft SQL Server Database Engine can be installed
on separate computers.The following procedure describes the steps involved in building such a topology. Note that these procedures require familiarity and understanding of both the Microsoft SQL Server Database Engine and the Windows operating system.
This procedure can be used when you initially install the software, or when you split an existing CommServe.
The following are not supported in this configuration:
|
Install Requirements
- Two computers that can host the CommServe and the database engine.
- A reliable and fast network connection between these two computers.
- The CreateCSSQLAccount utility, which is available in the Resource Pack. (See Tools and Utilities for more information.)
Install Procedure
Installing the Necessary Software
This step is not necessary if you already have a CommServe running on this computer.
See System Requirements - CommServe for more information on the SQL Server version.
Moving the Database
Alternatively you can use the following command line in a batch file:
<sql install path>\osql -S <SQL ServerName> -U sa -P <sapwd> -Q "BACKUP DATABASE [CommServ] TO DISK = 'C:\cs.dmp'"
This should create a dump file c:\cs.dmp.
You can choose the folder in which the .dmp file is created.
Remove the dependencies from SQL Services and then stop and disable SQL Services for BullCalypso instance on the CommServe computer.
Reboot the computer.
- Start Regedit.exe
- Navigate to the following key:
HKEY_LOCAL_MACHINE\SYSTEM\CurrentControlSet\Services\GxCVD(Instance001)
- Remove MSSQL$BullCalypso entry from the DependOnService multi string value.
To stop and disable the services:
- Open the Services window from Administrative Tools in Windows Control Panel.
- Right click the SQL Server(BullCalypso)service and then click Properties.
- Select the Disabled option from the Startup Type list.
- Click the Stop button.
See the SQL Server Management Studio help for information on restoring a database.
HKEY_LOCAL_MACHINE\SOFTWARE\CommVault Systems\Galaxy\Instance<xxx>\Database
Edit the following values:
sCONNECTION set it to <SQL Server computer>_commserv
sDOMAIN set it to <SQL Server computer>
sINSTANCE set it to <SQL Server computer>\BullCalypso
Setting up the SQL Server Account
Windows\CreateCSSQLAccount\CreateCSSQLAccount.htm
The utility must be copied to the following location in the CommServe computer:
<software_install_folder>\base
Windows\CreateCSSQLAccount
Changing DSN Settings
- Open Control Panel | Administrative Tools | Data Sources (ODBC).
- Click the System DSN tab.
- Click <CommServe computer>_commserv and then click Configure.
- Edit the following values:
Name - set it to <SQL Server computer>_commserv
Server - set it to <SQL Server computer>\BullCalypso
- Click Next.
- Choose the With SQL Server authentication using a login ID and password entered by the user option.
- Select the Connect to SQL Server to obtain default settings for the additional configuration options check box and enter the login and password that you created using the CreateCSSQLAccount utility.
- Click Next twice and then click Finish. (Nothing needs to be changed on these dialog boxes.)
- Click Test Data Source.
The result should be TEST COMPLETED SUCCESSFULLY.
If not make sure SQL server on the SQL Server computer is accessible and the login information given are correct.
See Enable or Disable Operations for step-by-step instructions.
Protecting the Database - Setting up the Disaster Recovery Backup
Recommended schedule is a daily full backup.
<sql install path>\Isql.exe -S <SQL ServerName> -U sa -P <sapwd> -q "BACKUP DATABASE [CommServ] TO DISK = 'C:\cs.dmp'"
This should create a dump file c:\cs.dmp.
You can choose the folder in which the .dmp file is created.