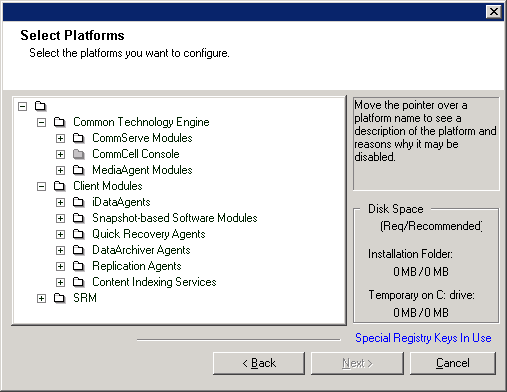
Install the File System NDMP Restore Enabler (Windows)


Click on a link below to go to a specific section of the software installation:

Related Topics:

Install Requirements

The following procedure describes the steps involved in installing the File System NDMP Restore Enabler only.

If you have not installed the Windows File System iDataAgent, the install program will automatically install the iDataAgent when you select the NDMP Remote Enabler. For information on installing Windows File System iDataAgent refer to Install the Microsoft Windows File System iDataAgent. If you choose to install additional components simultaneously, refer to the appropriate procedures for installation requirements and steps specific to the component.

Review the following Install Requirements before installing the software:

General

  • Agents should only be installed after the CommServe has already been installed in the CommCell. Also, keep in mind that the CommServe must be installed and running (but not necessarily on the same computer), before you can install the Agent.
  • You must also install the File System iDataAgent on the computer on which you plan to install any application iDataAgents, Quick Recovery Agents or DataArchiver Agents.
  • This version of the software is intended to be installed in a CommCell where the CommServe and MediaAgent(s) version is 8.0.0.
  • Close all applications and disable any programs that run automatically, including anti-virus, screen savers and operating system utilities. Some of the programs, including many anti-virus programs, may be running as a service. Stop and disable such services before you begin. You can re-enable them after the installation.
  • Ensure there is an available license on the CommServe for the Agent.
  • Verify that you have the software installation disc that is appropriate to the destination computer’s operating system.
    Make sure that you have the latest software installation disc before you start to install the software. If you are not sure, contact your software provider.

Firewall

  • If the CommServe® Server, MediaAgent and/or Clients communicate across two-way firewall(s):
    • Ensure port 8400 is allowed connections through the firewall.
    • In addition a range of bi-directional ports (consecutive or discrete) must also be allowed connections through the firewall.

     For information on configuring the range of ports, see Port Requirements for Two-way Firewall.

  • If the CommServe Server, MediaAgent and/or Clients communicate across one-way firewall(s):
    • Identify a range of outbound ports (consecutive or discrete) for use by the software.

     For information on configuring the range of ports, see Port Requirements for One-way Firewall.

  • If the MediaAgent/Client communicates with the CommServe Server across a one-way firewall, you must add the MediaAgent/Client host name (or the IP address) in the CommServe computer before installing the necessary software on the MediaAgent/Client computer.

Before You Begin

  • Log on to the client as local Administrator or as a member of the Administrators group on that computer.

Install Procedure

Getting Started

1. Place the software installation disc for the Windows platform into the disc drive.

After a few seconds, the installation program is launched.

If the installation program does not launch automatically:

  • Click the Start button on the Windows task bar, and then click Run.
  • Browse to the installation disc drive, select Setup.exe, click Open, then click OK.

NOTES

  • If you are installing on a x64 version of Windows 2008 Server Core R2, go to the AMD64 folder and run Setup.exe.
 
2. In this screen, you choose the language you want to use during installation. Click the down arrow, select the desired language from the pull-down list, and click Next to continue.  
3. Select the option to install software.

NOTES

 
4. Select the option to install software on this computer.

NOTES

  • The options that appear on this screen depend on the computer in which the software is being installed.
 
5. Read the Welcome screen.

Click Next to continue, if no other applications are running.

 
6. Read the virus scanning software warning.

Click OK to continue, if virus scanning software is disabled.

 
7. Read the license agreement, then select I accept the terms in the license agreement.

Click Next to continue.


Select Components for Installation

8. Select the component(s) to install.

NOTES

  • Your screen may look different from the example shown.
  • Components that either have already been installed, or which cannot be installed, will be dimmed. Hover over the component for additional details.
  • The Special Registry Keys In Use field will be enabled when GalaxyInstallerFlags registry keys have been enabled on this computer. Hover over the field to see which keys have been set, as well as their values. For more information, see Registry Keys.

Click Next to continue.

From the Select Platforms dialog box, expand the iDataAgent module and select the File System NDMP Restore Enabler. Make sure you have an available license on the CommServe for the File System NDMP Remote Enabler iDataAgent.
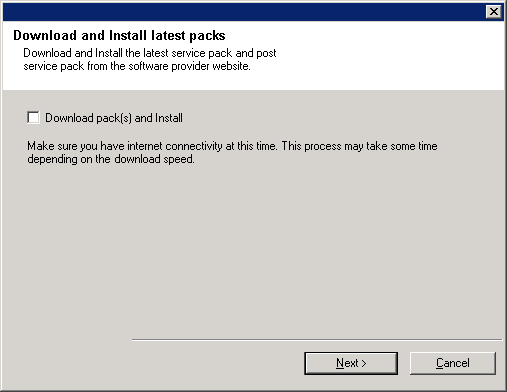
9. Select Download Pack(s) and Install to download and install the latest service packs and post packs from the software provider.

NOTES

  • Internet connectivity is required to download updates.
  • This step is applicable when installing on the first instance.
  • Updates are downloaded to the following directory: 
    <software installation>/Base/Temp/DownloadedPacks
    .
    They are launched silently and installed automatically for the first instance.

Click Next to continue.

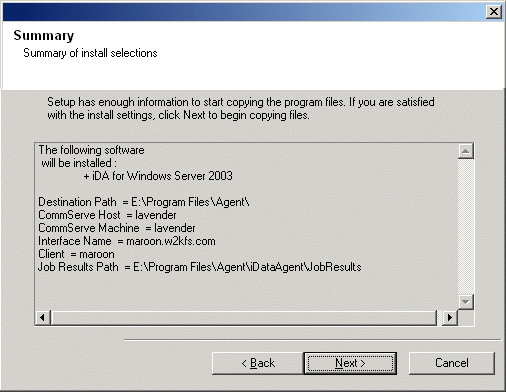
Verify Summary of Install Options

10. Verify the summary of selected options.

NOTES

  • The Summary on your screen should reflect the components you selected for install, and may look different from the example shown.

Click Next to continue or Back to change any of the options.

The install program now starts copying the software to the computer. This step may take several minutes to complete.

11. The System Reboot message may be displayed. If so, select one of the following:
  • Skip Reboot
    This option will be displayed if the install program finds any files belonging to other applications, that need to be replaced. As these files are not critical for this installation, you may skip the reboot and continue the installation and reboot the computer at a later time.
  • Reboot Now
    If this option is displayed without the Skip Reboot option, the install program has found files required by the software that are in use and need to be replaced. If Reboot Now is displayed without the Skip Reboot option, reboot the computer at this point. The install program will automatically continue after the reboot.
  • Exit Setup
    If you want to exit the install program, click Exit Setup.
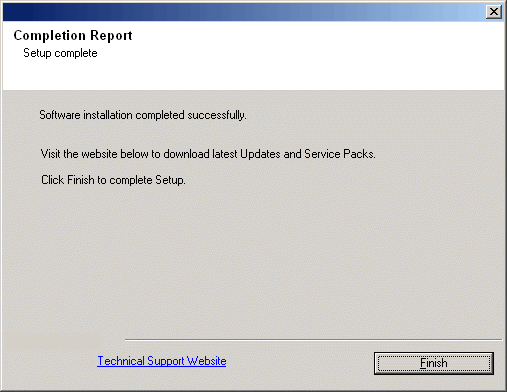
Setup Complete

12. Setup displays the successfully installed components.

NOTES

  • The Setup Complete message displayed on your screen will reflect the components you installed, and may look different from the example shown.
  • If you install an Agent with the CommCell Console open, you need to refresh the CommCell Console (F5) to see the new Agents.
  • If Reboot Now button is displayed make sure to reboot the computer before performing any other operations from the computer.

Click Finish to close the install program.

The installation is now complete.

Post-Install Considerations

Restore Data with File System NDMP Restore Enabler

Restoring data with the File System NDMP Restore Enabler works in the same manner as any other restore operation. Refer to the online Help or Perform a File System NDMP Restore for details.