Data Discovery and Search
Topics |
How To |
Troubleshoot |
Related Topics
Overview
Search Types
Search Tools
Search Criteria
Wildcard Support
Search Result Actions
Important Considerations
Use Cases
This topic provides an overview of the Data Discovery and Search feature to inform
end-users and compliance officers about the types of searches that can be conducted
and the available search tools. Detailed information is also provided on search
criteria, wildcards and use cases for users to gain a better understanding of the
search capabilities offered by this feature.
Certain configuration tasks must be performed prior to searching online and protected/archived
data. For more information see Configuration - Content indexing
and Search.
The Data Discovery and Search capabilities allow end-users and compliance officers
to search for data across computers and supported applications to find the information
they need to perform their job functions. End-User Searches and Compliance Searches
are briefly described below.
End-users typically need to find information about something that they are working
on, such as a project or task, which often requires significant time to locate the
data. The average user may not know which computers or storage devices in the organization
contain the data that they are trying to locate, and they may not know which applications
created the data to be searched (for example: e-mail messages/items/attachments,
text files, rich text files, Word documents, Excel spreadsheets, PDFs, etc.). The
End-User Search capability provides a solution to this business need by giving users
the proper tools to quickly and easily search for their data regardless of computer
or application.
The main concept behind End-User Searches is the ability for users to search
all data objects that were created by them, or that is accessible to them. End-User
Searches can be conducted from the web-based Search Console
or from the integrated Search Console available in
Outlook Add-In for Microsoft Exchange Server, by entering the appropriate
Search Criteria. (Outlook Add-In is not supported
by Domino Mailbox Archiver)
For step-by-step instructions, see
Search for Data Using the Search Console and
Search for Data Using the CommCell Console.
Compliance officers are often tasked with locating data in order to comply with
the legal discovery process or business regulations. Civil litigation requires that
data relevant to the case be provided for legal discovery. This can be a very time-consuming
task for compliance officers, since the data they need to provide to the courts
or attorneys may be spread across many different computers and storage devices throughout
the organization, and comprise different data types. The Compliance Search capability
allows compliance officers full access to all computers and supported applications
for searching, regardless of ownership/access attributes for the piece of data.
Regulatory compliance is another mission-critical business need that is addressed
by the Compliance Search capability. In certain geographic regions, publicly traded
corporations must comply with business regulations such as the Sarbanes-Oxley Act,
as well as other sector-based regulations governing Financial Services, Healthcare,
and Pharmaceutical industries. The Compliance Search capability is designed to address
this business need as well by giving compliance officers the tools to search across
computers, storage devices and applications to quickly and easily locate the information
needed to satisfy regulatory compliance requirements.
Compliance Searches can be conducted from the web-based
Search Console, the Search dialog in the
CommCell Console, or the integrated Search Console
available in Outlook Add-In for Microsoft Exchange
Server, by entering the appropriate Search Criteria.
For step-by-step instructions, see
Search for Data Using the Search Console and
Search for Data Using the CommCell Console.
| Capability |
End-User Search |
Compliance Search |
| Access of data objects |
- End-users can only search for messages/attachments in their own
mailboxes.
- End-users can only search for files/documents which are owned or
accessible by them.
|
- Compliance Officers can search all mailboxes, files and documents
regardless of ownership.
|
| Advanced Options (CommCell Console) |
Not Applicable |
The following search criteria are available
in the CommCell Console for Compliance Searches by users with Compliance
License:
- Search for data owned by
- Search for data owned by group / Expand Group
- Search for data accessible by
|
| Advanced Options (Search Console) |
- The following advanced option groups are not available in the Search
Console for End-User Searches:
- More options for Files/Emails
- Search by Job ID
- Search for files failed to index
- The Query Builder feature is not available to End-Users.
- The following Search Mail Data options are not available
for End- User Searches:
- Advanced options are available to search for emails on delegated
mailboxes for a user.
|
- The following advanced option groups are available in the Search
Console for Compliance Searches:
- More options for Files/Emails, which includes the ability to
search for data objects across ownership and accessibility rights
of users and user groups.
- Search by Job ID
- Search for files failed to index
- The Query Builder feature is available to Compliance Search users.
- The following Search Mail Data options are available only
for Compliance Searches:
|
| Retrieve from Search Console |
End-users have the facility to retrieve the
discovered items from the search result page as well as from the review
set page. |
Compliance users need to move the
discovered items to a review set in order to retrieve them. |
| Legal Hold |
Not Applicable |
Compliance users can search data and preserve
a subset of the data in a Legal Hold for long-term retention for legal purposes. |
| Tagging |
Not Applicable |
Compliance users can create and assign tags
to selected search items and later perform a search based on the assigned
tags. |
| ERM Connectors |
Not Applicable |
Compliance users can search for data and
submit selected documents to an ERM server in a record management
site. |
There are different types of interfaces available for performing end-user searches
and compliance searches, including the web-based Search Console and the Search dialog
in the CommCell Console. Although slightly different in appearance, they both offer
the same powerful and unique capability to locate data across computers and supported
applications. The Outlook-Add In can also be used as a search tool, and offers integrated
Search Console capabilities as discussed below.
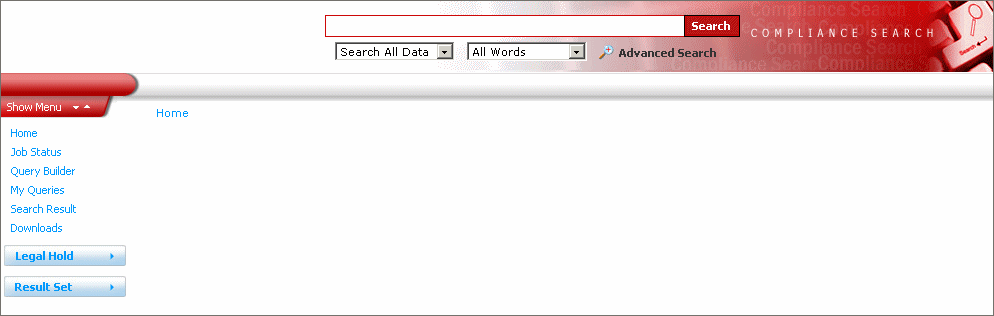 The
web-based Search Console is a search interface client that works in conjunction
with a Web Search Server which allows searches to be performed remotely
through a web browser. The Search Console is a convenient way to perform
offline and online searches without needing access to a CommCell. A depiction
of the Search Console is provided on the right and description of various
portions of the interface are given below: The
web-based Search Console is a search interface client that works in conjunction
with a Web Search Server which allows searches to be performed remotely
through a web browser. The Search Console is a convenient way to perform
offline and online searches without needing access to a CommCell. A depiction
of the Search Console is provided on the right and description of various
portions of the interface are given below:
- Use the entry space at the top of the screen to enter the
text string or wildcard pattern that you wish to search for.
- Search All Data - Provides the options to search only protected/archived
data or file server/desktop data or both.
- All Words - Provides the options to search all the words,
any word, or phrase from the text specified in the entry space.
- Home - Return to the Home view of the Search Console.
- Job Status - Displays the status of search restore operations.
The Job Status window displays a maximum of 25 most recent search restore
operation status, which are not older than 7 days.
- Query Builder - Provides an entry pane where you can construct
your own SQL custom queries, and save them for later use. For more information
on writing SQL queries refer to Microsoft documentation. Note that this
tool can be used only by a compliance user.
- My Queries - Displays a list of custom SQL queries that you
have set up.
- Search Result - Displays the results of a search operation.
- Downloads - Displays files containing search results that
were previously exported to a PST or ZIP file format, which can then
be downloaded.
- Legal Hold - Displays files from review sets that are moved
to the Legal Hold for long-term retention. For more information, see
Legal Hold.
- Review Set - Displays results from previous search operations
that have been saved to a Review Set.
- Advanced Search - Displays additional search criteria that
you can enter to further refine your search. For more information, see
Search Criteria.
- Refine Search - Allows you to filter the search result items based
on the Size in KB(hits), Modified/Received time, File Type, Tags,
and Keywords. The "Keyword" Navigator gives a rough estimate of the
count of the documents and may not match with the actual results.
For step-by-step instructions, see
Search for Data Using Search Console.
|
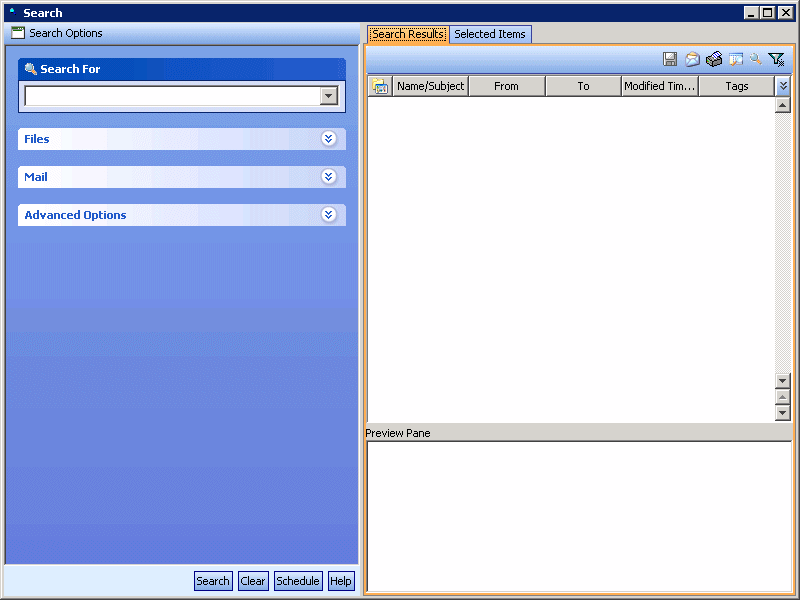 The
CommCell Console offers a Search dialog similar to the Search Console, which
allows CommCell users a convenient and familiar venue from which to search
for protected/archived data. A depiction of the Search dialog is provided
on the right and description of various portions of the interface are given
below: The
CommCell Console offers a Search dialog similar to the Search Console, which
allows CommCell users a convenient and familiar venue from which to search
for protected/archived data. A depiction of the Search dialog is provided
on the right and description of various portions of the interface are given
below:
- Search For - Use the entry space to enter (or select) the
text string or wildcard pattern that you wish to search for.
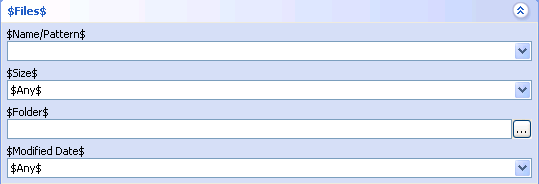
- Files - Provides a group of fields that allow you to specify
additional search criteria for files, to further refine the search.
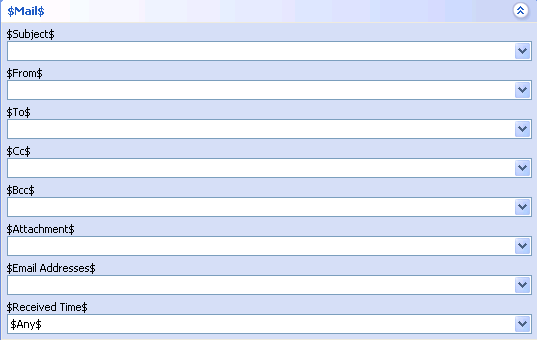
- Mail - Provides a group of fields that allow you to specify
additional search criteria for e-mails, to further refine the search.
- Advanced Options - Displays additional search criteria that
you can enter to further refine your search. For more information, see
Search Criteria.
- Schedule - Click to schedule the search.
- Preview Pane - Enables the user to preview the selected search
result item prior to restoring the item.
For step-by-step instructions on searching data using CommCell Console,
see
Search for Data Using CommCell Console.
To perform a job-based search from the CommCell Console, see
Perform Job-Based Search Using CommCell Console.
|
The Outlook-Add In provides the following search capabilities:
- Basic searches on message properties such as Subject, From and To can be
performed by end-users in their own mailboxes and does not require content indexing.
- Advanced searches of content within the body of the message and attachments
can be performed by end-users in their own mailboxes for legacy content indexes
created by prior releases of this product. Compliance searches of messages in
the Journaling mailbox are also supported for legacy content indexes.
- End-User Searches are supported through an integrated Search Console toolbar
button (when configured).
- Compliance Searches are supported through an integrated Search Console toolbar
button (when configured).
For an overview of this component, see
DataArchiver Outlook Add-In.
For more information on using the integrated Search Console, see
Accessing and Using the Search Console from Outlook Add-In.
| Capability |
Search Console
|
CommCell Console |
Outlook Add-In |
| Searchable Index Types |
Online and Offline Content Indexes |
Online and Offline Content Indexes |
Offline Content Indexes |
| Security Requirements |
See
Search Console |
See
CommCell
Console |
See
Outlook Add-In |
| Search and Restore |
- Add selected offline search results to a Review Set before you can
Prepare for Viewing
- Directory Share Name Pair must be configured on Web Search Server
for viewing online search results
- Restore requires no special security permissions besides
End User Search or
Compliance Search
- Objects are restored to the Job Results folder on the Web Search
Server
|
- Right-click selected offline search results and choose Restore
options (or click Schedule) to initiate the restore
- No special configuration required for restoring search results
- Compliance Searches are automatically granted a
Browse permission by default
- Restoring search results requires the Browse
and In Place Recover and/or Browse and
Out of Place Recover permissions to be explicitly granted to
the CommCell User Group for which the User is a member
- Objects can be restored In Place or Out of Place
- Search results can be automatically restored to a new or
existing review set in the Web Search Server using the Automated
Content Classification Policy.
|
- Right-click selected offline search results and click Recover
- User Mailbox-level search and restores are supported
|
| Job Monitoring |
Restore job progress can be viewed by clicking
the Job Status button |
Restore job progress can be viewed from the
Job Controller |
None |
| Scheduling Support |
None |
- Searches can be scheduled by clicking the Schedule button.
- Restores can be scheduled from the Restore Options (Job Initiation)
tab
|
None |
| Legal Hold |
- Compliance users can search data and retain a subset of the data
in a Legal Hold for long-term retention.
- The Legal Hold data can be retrieved to a new review set.
|
- Compliance users can browse and restore specific Legal Hold data
from the corresponding Legal Hold Set.
|
- Compliance users can search data and retain a subset of the data
in a Legal Hold for long-term retention.
- The Legal Hold data can be retrieved to a new review set.
|
| Tagging |
Compliance users can create new tags, search
data based on tags associated with the search items, and also assign new
tags to the search result items interactively. |
- Compliance users can create, modify, and delete tags from the CommCell
Console.
- Tagging operation can be scheduled from the Compliance Policy
Wizard.
|
Compliance users can create new tags, search
data based on tags associated with the search items, and also assign new
tags to the search result items interactively. |
| ERM Connectors |
- Compliance users can submit content indexed documents to an ERM
server interactively using an existing or new ERM
Connectors.
- When creating a new ERM Connector, you can associate a new or
existing record enter to the ERM Connector.
|
- Compliance users can create, modify, or delete ERM Connectors.
- When creating or modifying an ERM connector, the compliance user
can associate a a new or existing ERM server to the ERM
connector.
- When deleting an ERM connector, the CommCell Console also
displays the list of unused ERM servers that can be deleted.
- Compliance users can schedule and automate the process of
submitting search results to an ERM server through an
existing or new ERM connector.
|
- Compliance users can submit content indexed documents to an ERm
server interactively using an existing or new ERM
Connectors.
- When creating a new ERM Connector, you can associate a new or
existing ERM server to the ERM Connector.
|
| Delegated Search |
- End-users can search for Exchange emails on
delegated mailboxes.
- In a parent/child folder setting the end-user can search
Exchange emails in the child folder if the delegated rights are set
at the parent level. End-user will not be able to search emails in
the parent folder if the delegated rights are set at the child
folder level.
|
Not applicable |
- End-users can search for Exchange emails on
delegated mailboxes.
- In a parent/child folder setting the end-user can search
Exchange emails in the child folder if the delegated rights are set
at the parent level. End-user will not be able to search emails in
the parent folder if the delegated rights are set at the child folder
level.
|
| Miscellaneous |
The following unique capabilities are supported:
- Query Builder
- My Queries
- Review Set
- Multiple entries are allowed in the e-mail search criteria for
From, To, CC, and BCC message properties
- Preview the search result items prior to restore
|
The following unique capabilities are supported:
- Sampling of messages
- In Place Restore options to Append, Overwrite and
Skip
- Out of Place Restore destination can be specified
- Preview Pane
|
The following unique capabilities are supported:
- Search Console can be launched from an Outlook toolbar button for
End-User Searches and Compliance Searches.
- Preview the search result items prior to restore
|
This section provides information on the available search criteria that can be
used to further refine your search operation. Note that not all fields may be available
depending on the type of search you are performing, your access rights and/or other
configuration specifics particular to your environment.
The following options and option groups are available from the Advanced Search
window of the web-based Search Console:
Search - Use the search text box to enter the text string or wildcard
pattern that you wish to search for.
Set Default - Select this button to save the search criteria selections
and set it as the default.
Clear - Select this button to clear any search criteria specifications
on text boxes. When using this option, note that search criteria selections on drop-down
boxes and radio-buttons will not be reset.
Close - Select this button to close the Advanced Search window.
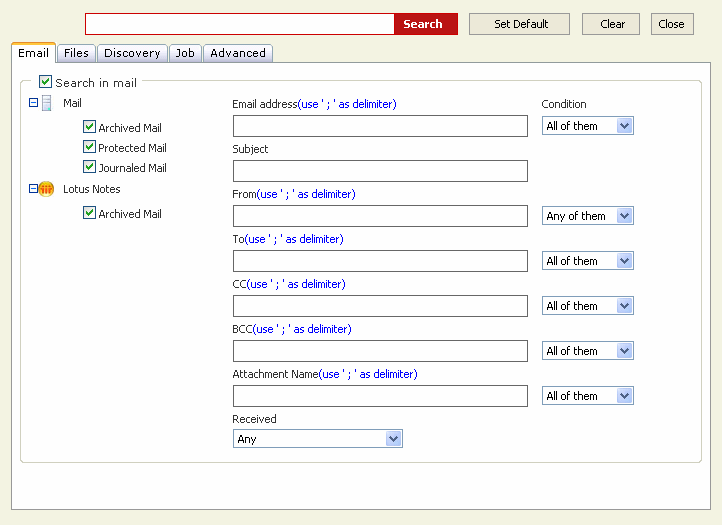
This option group specifies search criteria for e-mail data types.
Although the Search in mail criteria can all be used during the same
search operation, keep in mind that if your search criteria is too restrictive
then the search may not return any results.
NOTES
- When performing searches on TO, FROM, CC, or
BCC fields, you can either specify the entire mailbox display
name/alias name or you can use wildcards to search for partial mailbox
display names/alias names. When you specify the name with spaces in
between, make sure that you enter the name within quotes ("").
|
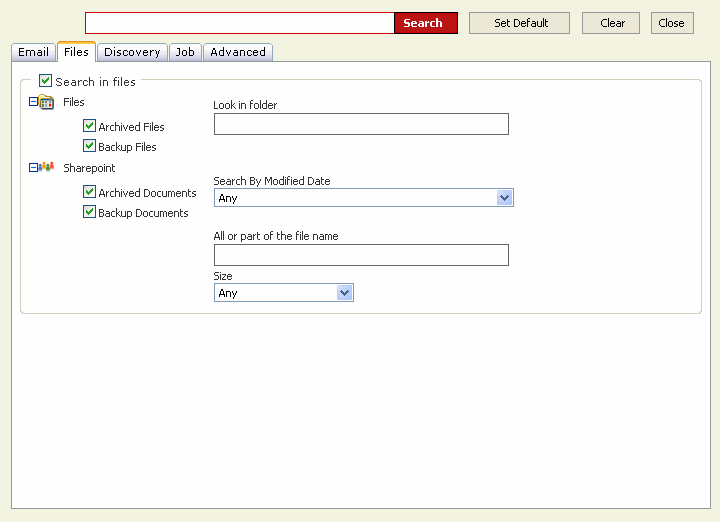
This option group specifies search criteria for file or document data
types.
Although the Search in Files criteria can all be used during the same
search operation, keep in mind that if your search criteria is too restrictive
then the search may not return any results.
|
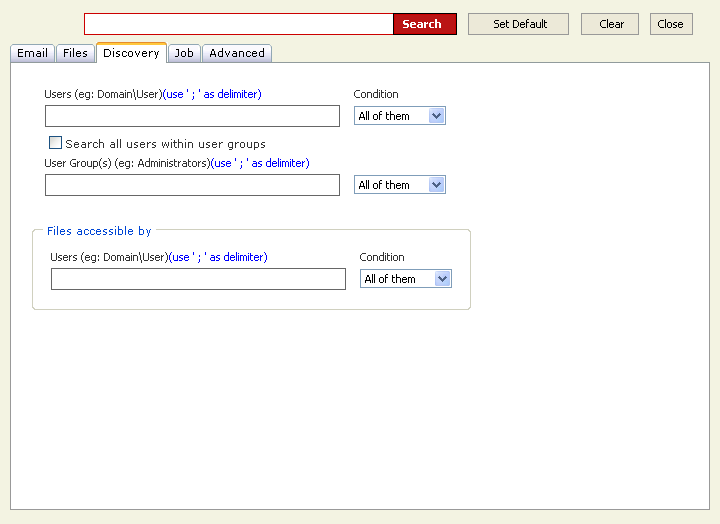
This option group allows to you select additional compliance search criteria
for Files and E-mails.
- You can narrow the search to files and/or messages owned by the
specified user(s) and/or user group(s). A drop-down list is provided
which allows you to specify whether to search only Files, Emails or
Both.
- Users - Use this space to narrow the search by specifying
one or more users who are owners of the data objects to be searched
(for example: Domain\User). If more than one User is entered, use
the semi-colon ';' to separate the additional entries. Optionally,
you can further refine searches for this field by selecting a
Condition from the corresponding list (All of them/Any of them/None
of them).
- Search all users within user groups - Specifies whether
to search data owned by all users within the User Group(s)
specified below.
- User Group(s) - Use this space to select one or more
User Groups in which to search (for example: Administrators). If
more than one User Group is entered, use the semi-colon ';' to separate
the additional entries. Optionally, you can further refine searches
for this field by selecting a Condition from the corresponding
list (All of them/Any of them/None of them).
- Files accessible by - Specifies whether to narrow the search
to files accessible by the specified user(s).
- Users - Use this space to narrow the search by specifying
one or more users who are owners of the files to be searched (for
example: Domain\User). If more than one User is entered, use the
semi-colon ';' to separate the additional entries. Optionally, you
can further refine searches for this field by selecting a Condition
from the corresponding list (All of them/Any of them/None of them).
|
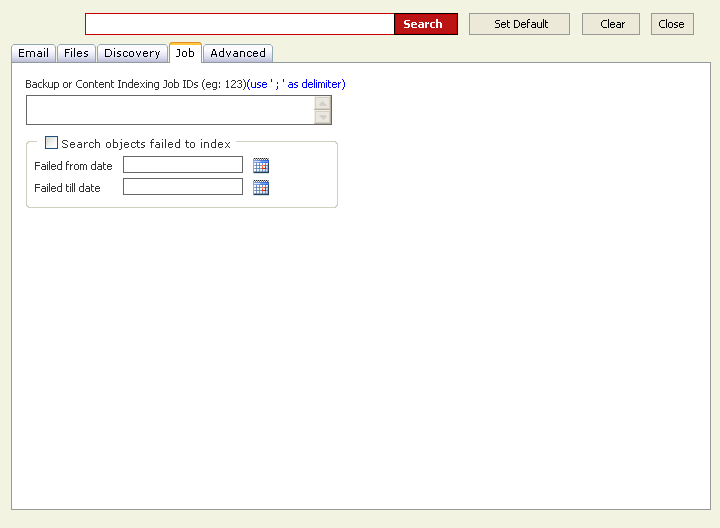
This option group allows you to perform a compliance search by Job ID
associated with Content Indexing jobs and/or Backup Jobs and search for
files that failed to Content Index.
Backup or Content Indexing Job IDs - Use this space to enter one
or more backup or content indexing Job IDs. If more than one Job ID is entered,
use the semi-colon ';' to separate the additional entries.
While searching for file server/desktop items using Job ID, the search
will display results based on the following conditions:
- If there are multiple online content indexing jobs for a sub client and
if the sub client content was not modified for all
these jobs, then the search will display results only for
the latest content indexing job.
- If you modify the sub client content and again perform a content
indexing job, the search will display results for the latest content
indexing job as well as for the last job that was performed before modifying
the sub client content.
Search objects failed to index
Select this option to perform a compliance search for data that failed
to be content indexed.
- Failed from date - Click the calendar icon for this field
to specify the starting date to search for data objects that failed
to be content indexed.
- Failed till date - Click the calendar icon for this field
to specify the ending date to search for data objects that failed to
be content indexed.
For an online content indexing operation, you can view the list of
successful/failed items from the CommCell Console and items that failed to
content index from the Search Console based on the following conditions:
- If there are multiple online content indexing jobs for a sub client and
if the sub client content was not modified for all these jobs, then you
can view the list of successfully content indexed items or failed
to content index items only for the latest job.
- If you modify the sub client content and once again perform an online
content indexing job, you can view the list of successfully content indexed
items or failed
to content index items for the latest job as well
as for the last job that was performed before modifying the sub client
content.
Note that you can only view the items that failed to content index
from the Search Console.
For related information on viewing content indexing results, see
View Content Indexing
Results.
|
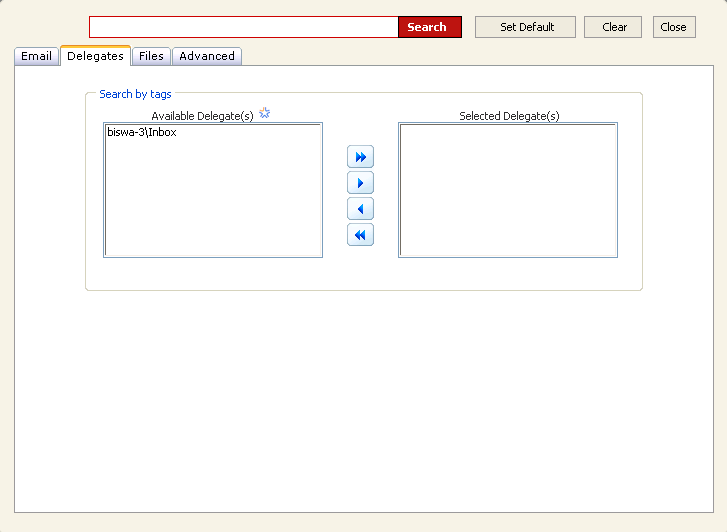
This option group allows end-users to search for Exchange emails on delegated
mailboxes.
- Available Delegate(s) - Lists the available delegate
mailboxes for the end-user.
- Selected Delegate(s) - Lists the delegate mailboxes selected
by the end-user to perform a search operation.
|

This option group allows you to search all versions or latest version
of the data, and to limit the search to the specified client(s).
- Client Computers - Specifies the clients on which the search
will be performed.
List boxes are provided to choose the clients from a list of available
clients.
- Select Version - Specifies whether to search all versions
or only the latest version of the files to be searched.
Options are
provided to Select All Versions or Select only latest version
If you select Select only latest version, note that the total
number of hit count displayed on top of the page may not match the actual
number of search items listed.
- Select Query Language - Select the language in which the
search will be performed.
|
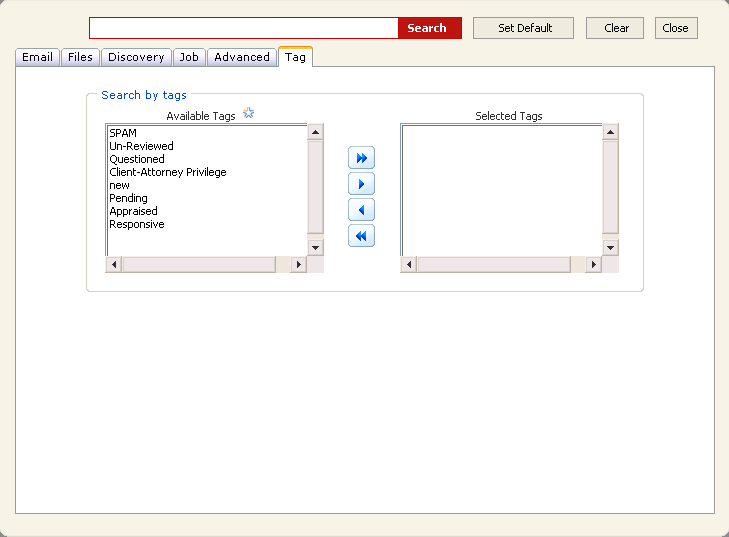
This option group allows you to perform a compliance search based on
the tags associated with the search items.
For related information, see Tagging.
|
The following option groups for Files, E-mails, and Advanced Options are available
from the left pane of the Search dialog in the CommCell Console:
The following search criteria are applicable for file or document data
types:
- Name/Pattern - Use this space to narrow the search to the
specified file name or wildcard pattern.
- Size - Use this space to narrow the search to the specified
file size or size range.
- Folder - Use this space and associated browse button to narrow
the search to the specified folder or directory.
- Modified Date - Use this space to narrow the search to files
with a specified modified date or date range.
Although the Files search criteria can all be used during the same search
operation, keep in mind that if your search criteria is too restrictive
then the search may not return any results.
|
The following search criteria are applicable for e-mail data types:
- Subject - Use this space to narrow the search to e-mails
with a subject line containing the specified text string or wildcard
pattern. This field allows you to search partial words without the need
for wildcard characters at the beginning and/or end of the search string.
- From - Use this space to narrow the search to e-mails that
were sent from the specified user.
- To - Use this space to narrow the search to e-mails that
were sent to the specified user. When searching Public Folder data using
this field, keep in mind that only e-mails posted to mail-enabled Public
Folders will be searchable. If you wish to search posts made to a Public
Folder, use the Subject or From fields instead.
- Cc - Use this space to narrow the search to e-mails that
were sent to the specified Carbon Copy (CC) recipients.
- Bcc - Use this space to narrow the search to e-mails that
were sent to the specified Blind Carbon Copy (BCC) recipients.
- Attachment - Use this space to narrow the search to e-mails
containing the specified attachment name.
- Email Addresses - Use this space to narrow the search to
the specified e-mail addresses using an Alias Name, Display Name, or
that are in Simple Mail Transfer Protocol (SMTP) format (for example:
user1@company.com;user2@company.com). If more than one e-mail address
is entered, use the semi-colon ';' to separate the additional entries.
- Received Time - Select an entry from the drop-down list to
narrow the search to e-mails received on the specified date or within
the specified date range according to date criteria (Any, Today, Yesterday,
This Week, This Month, This Year, Is, After, Before, Between); depending
on your selection additional date range fields may appear below the
Received Time field.
Although the E-mails search criteria can all be used during the same
search operation, keep in mind that if your search criteria is too restrictive
then the search may not return any results.
NOTES
- When performing searches on TO or FROM fields using
the Find dialog box for Exchange Mailbox-based agents, keep in
mind that alias name changes are not taken into account regardless of
where the search is being conducted from. Therefore, it is recommended
that you take alias names into consideration when searching at the mailbox
level and narrow the search only by SUBJECT, if necessary, leaving
the TO and FROM fields empty.
- When performing searches on TO, FROM, CC, or
BCC fields, you can either specify the entire mailbox display
name/alias name or you can use wildcards to search for partial mailbox
display names/alias names. When you specify the name with spaces in
between, make sure that you enter the name within quotes ("").
- When searching for content indexed e-mails, the Folder name and
Mailbox name fields do not get displayed in the search result.
|
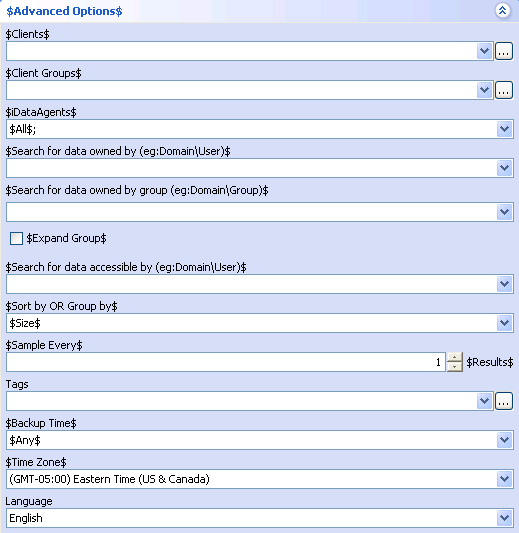
The following search criteria are generally applicable for all data types
(except where indicated), and are located in the left pane of the Search
dialog in the CommCell Console:
|
When you upgrade the CommServe to the current version, it is recommended that
you upgrade all the clients and content index the data using the current version
and then perform the search operation on the content indexed data. If for some reason
you do not wish to upgrade your clients or re-content index the data, you can continue
to Search the data that was already content indexed. See
Upgrade
Considerations for more information.
Note that, you can perform only a compliance search on SharePoint data that was
content indexed using a previous version.
You can view the list of file server/desktop items that were successfully content
indexed or failed to content index based on the following conditions:
- If there are multiple online content indexing jobs for a sub client and
if the sub client content was not modified for all these jobs, then you can
view the list of successfully content indexed items or failed items only for
the latest job.
- If you modify the sub client content and once again perform an online content
indexing job, you can view the list of successfully content indexed items or
failed items for the latest job as well as for the last job that was performed
before modifying the sub client content.
For step-by-step instructions to
view successfully content indexed items, see
View the Items that
Were Successfully Content Indexed. For step-by-step instructions to view
the list of items failed to content index, see
View the Items that Were Not Indexed During Content Indexing.
The following table lists the wildcards and operators that can be used along
with the search options:
| Wildcards and Operators |
Description |
Usage |
| * |
Denotes any number or text. |
A* - This will search for
any text starting with A. |
| ? |
Denotes a single number or character. |
A?B - Search for text starting
with A, ending with B and containing any character in between. For example,
AB, ACB, A2B. |
| "" |
Denotes a specific range of characters. |
"Hello" - Search for the
text containing "Hello". |
| AND |
Denotes the condition to include both the search
terms. |
A AND B - Search for data
containing both A and B. This is also accomplished by just typing A B. |
| OR |
Denotes the condition to include either of the
search terms. |
A OR B - Search for data
containing either A or B. |
| () |
Used along with a combination of AND and OR. |
(A OR B) AND (C OR D) -
Search for data that contains either (A,C) or (A,D) or (B,C) or (B,D).
(A B) OR C - Search for data containing
A and B or C.
|
| ; |
Used as a separator. |
A;B - Search for both A
and B. This is generally used when multiple terms need to be searched.
A OR B;C - Search for A and C or B and C.
A OR B;C D - Search for A, C, and D or
B,C, and D.
|
The limitations on wildcard usage are as follows:
- Words cannot contain any other special characters (only letters and numerals
are allowed).
- Empty space before and after wildcard characters are not allowed.
- Wildcards cannot match empty space or special characters. Although such
syntax may be accepted by a search query, it will not return the expected results.
- When wildcards are used at the beginning and ending of a character string,
the string must have at least 3 characters between the wildcards. Wildcard characters
separated by only 1 or 2 characters are not allowed.
- Search using wildcard characters without any text is not supported by the
software.
| |
If you would like to search for text strings that contain
the literal character for asterisk ( * ) or question mark ( ? ), then you
will need to put each of these special characters in double-quotes, as in
"*" and "?". For example, if you are searching for a question that someone
asked, such as 'Where is my data?' then you would need to enter the search
string as: Where is my data"?" |
The following section describes the various actions that can be performed from
the search console.
My Queries Actions
You can perform the following actions on the saved queries in the My Queries
page of the search console:
| Remove |
This action allows you to remove the selected saved query from the My
Queries page. |
To execute a saved query, click the query name.
Search Result Actions
You can perform the following actions on the search items in the search result
page of the search console:
| Select Page |
This option allows you to select all the search items in the current
page in the review set. |
| Select All |
This option allows you to select all the search items in the review
set. |
| Sort By |
This option allows you to sort the list of search items based on the
following:
- Relevance
- Size
- Url
- Modified Time
- Subject/Filename
You can also sort the list of search items alphabetically using the
 and
and
 buttons.
| |
The sorted results are not case sensitive and
therefore items starting with same alphabets but in different cases will
be displayed separately and not in a sequence. |
|
| Save Query |
This action allows you to save the query for the search items in the
My Queries page. On selecting this option, you will be prompted to enter
the query name and description. |
| Search within results |
This action allows to perform a search within the listed search result
items. |
| Add Selected Items to... |
You can use this option to move the selected search result items to
an already existing review set or to a new review set. On selecting New
Review Set..., you will be prompted to provide a name for the new review
set. |
| Hide Details |
This option allows you to hide the file details, such as file path,
size, client name, and modified time. |
| ...... |
This option displays an additional line of content for the specific
search result item. |
| Hide |
This option will hide the additional line of content for the specific
search result item. |
| View |
This option allows you to view the specific search result item that
was already restored to the job results directory in the web server from
a review set earlier. |
| Preview |
This options allows you to preview the specific search result item
on the same window prior to restoring to the web search server. |
| View in new window |
This options allows you to view the specific search result item on a
new window prior to restoring to the web search server. |
| Retrieve |
This action restores the selected search item to the job results
directory in the web server and makes the search item viewable. It will
also add the restored search item to the MyResults review set. You can also restore the selected search item using the Retrieve
button in review set page.
When using the Retrieve option from the search result page, note the
following:
- The Retrieve option is available in the search result page for
end users only.
- A maximum of 2000 search items can be retrieved from the search result
page at a time.
|
You can further filter the search results based on the Size in KB(hits),
Modified/Received time, File Type, Tags, and Keywords listed in the Refine Search
option in the left pane.
Downloads Actions
You can perform the following actions on the download items in the Downloads
page of the search console:
| Refresh |
This action allows you to refresh the Downloads page. |
| Delete All |
This action deletes all the downloads listed in the Downloads page.
To delete an individual download, click the
 icon for the specific download.
|
To open or save a download, click the download name or the
 icon.
icon.
You can perform the following actions on the search items in the review set page
of the search console:
| Select Page |
This option allows you to select all the search items in the current
page in the review set. |
| Select All |
This option allows you to select all the search items in the review
set. |
| Sort By |
This option allows you to sort the list of search items based on the
following:
You can also sort the list of search items alphabetically using the
and
buttons.
|
| Remove Items |
This action allows you to remove the selected search item from the review
set. |
| Delete review set |
This action allows you to delete the complete review set. |
| List media |
This action displays the media on which the search item was located.
From the list of media displayed, you can also pin a specific media for
an extended retention time using Pin Media option. To remove the
pin on the media, select Unpin Media.
|
| View Jobs |
This action displays the backup job details for the selected search
item. From the list of jobs displayed, you can pin specific jobs for an
extended retention time using the Pin Job option. To remove
the pin on the job, select Unpin Job.
|
| Retrieve |
This action restores the selected search item to the job results directory
in the web server and makes the search item viewable. The status of the
restore operation can be identified from the following icons displayed near
the selected search item:
 - Restore operation is complete and the search item is viewable.
 - Restore operation is in progress.
 - Restore operation failed.
For end users, you can also restore the selected search item using the Retrieve
button in the search result page.
Note that, a search item restored by a specific user is viewable to all
the other users.
|
| Save Review Set Summary |
This action allows you to save the review set summary a to any specified
location. By default, the review set summary is saved as an XML file. |
| Export Emails to PST |
This action allows you to restore the selected search item to a PST
file. |
| Export to CAB |
This action allows you to restore the selected search item to a ZIP
file. |
| Legal Hold |
This action allows you to move the selected search items to a new or
an existing Legal Hold. For more information, see
Legal Hold. |
| Manage Tag(s) |
This action displays the Manage Tag(s) window, which allows you to:
- Associate transient or Search tags to the selected search items.
In order to associate a search tag, you need to synchronize the associated
tags with the Content Indexing Server.
- Remove associated tags from the selected search items.
- Create a new tag and associate it with the selected search items.
For more information, see Tagging.
|
| Submit to ERM |
This action displays the Submit to ERM window, which allows you to
- Submit selected review set items to an ERM server through an
existing or new ERM Connector.
- Create a new ERM connector. On selecting the Create New ERM
Connector option, the Register New ERM window is
displayed, which allows you to create a new ERM Connector with an
existing or new ERM server.
For more information, see Enterprise
Records Management (ERM). |
| Submit Action |
This option applies the action selected from from the Actions...
drop-down box. |
| ...... |
This option displays an additional line of content for the
specific search item. |
| Hide |
This option will hide the additional line of content for the specific
search item. |
| Comments: [Add] |
This option allows you to add a new comment for the specific search
item in the review set. |
| Comments: [Review] |
This option allows you to edit the comment for the specific search item
in the review set. |
| Filter |
This option displays the Filter Review Set Items By: window,
which allows you to filter the search items within a review set based on
the following:
|
| Clear Filter |
This option removes all the filter selections in the Filter Review
Set Items By: window and lists all the search items in the review set. |
| Hide Filter |
This option will hide the Filter Review Set Items By: window. |
| Preview |
This options allows you to preview the specific search result item
on the same window prior to restoring to the web search server. |
| View in new window |
This options allows you to view the specific search result item on a
new window prior to restoring to the web search server. |
|
|
- Online Content Indexed data cannot be added to a Review Set.
- It is recommended to click the review set link on the tool bar to
refresh the page or the previous action is resubmitted if the function
key is used.
|
Legal Hold Actions
You can perform the following actions on the legally held items in the Legal
Hold page of the search console:
| Details |
This option displays the Legal Hold related details, such as Description,
Accessible Groups, Retention Policy, Default Retention, Extended Retention,
Size, etc. |
| Hide Details |
This option hides the Legal Hold details. |
| Sort By |
This option allows you to sort the list of legally held items based
on the following:
You can also sort the list of items alphabetically using the
and
buttons.
|
| Edit Legal Hold |
This action allows you to modify the description and extended retention
time for the specific Legal Hold. For step-by-step instructions, see
Modify a Legal hold. |
| Retrieve Legal Hold |
This action allows you to retrieve all the items in the Legal hold to
a new review set. On selecting this option, you will be prompted to enter
the review set name. For step-by-step instructions, see
Retrieve Legal Hold Data from Search Console. |
| Delete Legal Hold |
This action allows you to delete a Legal Hold. For step-by-step instructions,
see Delete a Legal Hold.
Warning: When you delete a Legal Hold, all the data associated with
the Legal Hold will become non-retrievable.
|
| Export to XML |
This action exports the Legal Hold information to an XML document. |
| View Failed Contents |
This action displays the list of items that failed to be legally held. |
| Move Failed Contents |
This action allows you to move the failed items in a legal hold to a
new review set. On selecting this option, you will be prompted to enter
the review set name. Once the failed items are moved to a review set, they
can be re-submitted once again to a Legal Hold. For step by-step instructions,
see Re-submit Failed
Contents to a Legal Hold. |
| View Contents |
This action allows you to view the list of legally held items in a Legal
Hold. This action is available from the failed contents page of the Legal
Hold. |
Consider the following prior to performing Data Discovery and Search operations:
- Clicking on a searchable column header in the search results display pane
of the Search dialog or Search Console will execute a new search to display
the data in the newly requested sort order. This also implies that if the search
results were sampled, a new sampling will be applied using the latest sort order
and the results may differ from the previously sampled search results.
- If you change the path of the URLs in the Client Properties (Search
Server Urls)
tab, which are used for accessing the end-user or compliance user Search Console
and/or the User Administration page, then you must manually update the corresponding
virtual directory path in the IIS Server. Likewise, if you change the path of
the URLs in the IIS Server which are used for accessing the end-user or compliance
user Search Console and/or the User Administration page, then you must manually
update the corresponding paths in the Client Properties (Search Server URLs) tab.
- When you search for emails sent to a specific user using the CommCell Console
or Search Console, note that the search operation does not return the emails
that was sent to the distribution group to which the user belongs. In such cases,
you need to search for emails sent to the user as well as emails sent to the
distribution group to which the user belongs. However, in the case of an end-user
search, if you search based on the email subject, all the emails with the specified
subject (including the emails sent to the distribution group to which the user
belongs) will be returned.
- When you access the Advanced Search options in the Search Console from a
Firefox browser, you will notice that the cursor indication is not displayed
for any of the textbox selections.
- When performing a search using the Search Console, if the search text begins
with the word "and" or "or", the search operation fails.
- Use
nDocCountUpdateIntervalMins
key to manage the frequency of Commserve updating the Content
Indexing Engine.
- A review set can contain a maximum of 50000 search items.
- If a review set contains large number of search items, the List Media
action will fail for any of the search items in the review set.
- If you include the $ symbol in any of the textboxes in the Advanced Search
window, the search operation fails.
- When downloading search items as CAB files, sometimes the file names containing
unicode characters may not get displayed correctly. However, the content of
the file will be correct.
- When performing a search from the CommCell Console, if you require to
search from a different Content Indexing Engine other than the default, you
can do so by setting the admin node URL in the
sDefaultFastServer registry key in the CommServe.
The following example scenarios illustrate how End-User Search and Compliance
Search capabilities can be used by companies and their employees to meet their mission-critical
objectives.
- A development manager was in the planning phase for a new feature called
Project Codename and needed to locate all e-mails and files relating to the
project that are within her rights to access. She used the Search dialog in
the CommCell to search for the word Codename.
The End-User Search returned the results she was looking for (pertinent e-mails,
project plan items, design documents, etc.) that she saved for later reference
during planning meetings.
- The SubPrime Corporation was involved in an ethics probe and a district
court placed the company under a legal duty to preserve and produce all relevant
documentation pertaining to the investigation. During testimony before the court,
a witness stated that he received an e-mail from the one of their subsidiary
lenders requesting a kickback (which is a type of bribe) for providing service
on high-risk loans. SubPrime's legal department met with the recovery administrator
to determine what steps they needed to take to comply with the court order.
The decision was made to retain all backup tapes from the past year, when the
bribe allegedly occurred, by taking these tapes out of the normal rotation cycle
which would otherwise cause them to be overwritten. The storage policies which
maintain the relevant media were re-configured for infinite retention, so that
the tapes would be preserved for the court.
Next, the legal department appointed a compliance officer to search through
e-mails from the past year to locate the particular e-mail where the kickback
was requested. Also, all files that were owned or accessible by the employee
accused of taking the bribe needed to be discovered and provided to the courts
for their review. Of particular interest were any spreadsheets listing amounts
paid to the subsidiary OffShore Lending Corporation. To prepare for the search,
the recovery administrator ran an offline content indexing operation on all
the backup tapes from the past year to generate the necessary content indexes
so that the data could be searched. An online content indexing operation of
the employee's desktop workstation was also performed so that any data not yet
backed up could be searched as well.
Once the online and offline content indexes were generated and made available
for searching, the compliance officer conducted the following searches to produce
the documentation requested by the court.
- Using the Search Console, the compliance officer entered the keyword
kickback in the search box, then narrowed
the search by specifying the following search criteria: FROM=Accounting@OffShoreLending.com,
TO=joeemployee@SubPrime.com, and
RECEIVE DATE=Between (From Time:
Jan 1, 2006 and To Time:
Dec 31, 2006). The initial search returned
no results. A second search was performed using a different keyword
kick back (which is a misspelled variation
of the original keyword), and this time the search results produced the
e-mail containing the alleged bribe request that the court was interested
in. The e-mail in the Search Results was saved to a Review Set, prepared
for viewing, then printed out for the court.
- Using the Search Console, the compliance officer entered the keyword
OffShore in the search box to find all e-mails
and files containing the name of the subsidiary. Additional search criteria
was entered to narrow the search for data objects within the specified time
range, which were owned or accessible by the accused employee. The search
returned hundreds of data objects (including e-mails, memos, and spreadsheets)
containing that keyword. The results were saved into a Review Set for later
review by the court. Additionally, the same exact search of the protected/archived
data was performed from the Search dialog in the CommCell Console which
yielded the identical set of protected/archived data objects allowing SubPrime
to prove to the court that the results were repeatable and that all the
documentation in question had been provided.
Thanks to the Compliance Search feature, the SubPrime Corporation averted
a legal disaster by quickly providing evidence to the court that vindicated
their case. The search results indicated that an e-mail had been sent from the
OffShore subsidiary to an employee in SubPrime requesting a kickback, but that
it was never acted upon as validated through the financial data in the spreadsheets.
As a result, SubPrime and Joe Employee were acquitted of any wrongdoing and
the company's reputation was saved.
Other Use Case Scenarios
The table below discusses few sample use case scenarios for search and provides
a comparison of how these search operations are performed in the Search Console
and in the CommCell console. Note that, you can access the Search Options
dialog box in the CommCell Console from any level (i.e. CommServe, Client,
iDataAgent, etc,.)
| Use Case |
Search Console |
CommCell Console |
| Find all emails received by user1 in the past
x days. |
Enable the Search in Emails section
in the Advanced Search page, and use the following options:
|
- Right-click the CommServe and select Search.
- Expand the Emails section in the Search Options dialog
box, and use the following options:
- To <user1>
- Received Time <After> and specify the date and time.
|
| Find all emails received by user1 between x
and y days. |
Enable the Search in Emails section
in the Advanced Search page, and use the following options:
- To <user1>
- Date <Between>
- Specify From date
- Specify To date
|
- Right-click the CommServe and select Search.
- Expand the Emails section in the Search Options dialog
box, and use the following options:
- To <user1>
- Received Time <Between>
- Specify From Time
- Specify To Time
|
| Find all emails received by user1 before y
days. |
Enable the Search in Emails section
in the Advanced Search page, and use the following options:
|
- Right-click the CommServe and select Search.
- Expand the Emails section in the Search Options dialog
box, and use the following options:
- To <user1>
- Received Time <Before> and specify the date and time.
|
| Find all emails received by user1 in the past
x days containing a specific word |
- Specify the word in the Search text box.
- Enable the Search in Emails section in the Advanced Search
page, and use the following options:
|
- Right-click the CommServe and select Search.
- Specify the word in the Search For text box.
- Expand the Emails section in the Search Options dialog
box, and use the following options:
- To <user1>
- Received Time <After> and specify the date and time.
|
| Find all documents belonging to User1 |
Go to the More options for Files/Emails
section in the Advanced Search page, and use the following options:
- Enable Search for Files owned by
- Enable Search for Emails owned by
- Users <domain\user>
|
- Right-click the CommServe and select Search.
- Expand the Advanced Options section in the Search Options
dialog box, and use the following options:
- Search for data owned by <domain\user>
|
| Find all communications between user1 and user2
in the past x days. |
Enable the Search in Emails section
in the Advanced Search page, and use the following options:
- From <user1 or user2>
- To <user1 or user2>
- Date <After>
|
- Right-click the CommServe and select Search.
- Expand the Emails section in the Search Options dialog
box, and use the following options:
- From <user1 or user2>
- To <user1 or user2>
- Received Time <After> and specify the date and time.
|
| Find all communications between user1 and user2
before y days. |
Enable the Search in Emails section
in the Advanced Search page, and use the following options:
- From <user1 or user2>
- To <user1 or user2>
- Date <Before>
|
- Right-click the CommServe and select Search.
- Expand the Emails section in the Search Options dialog
box, and use the following options:
- From <user1 or user2>
- To <user1 or user2>
- Received Time <Before> and specify the date and time.
|
| Find all communications between user1 and user2
between x and y days days. |
Enable the Search in Emails section
in the Advanced Search page, and use the following options:
- From <user1 or user2>
- To <user1 or user2>
- Date <Between>
- Specify From date
- Specify To date
|
- Right-click the CommServe and select Search.
- Expand the Emails section in the Search Options dialog
box, and use the following options:
- From <user1 or user2>
- To <user1 or user2>
- Received Time <Between>
- Specify From Time
- Specify To Time
|
| Find all emails received from user1 in the
past x days. |
Enable the Search in Emails section
in the Advanced Search page, and use the following options:
- From <user1>
- Date <After>
|
- Right-click the CommServe and select Search.
- Expand the Emails section in the Search Options dialog
box, and use the following options:
- From <user1>
- Received Time <After> and specify the date and time.
|
| Find all emails received from user1 between
x and y days. |
Enable the Search in Emails section
in the Advanced Search page, and use the following options:
- From <user1>
- Date <Between>
- Specify From date
- Specify To date
|
- Right-click the CommServe and select Search.
- Expand the Emails section in the Search Options dialog
box, and use the following options:
- From <user1>
- Received Time <Between>
- Specify From Time
- Specify To Time
|
| Find all emails received from user1 before
y days. |
Enable the Search in Emails section
in the Advanced Search page, and use the following options:
- From <user1>
- Date <Before>
|
- Right-click the CommServe and select Search.
- Expand the Emails section in the Search Options dialog
box, and use the following options:
- From <user1>
- Received Time <Before> and specify the date and time.
|
| Find all emails received between user1@outsidedomain.com
and user2@insidedomain.com |
Enable the Search in Emails section
in the Advanced Search page, and use the following options:
- From <user1@outsidedomain.com or user2@insidedomain.com>
- To <user1@outsidedomain.com or user2@insidedomain.com>
You can further filter the search based on the Date.
|
- Right-click the CommServe and select Search.
- Expand the Emails section in the Search Options dialog
box, and use the following options:
- From <user1@outsidedomain.com or user2@insidedomain.com>
- To <user1@outsidedomain.com or user2@insidedomain.com>
You can further filter the search based on the Received Time.
|
| Find all communications between outsidedomain.com
and insidedomain.com. |
Enable the Search in Emails section
in the Advanced Search page, and use the following options:
- From <outsidedomain.com or insidedomain.com>
- To <outsidedomain.com or insidedomain.com>
You can further filter the search based on the Date.
|
- Right-click the CommServe and select Search.
- Expand the Emails section in the Search Options dialog
box, and use the following options:
- From <outsidedomain.com or insidedomain.com>
- To <outsidedomain.com or insidedomain.com>
You can further filter the search based on the Received Time.
|
| Find all communications from user1 to user2. |
Enable the Search in Emails section
in the Advanced Search page, and use the following options:
You can further filter the search based on the Date.
|
- Right-click the CommServe and select Search.
- Expand the Emails section in the Search Options dialog
box, and use the following options:
You can further filter the search based on the Received Time.
|
| Find all communications sent to a distribution
list. |
Enable the Search in Emails section
in the Advanced Search page, and use the following options:
You can further filter the search based on the Date.
|
- Right-click the CommServe and select Search.
- Expand the Emails section in the Search Options dialog
box, and use the following options:
You can further filter the search based on the Received Time.
|
Back to Top