Base Client
When the CommServe is upgraded to the current release, the software will install a Base Client module containing the common set of binaries used by most CommCell components. This module will serve as a base for the rest of the CommCell components and should be the last CommCell module to be uninstalled from the system.
CommServe
The CommServe Database Engine will be upgraded to Microsoft SQL Server 2005 database instance with the appropriate service pack during the CommServe software upgrade.
(See System Requirements - CommServe for more information.)
As this impacts CommServe, CommNet Server and/or SRM Server, it is important to perform the upgrade of CommServe(s), CommNet Server(s) or SRM Server(s) in your environment when ALL of them can be upgraded to the current release. This will prevent any software conflicts.
MediaAgent Version
MediaAgent(s) support backward compatibility in order to phase out the upgrade process in the CommCell. Note the following in the case of such MediaAgents:
- All Clients attached to such MediaAgent must be of the same version or lower version. For example, clients with the software version 8.0.0 cannot use a MediaAgent with software version 7.0.0.
- New MediaAgent features available in the current version will not be available until the MediaAgent is upgraded to the current software version. Additionally, some existing features may not function as expected when the CommServe is upgraded.
-
When one of the MediaAgent associated with the Deduplication solution is upgraded to current version, then all the other MediaAgents in that storage policy copy, MediaAgents associated with the data path as well as the Deduplication Store, must be upgraded.
Client Version
Clients with software version 6.1.0 and 7.0.0 are supported after the upgrade. Note the following in such cases:
- Make sure all clients are in version 6.1.0 or above before performing the upgrade.
- New features for a client available in the current version will not be functioning until the client is upgraded to the current software version. Additionally, some existing features may not function as expected when the CommServe is upgraded to the current release.
- The following Agents are not backward compatible, and must be upgraded
as soon as the CommServe is upgraded:
- QuickRecovery Agent
- Recovery Director
- 1-Touch Server for Windows. See Upgrade the 1-Touch Server Software - Windows for more information.
- Web Search Server
-
If the CommServe software is upgraded to a new software release, any deconfigured clients from up to two prior releases will be automatically upgraded to the same software release. Thus, if a deconfigured client must be reinstalled, it will need to be reinstalled using the installation package for the same software release as the CommServe.
In cases where the deconfigured client is three or more releases older than the current release, the DBUpgrade utility can be used to upgrade the deconfigured client to the current software release. (See Tools and Utilities for more information on this utility.) However, the software will only be upgraded if there are fewer than 50 deconfigured clients in the CommCell. If more than 50 clients in the CommCell are deconfigured, the deconfigured clients will not be upgraded.
Note several issues have been identified when the CommCell is operated with mixed versions. See Backward Compatibility Issues for more information.
Operating Systems / Application Versions No Longer Supported
Before performing an upgrade, make sure to check the System Requirements to see if the operating system/application version is supported in the current release. If the operating system/application version is not supported ensure that the operating system/application is upgraded to a supported version.
Merge Impact of File Archiver for Windows/File Share Archiver Agents
In the current release, the File Archiver for Windows Agent and File Share Archiver Agent have merged into one File Archiver for Windows Agent with enhanced capabilities of archiving and recovering files from both Windows file systems and NAS file servers. Details regarding the changes are provided below.
Agent Name
After upgrading the File Share Archiver Agent, the corresponding icon name in the CommCell Browser will change from File Share Archiver to File Archiver. There is no icon name change when upgrading the File Archiver for Windows Agent, therefore the name in the CommCell Browser will remain as File Archiver.
Instances
The agent has been restructured in the CommCell Browser to include an Instance icon below the agent, and above the archive set, corresponding to the type of data or configuration that was used in the prior release. The new instance types that are created automatically during upgrade are briefly described below.
- If the agent was previously configured for archiving and recovery of Windows file system data, then the upgrade process will automatically create the Local File System Instance type below the agent. The previous property settings in the default archive set and subclients below the Instance will be preserved.
- If the agent was previously configured for Proxy Stub Subclient support to archive and recover data residing on a Celerra file server, then the upgrade process will automatically create the Celerra Instance type below the agent. The previous property settings in the default archive set and subclients below the Instance will be preserved.
- If the agent was previously configured for FPolicy Subclient support to archive and recover data residing on a NetApp filer, then the upgrade process will automatically create the FPolicy Instance type below the agent. The previous property settings in the default archive set and subclients below the Instance will be preserved.
- If the agent was previously configured for archiving and recovery of NAS data residing on any supported file server, which was not configured for Proxy Stub Subclient or FPolicy Subclient support, then the upgrade process will automatically create the Network File Share Instance type below the agent. The previous property settings in the default archive set and subclients below the instance will be preserved.
- The Celerra proxy subclients deleted prior to upgrade would be visible as active instances after the upgrade.
- After upgrading the File Archiver for Windows Agent to this release, previous Celerra restore operations are now associated with the Local File System instance. This is because 7.0 File Archiver subclient content was assigned to either a Local Migration or a Celerra subclient.
- The FPolicy subclients deleted prior to upgrade would be visible as active instances after the upgrade.
- After upgrading the File Share Archiver Agent to this release, previous FPolicy restore operations are now associated with the Network File Share instance. This is because 7.0 File Share Archiver subclient content was assigned to either a NAS or an FPolicy subclient.
- After upgrading the File Share Archiver from 7.0 to 8.0, the filer name of the first content path in the File Share Archiver subclient will be used as the filer name of the corresponding 8.0 Network File Share instance. If the 7.0 subclient has more than one folder path in the content, they will all be preserved after upgrade. The 8.0 GUI does not allow the user to add data to the subclient content that does not reside on the filer indicated by the filer name of the Network File Share instance. If the user would like to add data residing on a different filer, a new Network File Share instance must be created with that filer name.
- If multiple non- FPolicy NAS subclients existed regardless whether they resided on the same filer, they will be bundled into a single Network File Share instance after upgrading the File Share Archiver from 6.1 or 7.0 to 8.0. It is recommended to create new Network File Share instances pointing to different filer after the upgrade.
- Upgrading a File Archiver agent from 7.0 to 8.0 that has only Celerra subclients, will create a Local File System instance. If archive or recovery schedules exist for Celerra subclients, similar schedules will also be created for Local File System. The Local File System instance thus created can be deleted if desired.
Licensing
There have been no license naming changes for any of the previously supported DataArchiver configurations. The only difference is that the license is consumed at the point of Instance creation, instead of being consumed during installation.
Configuration Settings
All previously configured property settings in the CommCell Browser will be preserved after the upgrade, therefore there is no need to re-configure or re-apply these settings after upgrading the agent. For example, the archiving rules, authentication credentials, pre/post processes, filters, security, etc. will be seamlessly ported forward to the new agent design.
Functionality
General CommCell functionality will remain the same for the agent after the upgrade. For example, archive and recovery operations, job management features such as Job History, Reports, Alerts, Schedules, etc. will seamlessly support the new agent design without the need to re-establish any configuration settings.
Run a New Index
Immediately after upgrading to the current release, we strongly recommend that you Start a Migration Archiving Operation that Creates a New Index for all subclients. This is because a single recovery operation cannot recover both the previous release's data and new data of the current release.
Recovery Operations
- Data archived by the agent in a previous release can be recovered by the File Archiver for Windows Agent in the current release. However, data archived by the File Archiver for Windows Agent in the current release cannot be recovered to an agent from the previous release.
- If you want to recover data from a previous release, while browsing the data you need to specify a point in time before you upgraded to the current release. See Browse Data Before a Specified Time for details.
Backward Compatibility
After an upgrade from 7.0.0 to 8.0.0, the File Share Archiver client would be able to perform recall on stubs created post and before the upgrade.Scripts
After upgrading, it is recommended to create new scripts for Network File Share and FPolicy subclients. See Command Line Interface - Save a Job as a Script for more information.
Merge Impact of SharePoint Database/SharePoint Document iDataAgents
In the current release, the SharePoint Database iDataAgent and SharePoint Document iDataAgent have merged into one SharePoint Server iDataAgent.
Default Backup Sets
In the previous release, only one default backup set was created. It was named defaultBackupSet. In this release, two default backup sets are created. One is Documents, the other is Databases.
- The Databases backup set has the same functionality as the SharePoint Database iDataAgent did in the previous release.
- The defaultBackupSet of the 7.0 SharePoint Document iDataAgent will be renamed to Documents in this release and it remains as the default backup set. If defaultBackupSet was renamed before upgrading, then that name will remain the same and it becomes the default backup set after upgrading.
See Backup Sets - Microsoft SharePoint Server iDataAgent for more information.
Run a Full Backup
- Immediately after upgrading to the current release, run a Full Backup for all subclients of the Databases backup set. This is because a single restore operation cannot restore both the previous release's data and new data of the current release.
Restore Operations
- Restoring data from the current release to a SharePoint Server client of the previous release is not supported.
- If you want to restore data of a previous release, while browsing the data you need to specify a point in time before you upgraded to the current release. See Browse Data Before a Specified Time for details.
Site Collections
In the previous release, the number of site collections that were shown as being backed up in the Backup Job Details, Job History, etc. were erroneously doubled. After upgrading, this has been resolved and the correct number is displayed.
Scripts
After upgrading, it is recommended to regenerate your Save as scripts due to backup set and agent name changes. See Command Line Interface - Save a Job as a Script for more information.
Clustered Environments
Upgrades from version 7.0.0 to 8.0.0
- When upgrading the software on the physical node in a clustered environment, the upgrade program enables to upgrade the software on the remaining physical nodes of the cluster.
- All physical installations in a cluster must be upgraded. When a physical node is upgraded, all the virtual installations associated with that instance is automatically upgraded.
Upgrades from version 6.1.0 to 8.0.0
A cluster should be upgraded in its entirety - all physical and virtual installations must be upgraded.
- On Windows, upgrade the physical nodes prior to upgrading the virtual server. Similarly upgrade the active node first before upgrading the passive nodes.
- On NetWare, you must upgrade all the physical nodes prior to upgrading the virtual servers.
- Upgrade the active node first and then upgrade all the passive nodes. The upgrade program will identify the physical node if it is present and prompt you to identify the name of the physical node during the upgrade process.
Collation Settings in SQL Database used for the CommServe Database Engine
If the SQL database was manually installed before installing the CommServe software (instead of automatic installation by the CommServe install program) you must check the SQL Collation Settings for the CommServ, master and tempdb database settings to verify that the Collation Settings are the same. This can be done as follows:
The Collation name displays collation settings.
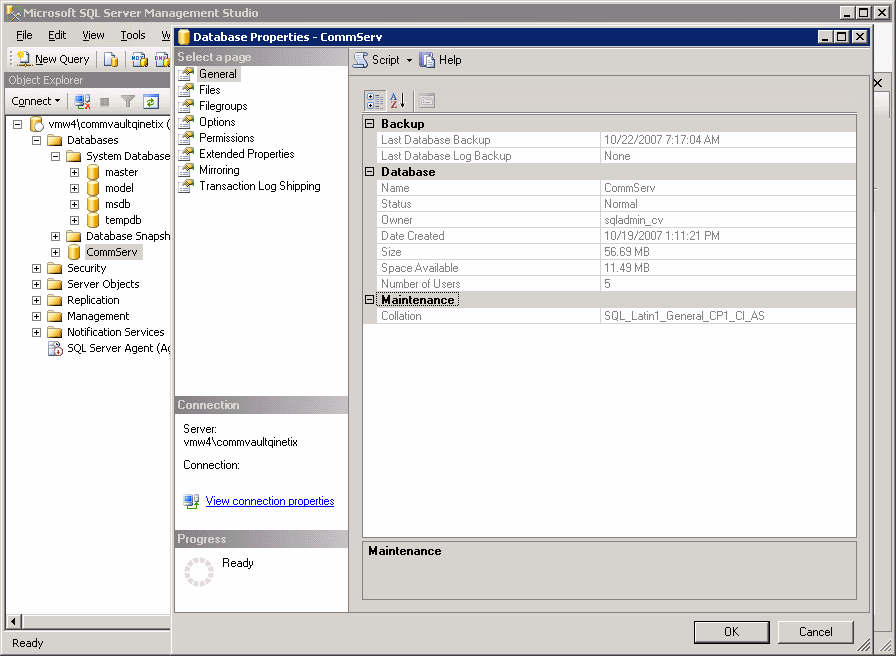
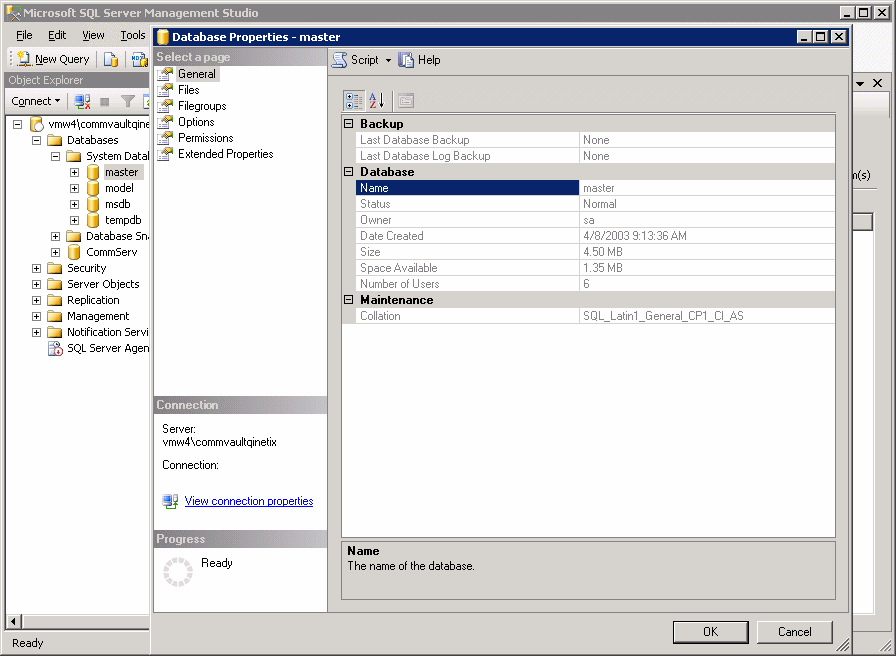
If the Collation Settings are not the same, perform the following steps to correct the Collation Settings:
Make sure that the Collation setting are appropriately selected, as follows:
- If the master and tempdb databases do not have the collation setting as SQL_Latin1_General_CP1_CI_AS, select Dictionary order, case-insensitive, for use with 1252 Character set in the SQL Collations list.
Java Runtime Environment (JRE)
Consideration for Java Runtime Environment (JRE):
The software can function with JRE version 1.6.x or higher.
If a JRE version 1.6.0_06 or higher is available, the software will use the existing JRE software.
If JRE version 1.6.0_05 or lower is available, or no JRE version is available at all, you will be prompted to install JRE version 1.6.0_06
You can run CommCell Console as a Remote Web-Based Application without installing the software provided IIS is installed and running on the CommServe computer (or CommCell Console and IIS are running on an alternate computer). However, you must manually install JRE in this case. When running the applet Java� Runtime Environment (JRE) SE v1.6.0_06 is recommended - can be installed from the software installation disc.
- If you have created or copied shortcuts for the CommCell Console on your desktop or Start menu, you should delete them and re-copy the new shortcut which is created during the upgrade.
Content Indexing
General Considerations for Content Indexing
To take advantage of the new features, it is recommended to upgrade the Web Server along with the CommServe upgrade.
- Many of the new features require the latest version of the Content Indexing Engine profile, Contact Professional Service for replacing the old index profile.
- Ensure that to have a license for the new features on the CommServe. See License Requirements for more information on these licenses.
- Replace to the latest version of the Content Indexing profile, involves re-content index the data (see Re-Content Index for more information), including data that was secured before the upgrade. This will allow you to seamlessly perform searches on all your data.
| For tagging and delegate search, ensure that to have a latest version of Content Indexing Engine profile. |
Exchange Compliance Archiver
Find and Retrieve operation schedules created in the previous release will carry over to this release. However, since this type of content indexing is now considered a legacy feature, new data will not be indexed once the CommServe has been upgraded. Therefore, when these scheduled jobs run, no new data will be found. It is recommended that you delete those schedules and create new Search and Retrieve schedules in the current release. For more information, see Schedule a Search and Restore Operation.
MediaAgent Upgrade
If you are using the Content Indexing feature in the 6.1 version, prior to upgrading the MediaAgent, make sure that you copy the following files from the base folder of the software install location to a temporary location in your local disk:
- CTCV_API.DLL
- CTContentEngine.INI
- ExcludeWord.lst
Once you have completed the MediaAgent upgrade, copy back the files to the base folder in the software install location. This is required to search and retrieve data that was content indexed using the previous version.
Note that these files are also available in the Maintenance Advantage Web site; if necessary, you can download these files and copy them to the base folder in the software install location after the upgrade.
GxCmd Commands are no longer supported as of this release
Use Qcommand instant. See Command Line Interface for more information.
Considerations for Upgrading 32-bit CommServe on a Microsoft Windows x64 Platform
Enterprise Version
The CommServe is now supported on Windows x64 platforms. See System Requirements - CommServe for more information.
The CommServe must be upgraded with the Windows x64 binaries - See Upgrade the 32-bit Components installed on Microsoft Windows x64 Platform for step by step instruction. (Upgrade to a 32-bit CommServe is not supported.)
Express Version
The CommServe on a x64 platform can be upgraded and will continue to use the 32-bit version of the software. Use Disc 1 from the Software Installation Disc for Express version to perform this upgrade.
Rebuilding a client using Media Explorer after an Upgrade
It is not recommended to rebuild your client with Media Explorer after an upgrade, using backups created in the previous release. Run a full backup after the upgrade if you intend to use Media Explorer to rebuild a client.
Performing Upgrades Using Terminal Server
When using Terminal Server to perform an upgrade, use a UNC path to initiate the Setup.exe for the upgrade program. For example:
Start > Run > <computer_where_software_installation_disc_resides>\<sharename>\Setup.exe
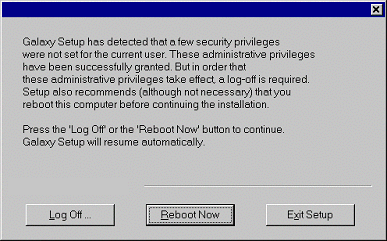
Reboot or Log Off Requirements
During the course of the upgrade, you may be asked to reboot or log off the computer. The following section describes each of these prompts and suitable action that must be taken in each situation:
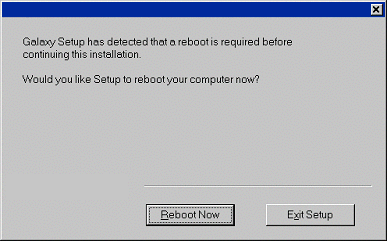
Reboot Now
If this option is displayed without the Skip Reboot option, the upgrade program has found files required by the software that are in use and need to be replaced. Perform the following steps:
- Click Restart Now to restart the computer.
- When the computer restarts, use the same user account to log on to the computer.
The upgrade program will automatically resume when you log back on.
Log Off
If this option is displayed without the Reboot Now option, the upgrade program may have assigned the required rights that are necessary for performing the upgrade, to your account. Log off and log back on using the same user account. The upgrade program will automatically resume.
The following rights are necessary for performing the upgrade:
- Right to increase quotas
- Right to act as part of the operating system
- Right to replace a process level token

Logoff with Reboot Now
If Logoff option is displayed with the Reboot Now option, the upgrade program may have assigned the required rights that are necessary for performing the upgrade, to your account and also found files that need to be replaced.
It is recommended that you reboot the computer at this point. The upgrade program will automatically resume after the reboot.
License Changes
When you upgrade the software, there are certain feature licenses that must be obtained after the upgrade. The following sections describes these licenses.
Patch Requirements on Solaris
With the product enhancements in the current version, there are now Solaris operating system patch dependencies that need to be met in order for Solaris components to function and operate properly.
For your convenience, the necessary patches have been included in the installation disc for UNIX platforms. You will also be prompted to install these patches when you install or upgrade the Solaris components. The following table lists these patches based on the Solaris version.
| Solaris 2.6 | Solaris 2.7 | Solaris 2.8 | Solaris 2.9 |
| 107733-10 | 106950-21 | 108434-17 | 111711-11 |
| 105591-20 | 106327-23 | 108435-17 | 111712-11 |
| 106300-24 | 109147-30 |
Note that some older third party applications may have dependency problems with these patches, which may cause the applications to not operate properly. It is recommended that you check with your third party application provider to make sure that the installation of these Solaris patches are compatible with your existing applications prior to their installation.
Information about the Solaris patches can be found at the following site:
http://www.sun.com/bigadmin/patches
Components Renamed in this Version
- The Load balance (Spill and fill) between Data Paths option has been renamed as Round Robin between Data Paths in the Data Paths tab of the Copy Properties dialog box. The underlying functionality of this option remains the same.
- The Commserver Recovery Tool has been renamed as CommServe Disaster Recovery Tool. The underlying functionality of this tool remains the same.
Restore Operations May Fail With an Error Message
The following error message will be displayed:
FsIndexRestore log shows that Connection to the CommServ database failed. [Microsoft][ODBC SQL Server Driver][Shared Memory]SSL Security error [Microsoft][ODBC SQL Server Driver][Shared Memory]ConnectionOpen (SECDoClientHandshake()).
To resolve this problem, use the steps outlined in the following knowledge base article published in the Microsoft web site:
http://support.microsoft.com/kb/309398
Automatic Copy
In this release, Automatic Copy is no longer a storage policy copy property. Automatic Copy is now a scheduling option when initiating auxiliary copy job operations. If selected, auxiliary copy operations are automatically preformed every 30 minutes to copy data that needs to be copied on the primary copy (source). During upgrade, those storage policy copies enabled with the automatic copy option will now have corresponding Automatic Copy default schedules. For more information, see Automatic Copy.
Active Directory iDataAgent
- To upgrade Active Directory iDataAgent you now require specific user privileges. Before upgrading, review User Privileges for more information.
Exchange Mailbox iDataAgent and Exchange Mailbox Archiver Agent
- After upgrading the Exchange Mailbox iDataAgent you must perform a full backup to ensure that alias name enhancements are updated in the CommServe database.
- After upgrading the Exchange Mailbox Archiver Agent you must perform a migration archiving operation that creates a new index to ensure that alias name enhancements are updated in the CommServe database.
-
If you want to preserve the functionality of the sMigFolder_subclientname registry key after upgrading the Exchange Mailbox Archiver Agent, then you must transfer the value for the key into the Subclient Properties (Archiving Rules) tab for each respective subclient. For more information, see Archiving Specific Root-Level Mailbox Folders.
DataArchiver Outlook Add-In
-
We strongly recommend upgrading the Outlook Add-In, and any agents that support it, to the same release version as the CommServe. Otherwise, the Outlook Add-In functionality will be limited or unavailable. For more information, see Backward Compatibility - DataArchiver Outlook Add-In.
Data Classification Enabler
-
Data Classification Enabler installed using the installer software can be upgraded using the upgrade software. For Data Classification Enablers installed using an MSI package (Remote Installs - MSI Packages Using Active Directory Group Policies), uninstall the previous version and install the current version.
NAS NDMP iDataAgents
- Every MediaAgent within a storage policy used by NAS subclients must be on the same version of the software, which must be a MediaAgent Version supported with this release of the CommServe software.
-
In previous releases of the software, the NDMP Remote Server software included the capabilities of the File System NDMP Restore Enabler. Upgrading the MediaAgent software from a previous release will upgrade the NRS software, removing the ability to restore NAS NDMP data to a Windows computer. Install the File System NDMP Restore Enabler to restore this capability.
Post-Upgrade Service Pack Requirements
After upgrading the CommCell verify and if necessary apply the following:
- Any Service Packs that may have been released for this version of the software.
- Any post Service Pack hot fixes. Such hot fixes are available on the Maintenance Advantage web site.
Sending the Disaster Recovery Backup Data to Customer Support
In order to protect and validate data in the CommServe database, a recent copy of the Disaster Recovery Backup is required to be posted to a FTP site.
Disaster Recovery Backups are saved in the CommServe DR folder. The CommServe DR folder can be viewed from the CommCell Console, using the DR Backup dialog box available from the Control Panel. Each Disaster Recovery Backup has a distinct folder containing the Disaster Recovery Backup files. All the files available in the folder containing the most recent Disaster Recovery backup must be posted to the FTP site.
The following sections describe three different ways to upload the disaster recovery backup to the FTP site.
Using Internet Explorer
- Zip the folder containing the latest Disaster Recovery data.
- Display Internet Explorer 5.x (IE5).
- Ensure that IE is set to passive mode as shown below.
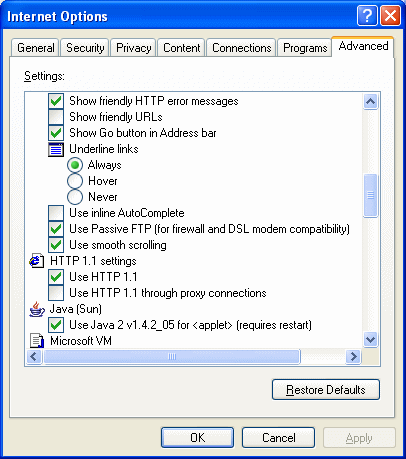
- Type the following address in the address bar:
ftp://qnftp01.commvault.com/<CommCell ID>
where
<CommCell ID> is the 5 character CommCell Identifier. (All CAPS)
- From the File menu, click Login As.
- Enter the following login ID and password:
Login: ccust01
Password: qu1ckR5f
This will display the incoming/<CommCell ID> folder.
- Drag and drop the Zip file containing the latest Disaster Recovery Backup to the site and notify support.
From the Command Line
- Navigate to the folder containing the zipped file and then type the following:
ftp qnftp01.commvault.com
For USER type: ccust01
For PASSWORD type: qu1ckR5f
- After successful login, type the following:
quote pasv
The following message will be displayed:
227 Entering Passive Mode (208,253,164,61,46,91)
- Navigate to the CommCell ID folder using the cd command. For example: cd F8888, assuming that the CommCell ID is F88888. Note that these folders are hidden folders and therefore you will not be able to see them.
- Type bin to converts to binary mode.
- Copy the Zip file containing the latest Disaster Recovery Backup using the
following command:
put <zip_filename>
From an FTP Client Utility
Historically, most FTP clients default to passive mode.
- Point the client to qnftp01.commvault.com.
Set login= ccust01
Set passwd= qu1ckR5f
- Set the initial folder to point to the incoming/CommCell ID folder. (i.e., set the initial folder to incoming/F8888)
- Set the client for binary mode transfers.
- Upload the Zip file containing latest Disaster Recovery Backup.