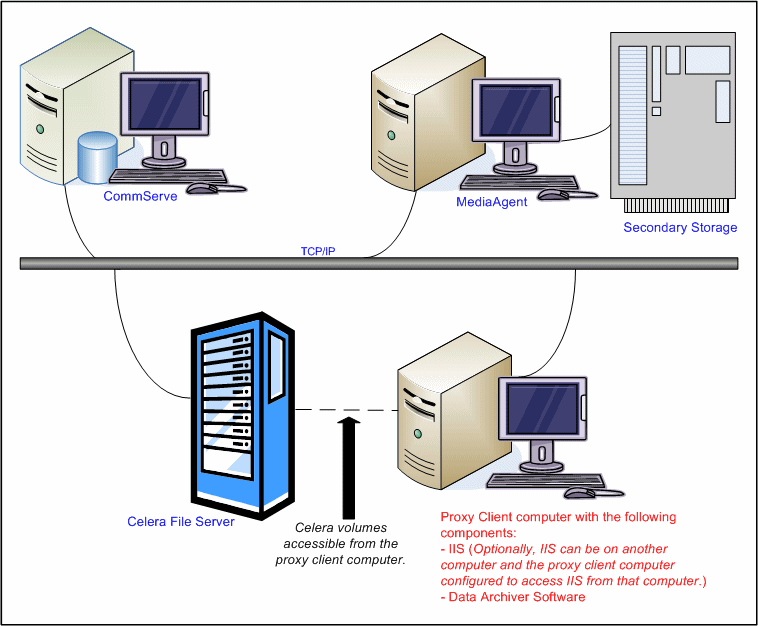
The diagram on the right depicts a typical configuration for this feature.
Topics | How To | Related Topics
Moving Celerra Proxy Stub Folder to a New Location
Moving Celerra Stubs to a New Filer
|
The Celerra Proxy Stub Subclient feature allows the File Archiver for Windows Agent to archive and recover data residing on an EMC Celerra File Server. A specially configured subclient of the File Archiver
for Windows Agent, referred to as a Celerra Proxy Stub Subclient, serves as a proxy to conduct recalls of archived data from the EMC Celerra File Server.
The diagram on the right depicts a typical configuration for this feature.
|
|
Consider the following before you begin using this feature:
Plan an archive and recover strategy as follows:
To understand the archiving rules available with the software see Migration Archiving - File Archiver for Windows Agent.
Verify that the computer in which you wish to install the software satisfies the minimum requirements specified in System Requirements - File Archiver for Windows Agent.
The Celerra Proxy Stub Subclient feature requires the following license:
DataArchiver for Files - Network Storage for the capability of File Archiver for Windows to archive and recover data residing EMC Celerra File Server. One license is consumed when a Celerra instance is created. Additional Celerra instances share this license.
For more information on File Archiver for Windows licenses, see License Requirement.
The user account must have read and write permissions on the CIFS share and exported to the network storage file server/proxy. The user account must also have admin access to filer and read/write access to the Windows registry on the proxy computer.
No additional software is required to configure the Celerra Proxy Stub Subclient. Ensure that the File Archiver for Windows Agent is installed on the Proxy Client computer.
For more information on installing the File Archiver for Windows Agent see Deployment - File Archiver For Windows Agent.
The following section provides the high-level steps for configuring the IIS Server, EMC Celerra File Server, creating a Celerra instance and configuring the Celerra Proxy Stub Subclient for archiving and recovery of data residing on an EMC Celerra File Server:
See Configure the IIS Server for Celerra Proxy Stub Subclient Support for step-by-step instructions.
See Configure the EMC Celerra File Server for Celerra Proxy Stub Subclient Support for step-by-step instructions.
See Create/Modify a Celerra Instance for step-by-step instructions.
See Celerra Proxy Stub Subclient for step-by-step instructions.
See also, Considerations for Creating the Celerra Proxy Stub Subclient.
See Configure Proxy Authentication Credentials for step-by-step instructions.
See Configure Celerra Proxy Settings for step-by-step instructions.
After installing and configuring the required components, data is ready for archiving and recovery.
The recovery administrator can schedule migration archiving jobs, similar to scheduling backup jobs for iDataAgents. To ensure that only successfully archived files will be changed into stubs, the migration archiving operation is divided into two phases: archiving and stubbing.
Refer to Migration Archiving for more information on archiving.
File Archiver for Windows provides two ways to recover an archived file: by accessing the file with an Open operation (e.g., opening a stub in an application, double-clicking a stub in Windows Explorer) or from the CommCell Console (stand-alone application).
Refer to Recover Archived Data for more information on Recovery operations.
For Celerra recall to work properly the Celerra folder needs to be added to the Sophos exclusion folder list in case the Sophos antivirus is installed on the File Archiver Agent platform.
| When Celerra stubs are recalled, Celerra filer does not replace Security Access Control List if it has been changed on the stubs. |
For Local File Systems and Celerra instances, a hidden folder (GXHSMCACHE) is created on each volume you are monitoring for stub recovery. The purpose of this folder is to provide a temporary location to open a recovered stub file. When the stub recovery is completed, the file will be deleted from the hidden folder.
When the volume where the proxy stub folder resides runs out of space, user can move the proxy stub folder to a new location in another volume where more space is available.
Follow the procedure given below to move the Celerra proxy stub folder to a new location:
Follow the procedure given below to move the Celerra stubs from an existing Celerra filer to
a new Celerra filer where the stubs can be properly recalled.
Best practices guidelines include the following:
For http path:
For File Archiver for Windows on Celerra, file names cannot be longer than 242 bytes. While archiving Celerra Proxy subclient it is required to have file name within 242 bytes as Windows has a 260 byte limitation on file names.
Troubleshooting tips for this feature include the following:
Consider the following prior to configuring and using this feature:
\\file_server1\dir1
\\file_server1\dir2
Note that the depiction of content in the above example varies by File Server and operating system.
User-defined subclient: Subclient-Directory-1
Content:
\\file_server1\dir1
Distributing the client data using subclients in this way can help improve archiving performance by balancing the processing load into logical groupings.
For example, suppose the dirl folder contains a subdirectory called Temp Files that you do not want archived. You can add a subclient filter for the user-defined subclient Subclient-Directory-1 to exclude the Temp Files subdirectory from being scanned for archiving. For more information, see Filters.
For example, the asterisk (*) wildcard can be used in the Exclude these files/folders/patterns field when filtering data using subclient-level archive filters to exclude file patterns and folders/directories from being scanned for archiving. For example:
This feature is configured on a Celerra file server and allows the grouping of file systems and CIFS servers into virtual containers. Each VDM has all the required data to support one or more CIFS servers and their file systems.
The VDM servers store their dynamic configuration information in a configuration file system. A VDM can be loaded and unloaded, moved from Data Mover to Data Mover, or imitated to a remote Data Mover as an independent unit.
Refer to the section on Define a Connection between the EMC Celerra Data Mover and the ProxyHost for a command line example, to set up connection between VDM and proxy host.