The procedure on this page describes the steps involved in upgrading
a CommCell component in a non-Microsoft Clustered environment.
This
procedure covers upgrade for both VERITAS and HP Scalable NAS/PolyServe
Clustered environments. See
Clustering
Support - Support for more information on component supported on
these platforms.
If multiple components are installed on a computer, then ensure that all
applicable components are selected for upgrade. In such a situation, the upgrade
sequence may vary. Refer to the appropriate procedures for upgrade
requirements and steps specific to the component.
If you are upgrading the software from 7.0.0 to
9.0.0
The upgrade can be initiated from any one of the physical nodes. When
a physical node is upgraded, all the virtual installations associated
with that instance are automatically upgraded. (Virtual nodes need not be
upgraded separately.)
When the software is upgraded on a physical node, the upgrade
program facilitates the upgrade of the remaining physical nodes in
the cluster by displaying a list of all the available physical
nodes. You can select the appropriate nodes in which the software
must be upgraded. See the Windows File System
iDataAgent - to upgrade in Physical Node.
The following table provides a list of supported upgrade paths for
the current
software version. If the
version currently installed on your computer is not listed here, contact
your software provider for more information.
Verify that no jobs are in progress or scheduled to occur while the
software is being upgraded on the client. If jobs are scheduled, either
perform the upgrade at another time or disable all jobs in the client using
the Activity Control tab from the Client Computer Properties
dialog box in the CommCell Console. Once the upgrade is completed, you can enable the jobs from this dialog box.
Verify that the CommServe computer is accessible.
Verify the following services are running on the CommServe:
CommServe Services.
BullCalypso SQL Server Service for the
instance.
Close all applications and disable any programs that run automatically,
including antivirus, screen savers and system utilities. Some programs,
including antivirus software, may be running as a service. Stop and disable
all non-essential services before you begin. You can re-enable them after
the upgrade.
Verify that all applications (CommCell Console, Service
Control Manager) are
closed.
The files and folders associated with CommCell components should not
be opened by other applications (for example, Windows Explorer, FTP, etc.) on this
computer or from other computers during the upgrade.
Verify that you have the
Software
Installation Disc that is appropriate to the destination computer�s
operating system.
Cluster Specific
Verify or ensure that
bIgnoreClusterVMCheck
registry key with a value of 1 is
available on the node in which the upgrade is performed.
Choose the language you want to use during installation.
Click the down arrow and select the desired language from the drop-down list, and click Next to continue.
2.
Select the option to install software.
NOTES
This screen will only appear when the
bAllow32BitInstallOn64Bit registry key has been created and
enabled on this computer.
3.
Select the option to install software on this computer.
NOTES
The options that appear on this screen depend on the computer in which
the software is being installed.
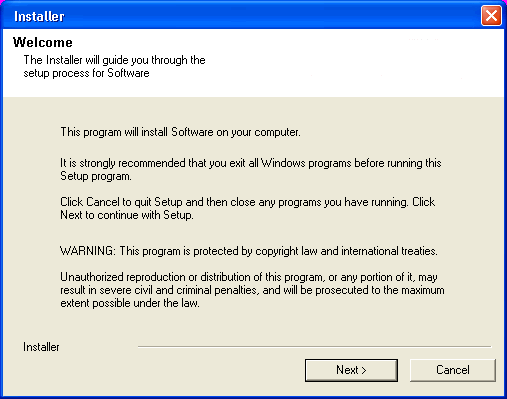
4.
Read the Welcome screen.
Click Next to continue, if no other applications are
running.
5.
Read the virus scanning software warning.
Click OK to continue, if virus scanning software is disabled.
6.
Read the license agreement, then select I accept the terms
in the license agreement.
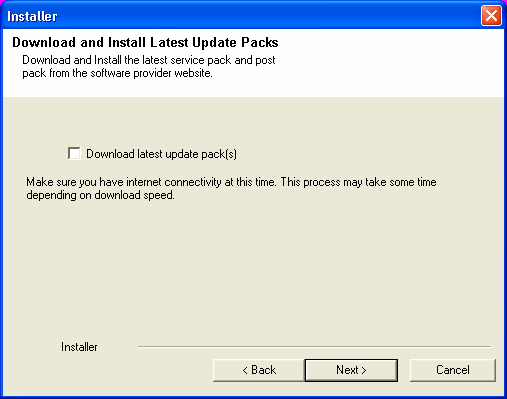
Select Download Pack(s) and Install to download and install the latest service packs and post packs from the software provider.
NOTES
Internet connectivity is required to download updates.
Updates are downloaded to the following directory:
<software installation>/Base/Temp/DownloadedPacks.
The downloaded updates are automatically installed after the upgrade.
Click Next to continue.
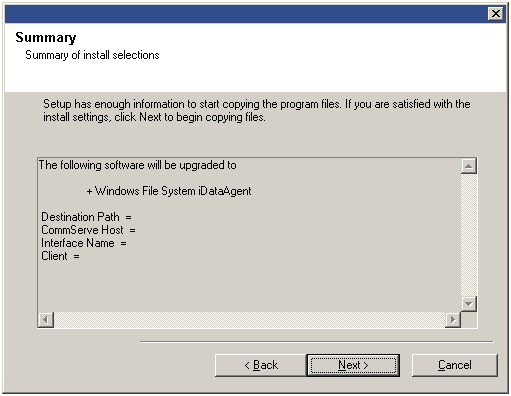
13.
Verify the summary and Click Next to continue.
NOTES
The Summary on your screen will reflect the components installed on
the computer, and may look different from
the example shown.
The upgrade program now starts the upgrade process.
This step may take several minutes to complete.
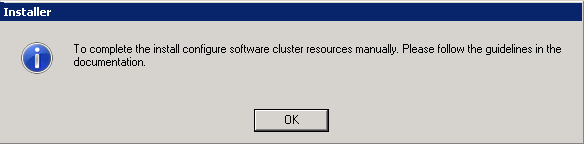
14.
Click OK and manually configure the cluster resources.
NOTES
For more information on configuring the cluster resources, see
the following:
Review the Post-Upgrade Considerations specific to the components
that were upgraded using this procedure. (See
Upgrade Considerations for a list of
all Upgrade procedures.)
General
Install post-release updates or Service Packs that may have been released
after the release of the software. When you are installing a Service Pack,
ensure that it is the same version as the one installed in the CommServe Server.
Alternatively, you can enable
Automatic Updates for quick and easy installation
of updates in the CommCell component.
If Activity Control was disabled on the client prior to the
upgrade, enable it after the upgrade using the Activity Control tab
from the Client Computer Properties dialog box in the CommCell
Console.
Cluster
If the passive node was not available while installing/upgrading the software, you
must manually install/upgrade the software on the passive node now.
(See Manually Upgrading
the Software on a Passive Node
for step-by-step instructions.)
By default, a failure of MediaAgent or Agent software on the active node
in a Windows, Veritas, or HP Scalable NAS/PolyServe Cluster will not cause a failover to
be initiated. For information on how to change this default behavior, see
Clustering
Support - Failovers.
You may have to update the cluster plug-in resource with the new
service names.
To uninstall, start, and stop windows services on a local computer,
use the instsvc utility. For more
information, see List of Tools and Utilities.
In case of VERITAS Cluster you must manually install/upgrade the
software on all the available Nodes.
For installs/upgrades on the VERITAS Cluster, complete the following
procedures for the agent. These procedures can be completed using the
VERITAS Cluster Administrator.
Create the Cluster Resources for Services
Once the physical nodes and the virtual machine are installed/upgraded,
services should be added as generic services. Also, you may want to
designate the services as "critical" if you want to cause the virtual
machine to fail over if the associated service stops.
In Windows Services, locate the services for each installed/upgraded
cluster (e.g., Bull Calypso Cluster Plugin (penodevn1_netwo) (instance001))
right-click and select Properties, and locate the service name in
the General tab (e.g., GxClusPlugin
(penodevn1_netwo) (Instance001))
The service name is case- and space-sensitive, so record it exactly as it appears.
In Cluster Administrator, navigate to the appropriate Cluster
group. Create a generic service resource for the cluster plugin
service.
If you want an automatic failover to occur, mark the resource as
Critical and Enabled.
Repeat this procedure for each client installed on the cluster.
Create Service Dependencies
In Cluster Administrator, click Resources.
Click Link and make
the Cluster plugin
resource dependent upon the Mount resource and the Lanman service.
Associate Services with the Current Active Node
In Cluster Administrator, navigate to the appropriate
GenericService group.
Right-click the cluster plugin resource. From the short-cut
menu, click Online and the name of the current active node.
Important Considerations
Windows File System:
Backups of local physical node volumes from virtual nodes are not
recommended. Set the virtual node default subclient content to the shared disk
resource(s) instead of using auto detection (/), or create a subclient to use
for backups with the shared disk resource(s).
Image Level
For Non-Microsoft cluster, create the file
<JobResults Directory>\CVClusterVolumes.txt with a list of drives
in it. For example, the file can contain "D: E: F:".
For installs/upgrades on the HP Scalable NAS/PolyServe Cluster, complete the
following procedures for the agent.
Create and Use Scripts to Administer Virtual Machine Services
You should create and use three scripts to administer virtual machine
services:
Probe script is used to reveal the state of the specified
services. This is done using the GxSCMCmd.exe utility.
Start script is used to start services.
Stop script is used to stop services.
Create a probe script to have the status of both the
Bull Calypso Communications
Service (GxCVD) and the
Bull Calypso Event Manager
Service (GxEvMgrC) checked. In the probe script, include the
GxSCMCmd.exe utility by name in the appropriate command. (This
utility is available from the Resource Pack. See
Tools and Utilities for more information.) Create a folder (e.g.,
m:\GxSCMCmd) on a shared disk that the virtual host you created
has access to. Copy the
GxSCMCmd.exe utility and the
script files you created (probe.bat, start.bat,
stop.bat) to this folder. The utility will return the state of
the specified services: '0' if the services are running or '1' if
services are stopped. For an error condition, '-1' is returned. Note
that the service name includes the name of the client and the name of
the instance. To avoid error in providing the vhost name and instance
name in the path of scripts, copy the key name from here:
HKEY_LOCAL_MACHINE\SYSTEM\CurrentControlSet\Services\GXClusPlugIn
(vhostname) (Instance00x)
These examples provide sample script names, locations and virtual host name as
suggested names not requirements.
The command syntax is:
GxSCMCmd.exe -IsRunning <list of service name>
For example, your probe script (e.g., m:\GxSCMCmd\gxprobe.bat) may appear as follows:
Be sure to copy the GxSCMCmd.exe utility to the shared disk resource. Also, be sure
to include the probe script on the shared disk.
The stop and start scripts must also contain the registry entry for
the virtual machine service names. Your start script (e.g.,
m:\GxSCMCmd\gxstart.bat) may appear as
follows:
Add the custom service monitor to the virtual host configuration in
the PolyServe Matrix Server console.
Ensure that the virtual host name
<virtualpolyserve> is online.
From the Services MMC snap-in, verify or manually start the
cluster plugin service, "Bull Calypso
Cluster Plugin
(virtualpolyserve)
(Instance00x)",
on the active primary node for the Vhost
virtualpolyserve
From the PolyServe Matrix Server, click the
Virtual Hosts tab.
Right click Virtual Host <virtualpolyserve>
and then Add Service Monitor.
For the Monitor Type field in the Add Service Monitor dialog box, click
CUSTOM.
Assign a name to the service monitor by typing the name in the
Name field.
In the User probe script field, type the path to the probe script that
calls the GxSCMCmd.exe command (on the share disk)
Click Advanced.
From the Advanced Service Configuration dialog box, click the Scripts tab.
In the Script pathname: Start field, type the path to the start script
(shared disk). In the corresponding Timeout (seconds) field, type a timeout value greater than 60
seconds.
In the Script pathname: Stop field, type the path to the stop script
(shared disk). In the corresponding Timeout (seconds) field, type a timeout value greater than 60
seconds.
Click OK once, then again.
The monitor should now start, and the primary node should now be
active. Failover will occur if services are disabled on the primary
node, and services in such a case will move to a secondary node.