Offline backups can be performed when the database is in offline or online mode.
If the database is online, it shuts down the database, performs the backup and then
brings up the database back.
From the CommCell Browser, navigate to <Client> |
Oracle.
Right-click the <Instance> and click All Tasks
| New Subclient.
In the Subclient Name box, type a name.
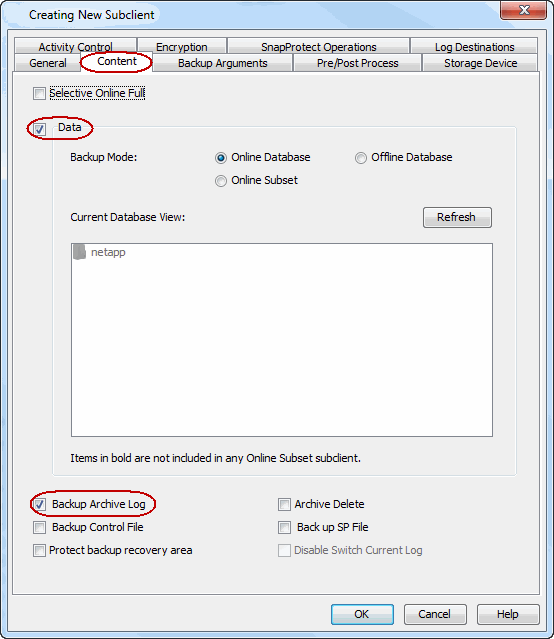
Click the Content tab.
Select the Offline Database checkbox.
Click the Storage Device tab.
In the Data Storage Policy box, select a storage policy name.
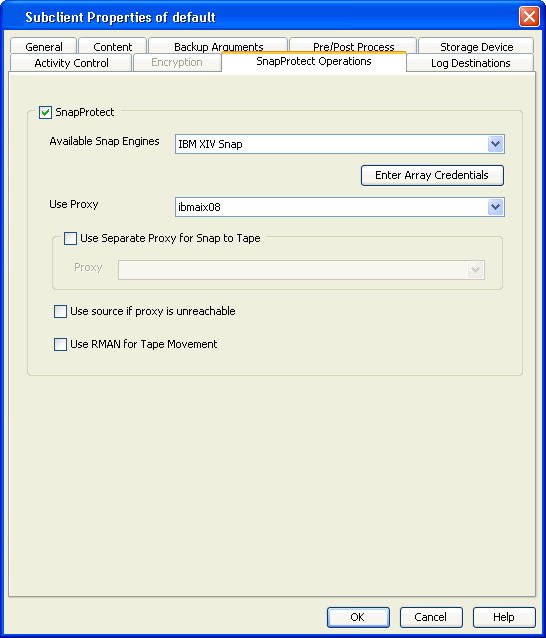
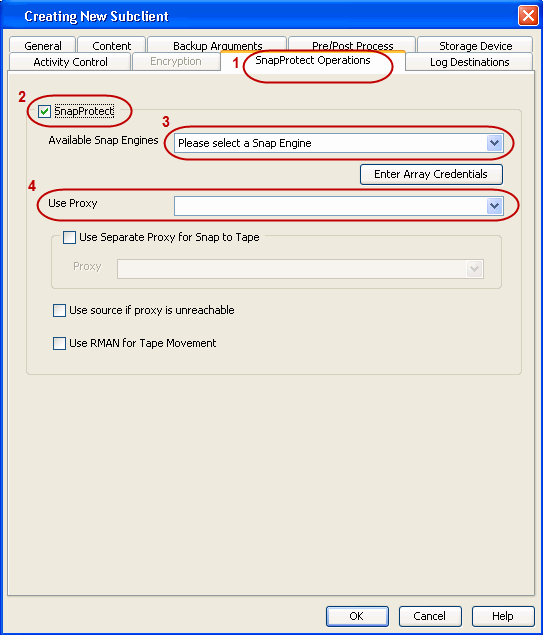
Click the SnapProtect Operations tab.
Click SnapProtect to enable SnapProtect backup for the selected
subclient.
Select the storage array from the Available Snap Engine
drop-down list.
From the Use Proxy list, select the MediaAgent where SnapProtect
and backup copy operations will be performed.
When performing SnapProtect backup using proxy, ensure that the operating
system of the proxy server is either same or higher version than the client
computer.
Once you perform a SnapProtect backup, perform a log backup. You will need
to create a separate subclient for log backups. By default, the system will use
data storage policy for SnapProtect backups and backup copy. If you create a
log specific subclient, the log specific storage policy is used for SnapProtect
backups and backup copies.
Use the following steps to configure log backups.
From the CommCell Browser, navigate to <Client> |
Oracle.
Right-click the <Instance> and click All Tasks
| New Subclient.
In the Subclient Name box, type a name.
Click the Content tab.
Click to clear the Data checkbox.
Select the Backup Archive Log checkbox.
If you have multiple log locations, click Log Destinations tab.
You can customize the pruning of archive logs after the backup using RMAN
Scripts. If applicable, you will also need to specify the connect target string
and connect string for a recover catalog for a full RMAN script.
File System Movement to Tape
RMAN will not know which archive logs have been backed up for file system
movement to tape. Hence, we need to prune all the backed up archive logs. Use
the following command to prune the logs for file system movement to tape:
connect
target sys/****@oracledb
connect
catalog catuser/****@catalog
DELETE
NOPROMPT ARCHIVELOG ALL COMPLETED BEFORE ‘SYSDATE-XX’
rman cmdfile</path/to/rman.script>
Example:
connect
target sys/syspw@oracledb
connect
catalog catuser/syspw@catalog
DELETE
NOPROMPT ARCHIVELOG ALL COMPLETED BEFORE ‘SYSDATE-2’
rman cmdfile</path/to/rman.script>
If you run the command in the above example, RMAN will
remove all archive logs on the disk that are older than 2 days.
RMAN Movement to Tape
You can use the same command used for file system movement to tape to prune
all archive logs. In addition, you can also use the following command to delete
the archive logs that have been backed up multiple times, if you are saving
multiple copies of archive logs to optimize your database recovery:
connect
target sys/****@oracledb
connect
catalog catuser/****@catalog
DELETE
NOPROMPT ARCHIVELOG ALL BACKED UP XX TIMES TO DEVICE TYPE sbt;
rman cmdfile</path/to/rman.script>
Example:
connect
target sys/****@oracledb
connect
catalog catuser/****@catalog
DELETE
NOPROMPT ARCHIVELOG ALL BACKED UP 2 TIMES TO DEVICE TYPE sbt;
rman cmdfile</path/to/rman.script>
If you run the command in the above example, RMAN will
remove all archive logs that have been backed up at least 2 times to device type
‘sbt’.
Selective Online Full backup is a full backup taken when Oracle database is
online, and the backup data is copied to a selective copy (during an auxiliary
copy operation) from which it can be restored.
From the CommCell Browser, navigate to <Client> |
Oracle.
Right-click the <Instance> and click All Tasks | New Subclient.
In the Subclient Name box, type a name.
Click the Content tab.
Select the Selective Online Full checkbox.
A message indicating that you need to use a separate Storage Policy for
Selective Online Full backups is displayed. Click OK.
Click the Storage Device tab.
In the Data Storage Policy box, select a storage policy name.
Click the SnapProtect Operations tab.
Click SnapProtect to enable SnapProtect backup for the selected
subclient.
Select the storage array from the Available Snap Engine drop-down list.
From the Use Proxy list, select the MediaAgent where SnapProtect
and backup copy operations will be performed.
When performing SnapProtect backup using proxy, ensure that the operating
system of the proxy server is either same or higher version than the client
computer.
If Oracle home of ASM instance and RDBMS instance are different, then make
sure to separately configure ASM instance on the CommCell Console in
additions to RDBMS instance.
Make
sure that the kfed utility resides under <Oracle ASM Home>/bin location. If
the kfed utility do not exist, then build the kfed utility as shown in the
following example:
cd <Oracle ASM Home>/rdbms/lib
make –f ins_rdbms.mk ikfed
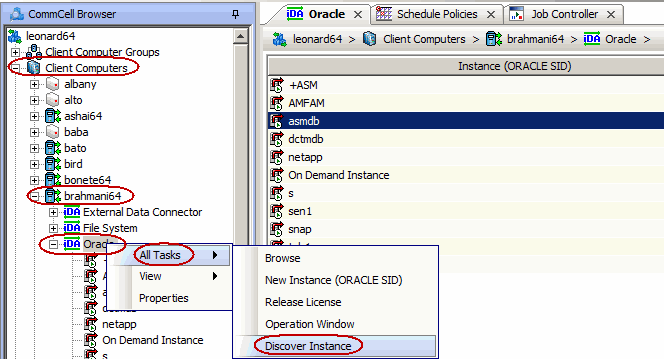
Ensure that the ASM disk string is not empty. Use the following steps to
configure the ASM instance:
From the CommCell Browser, navigate to Client Computers | <Client>.
Right-click Oracle, point to All Tasks and then
click Discover Instance.
Click Yes.
If your +ASM instance and RDBMS instance is
not discovered automatically, you may have to manually add the
instance.
From the CommCell Browser, navigate to Client Computers |< Client
>.
Right-click Oracle,pointto All Tasks, and
then click New Instance (ORACLE SID).
In the Instance (ORACLE SID) box, type the Instance
name.
In the User Account box, type thelogin credentials to access the
Oracle client.
In the ORACLE HOME box, type the Oracle application install path.
In the Storage Policy used for the data of default subclient
box,
select a storage policy name.
Click the Storage Device tab.
In the Storage Policy used for user command backup of data
box,
select a storage policy.
Click the Log Backup tab.
In the Storage Policy used for all Archive Log backups box,
select a storage policy name.
Click OK.
Click the Details tab.
In the Connect String box, type the credentials to access the
Oracle database.
For example,
sys/pwd12@orcl4.
Click the Storage Device
tab.
In the Storage Policy used for user command backup of data box,
select a storage policy.
In the Storage Policy used for all Archive Log backups box,
select a storage policy name.
Click OK. You can now create a subclient and perform SnapProtect
jobs.
The following steps are performed automatically when you perform a SnapProtect
backup:
The database is placed in a quiesced state.
A snapshot is created for data volumes.
The database is placed in a unquiesced state.
The snapshot is mounted on source and cataloging of datafiles is
performed from
mounted snapshot.
The snapshot is created for log volumes
The snapshot is mounted on source and cataloging is performed for mounted log files.
Cataloging is performed to verify whether all the datafiles are properly
captured during a SnapProtect backup. RMAN catalog datafilecopy will check the
datafile header and verify its authenticity before cataloging it.
Use the following steps to disable the cataloging operation:
From the CommCell Browser, navigate to Client Computers.
Right-click the <Client>, and then click Properties.
Download the
update_sc.xml file and save it on the computer from where
the command will be executed.
Execute the following command from the <Software_Installation_Directory>/Base
folder after substituting the parameter values.
If you select
RMAN for backup copy, you should install the Oracle
iDataAgent and the oracle instance
configured in CommCell browser should be identical to the instance in the source
computer.
The following table displays all the
parameters you can use with the commands mentioned in the above sections. To add
a parameter to
your command, use the following syntax: (A example is provided at the end
of the table.)
qoperation execute -af <template XML file> -<parameter
name> <value>
Parameter
Description of Parameter
Values
clientName
Name of the client computer, as displayed in the
CommCell Browser
instanceName
Name of the oracle instance
subclientName
Name of the Subclient used for
SnapProtect operations
storagePolicyName
Name of the storage policy used for
SnapProtect
operations
isSnapBackupEnabled (true/false)
To enable/disable a SnapProtect backup
snapShotEngineName
To define the engine to be used for a SnapProtect backup
snapToTapeProxyToUseSource (true/false)
To enable/disable using source if proxy is unreachable
snapToTapeProxyToUse clientName="client_name"
To define proxy client to be used of backup copy operations.
isRMANEnableForTapeMovement(true/false)
To enable/disable using RMAN for backup copy
Examples
The following example shows how to add a parameter for a command:
Enabling SnapProtect Backup
Enable SnapProtect backup for instance name under client brahmani64.
You can perform a SnapProtect backup for Oracle when the database is on a NFS
Volume. However, you will require a root access in the storage device's NFS configuration
to be able to read and write on the accessible Oracle files
i.e., the host on which the NFS Volume is mounted.
You can also perform SnapProtect backups for Oracle if the database resides
on a Direct NFS volume. SnapProtect backups supports volumes using the Oracle
Direct NFS (dNFS) protocol.
File level reverts can also be performed when the database is on a NFS volume
by using the
sUSE_FILE_LEVEL_REVERT
registry key. Do not perform the file level revert when the database resides on
a NFS with regular LUNs.
Consider the following while performing a SnapProtect backup for data or
databases that reside on a NFS Volume:
The export name on the storage device should be the same as the storage path on
the storage device.
E.g., if the storage path of the storage device is
/vol/Volume/Qtree, use
/vol/Volume/Qtree as the export name and not an alias such as
/ExportName.
You can use the exports both at the root of a NetApp volume and at
subdirectory levels below the root of the volume.
Make sure that the storage device is accessible from the source and proxy machine
(even if they exist in different domains) using the storage device's short name while
mounting NFS exports from the storage device. Make sure to enter the storage
device credentials using its short name. Do not use an IP address or the
fully qualified domain name.
E.g., use a short name for the server such as
server1 or server2.
You can perform SnapProtect operations for a single node Oracle RAC setup. When configuring the Oracle RAC components for
a SnapProtect
backup, ensure the following:
The Oracle instance should be configured on one of the physical nodes for
the Oracle RAC Agent.
If the data and archive logs do not reside on a shared location,
create a user-defined subclient for the archive logs and run a backup
using RMAN. The original subclient should only include the data volume
in order to perform a SnapProtect backup.
The Use RMAN for Tape Movement option is selected during the
subclient configuration if you plan to backup the archive logs.
The ASM Oracle Database should be located on a ASM disk group, and the
underlying disks should be snap-able.
You must select a physical client and a RAC instance under such physical
client for scheduling SnapProtect operations. It is recommended to configure
the RMAN catalog prior to performing a SnapProtect backup.
Use the following steps to configure a RAC instance for SnapProtect
operations using a single node:
From the CommCell Browser, navigate to Client Computers | <RAC
Physical Client>.
Right-click the <Oracle Agent>, point to All
Tasks and then click New Instance (Oracle SID).
In the Instance (ORACLE SID) box, type the RAC Instance
name.
In the ORACLE USER box, type the user account name for
RAC Instance.
In the ORACLE HOME box, type the Oracle home path for
RAC instance. Alternatively, you can click Browse to
select the location.
Select the Storage Policy for the data of a default
subclient from the list.
Click the Details Tab.
In the Connect String box, type the Connect String (SYS login):
<sys>/<syspassword>@<Oracle service>
Example: sys/password1@racdb1
In the TNS_ADMIN Folder box, type the TNS ADMIN folder
name. Alternatively, click Browse to select the location.
Click the Storage Device tab.
In the Storage Policy used for user command backup of data
box, select a storage policy.
Click the Log Backup tab.
In the Storage Policy used for all Archive Log backups
box, select a storage policy name.
Click OK.
Make sure that the kfed utility resides under the following
location:
<Oracle ASM Home>/bin
If the kfed utility do not exist, build the kfed utility as shown
in the example:
cd <Oracle ASM
Home>/rdbms/lib
make –f ins_rdbms.mk ikfed
You must configure an ASM
instance since Oracle RAC SnapProtect operations support only ASM
instances (In case of a first node, it is +ASM1).
When you perform a SnapProtect backup for online databases, ensure you also backup
the archive logs. The archive log destination should be shared among all RAC
instances. If the log destination is not shared among all RAC instances, you
need to separately schedule the archive log backups using a user-defined
subclient.
When you backup archive logs, you can specify the location
(archive log destinations) from where log backups should be performed.
Oracle RAC database will be distributed across many physical clients. These
physical clients may or may not share archive log destinations for all
instances.
Use the following steps to configure backups for online databases if the archive log
destination is shared among all RAC instances:
From the CommCell Browser, navigate to <Client> |
Oracle |Instance.
Right-click the <Subclient> and click Properties.
Click the Content tab.
Select the Backup Archive Log checkbox. If you want the archive
log files to be deleted after they are backed up, select the Archive Delete
checkbox.
If you have multiple log locations, click Log Destinations tab.
You can use RMAN for copying the data to the media in an Oracle RAC setup. When
the data is moved to
media, the RMAN backup
interface is used for block level backup operations. Also, these backup
operations are
recorded on the RMAN catalog.
RMAN is required in the case of Automatic Storage
Management (ASM) Oracle Databases, since ASM data is not available on the file
system.
Prior to using RMAN for copying the data to the media, ensure the
following:
The Oracle (non RAC) instance on the proxy computer should have the same name as
that in the source computer.
For backups involving ASM instances, both ASM and the RDBMS instances
have to be configured on the proxy computer.
You must configure the Oracle instance and corresponding ASM instances
under the proxy client.
The Oracle user id/group id on the on the proxy computer should be
identical to the user id/group id on the source computer
The catalog user and the catalog database must be the accessible by the
source and the proxy Oracle instances. Catalog is mandatory for RMAN backups
on proxy computer.
The Oracle database installed on the proxy and source machine should be
compatible.
The proxy and source computer should have the same directory structure
e.g. dump, diagnostic and data directories.
Oracle database requires the ASM to be registered with Oracle Cluster
Registry (OCR). It will ensure the RMAN to successfully mount the disk
group.
If multiple source client database instances are configured to run RMAN
backup copy on the same proxy MediaAgent, the backup copy may fail due to
instance and database name conflicts. The conflicting database and instances
need to be moved to a different proxy MediaAgent in such cases.
By default, during RMAN backup copy the data
snaps are mounted in the same location as source on proxy MediaAgents. In case of ASM
databases, the ASM Disk Groups are not renamed during RMAN backup copy. This is to facilitate incremental
RMAN backup copy where the
datafile paths need to be in the same path as source.
However, if you use the same proxy MediaAgent for multiple databases
RMAN backup copy may fail if the file system mount points or ASM Disk Group names of different
Oracle instances conflict with each other. In such cases, set the
sRMANDATAFILECOPY registry key to make the data snaps to be mounted on a
different path or in case of ASM databases, to rename the ASM Disk Groups
uniquely.
If you plan to use RMAN for copying the data to the media on the proxy
computer, copy the Oracle parameter file (pfile) from the client to the
proxy computer's $ORACLE_HOME/dbs/ directory, and remove any parameter
containing Oracle RAC related entries.
For example:
cluster_database_instances
cluster_database
<RAC Instance name>.thread
<RAC Instance name>.local_listener
<RAC Instance name>.instance_number
Use the following steps to configure the RMAN backup copy for Oracle RAC
setup:
From the CommCell Console, navigate to Client Computers |
<Client> | Oracle RAC | <Instance>.
Right-click the
subclientand click Properties.
Click the SnapProtect Operations tab.
Click SnapProtect.
Select the storage array from the Available Snap Engine
drop-down list.
Click Use RMAN for Tape Movement.
The Use RMAN for Tape
Movement option is not supported
for software snapshots.
The snapshots of the data created by the SnapProtect backup are also
available for various other operations like list, mount, unmount, delete, or
revert.
The browse operation provides the capability to see the snapshots created for
an agent, job, or a snapshot copy. The list of the snapshots displayed is corresponding
to the entity selected for the browse operation, for e.g., browsing the snapshots
for an agent will display all the snapshots created for the selected agent. You can
view volume or disk related information for the snapshots. Follow the steps given
below to browse snapshots.
From the CommCell Browser, navigate to Client Computers | <Client>
| <Agent>.
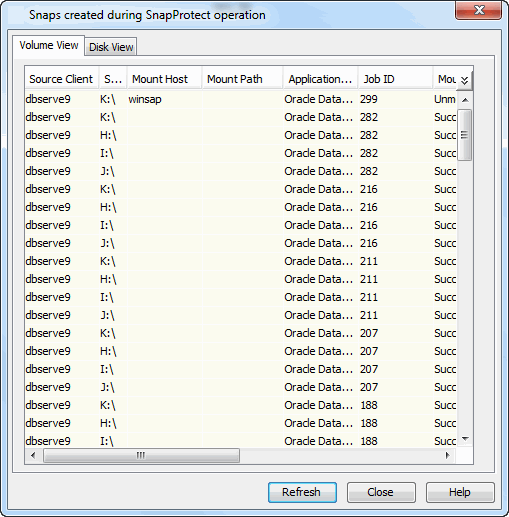
Right-click the subclient and click List Snaps.
The Snaps created during SnapProtect operation dialog box displays a list of
all the snapshots created for the selected subclient. It also displays important
information about each snapshot, including the source month path, snap mount
path, the storage array, and the source client.
Click the Disk View
tab to display the snapshot name, e.g.
SP_2_79_1286222629.
You can also browse snapshots at the instance level of the Oracle
Agent.
You can mount any available snapshot to access the data included in the
snapshot. It is recommended that you select the option to protect a snapshot
when it is mounted, as this will ensure that the changes made to the snapshot
when it is mounted are not retained when you unmount the snapshot and the
snapshot is usable for data protection operations. Follow the steps given below
to mount snapshots:
From the CommCell Browser, navigate to Client Computers | <Client>
| <Agent>.
Right-click the subclient and click List Snaps.
Right-click the snapshot that you wish to mount and click Mount.
Click Yes.
In the Mount Path dialog box, specify the destination client and the path on the client in the
Destination Client and Destination Path fields.
On a Windows
platform, enter a CIFS Share Name for the Agent.
If you do not wish to save
any changes made to the mounted snapshot after the snapshot is unmounted,
select Protect Snapshot during mount.
Click OK.
If you do not select Protect Snapshot
during mount,the changes made to snapshot when it is mounted will be retained
after the snapshot is unmounted and the snapshot can no longer be
used for restore.
Unmount Snapshots
Follow the steps given below to unmount snapshots:
From the CommCell Browser, navigate to Client Computers | <Client>
| <Agent>.
Right-click the subclient and click List Snaps.
Right-click the snapshot you
wish to unmount and click Unmount.
Click Yes when prompted if you want to continue.
If the snapshot does not get unmounted,
select the Force Unmount option to mark the snapshot as
unmounted.
Snapshots can either be deleted using job-based pruning or from the list of
displayed snapshots when browsing snapshots. Data Aging can also be used to
define the retention rules and pruning of snapshots. Follow the steps given
below to delete snapshots:
Manual deletion of snapshots is not recommended. When a
snapshot is deleted, it is no longer possible to perform data
recovery operations from the snapshot copy. However, if a backup
copy was created from the snapshot, data recovery operations can
be performed from the backup copy.
Ensure that the snapshot to be deleted is not mounted.
From the CommCell Browser, navigate to Client Computers | <Client>
| <Agent>.
Right-click the subclient and click List Snaps.
Right-click
the snapshot you wish to delete.
Ensure all snapshots with the same Job ID
are selected for a successful deletion operation.
Click Delete.
Enter the confirmation
text string, erase snapshots.
You can use the revert operation to bring the data back to the point-in-time
when the snapshot was taken. This operation overwrites any modifications to the data
since the time when the snapshot was created. This option is available if
the storage arrays that you are using supports revert.
Revert operations are supported on NetApp File Servers but
not from SnapVault or SnapMirror snapshots. You can either perform an
application aware revert or a hardware specific revert.
Review the following before performing a revert operation:
It is recommended to perform an application aware revert operation to
prevent a possible loss of data.
Log revert is not supported.
When using HP EVA Clone or Data Replicator for SnapProtect backup, the revert operation is not supported.
On Unix clusters, use pre/post scripts to freeze and unfreeze the
cluster for revert operations. For example, on Red Hat Linux cluster,
use the following command in the pre/post scripts:
clusvcadm -Z <group> to freeze the
cluster
clusvcadm -U <group> to unfreeze the
cluster
This is required because, during revert the application is shut down
and corresponding volumes are unmounted. In that case, the cluster will
automatically failover to another node thus preventing the revert
operation.
It is recommended to verify the
contents of the backup and ensure that you want to perform a revert operation
as it is an irreversible operation.
If you plan to perform a revert operation, you
will not be able to use the associated storage policy for further
auxiliary copy operations.
Perform an Application Aware Revert
From the CommCell Browser, right-click the entity
that contains the data you want to restore, and click All Tasks | Browse Backup Data.
From the Browse Options dialog box, click OK.
Select the data you want to revert and click Recover All Selected.
From the Restore Options dialog box, click Advanced.
Select the Use hardware revert
capability if available
option.
Click OK to confirm the revert operation.
Click OK from the Advanced Restore Options dialog box.
Click OK to start the revert.
An application aware revert operation reverts
back all the volumes included in the backup.
For NetApp NFS configurations:
This operation reverts all data on the file server volume, not just the
data that is associated with the application.
A volume revert deletes all snapshots that were created
after the snapshot to which you are reverting.
If you perform a volume revert on the source for a
SnapVault/SnapMirror copy, and the snapshot to which you are
reverting was created before the most recent snap moved to
the SnapVault/SnapMirror copy, then the SnapVault/SnapMirror
copy operation no longer works.
Perform a Hardware Specific Revert
From the CommCell Console, navigate to Client Computers |
<Client>.
Right-click the subclient and click List Snaps.
Right-click the snapshot that you wish to delete and click Use hardware revert
capability if available.
Enter the confirmation
text string, confirm.
Click OK.
A hardware specific revert operation reverts back
the volume included in the snapshot.
For NetApp NFS configurations:
This operation reverts all data on the file server volume, not just the
data that is associated with the snapshot.
A volume revert deletes all snapshots that were created
after the snapshot to which you are reverting.
If you perform a volume revert on the source for a SnapVault/SnapMirror
copy, and the snapshot to which you are reverting was created
before the most recent snap moved to the SnapVault/SnapMirror
copy, then the SnapVault/SnapMirror copy operation no longer
works.
Snapshots may be deleted from the array due to factors like low disk space on
the array, number of snapshots exceeds the threshold etc., and the jobs corresponding
to these deleted snapshots can no longer be used for any data recovery or backup
copy operations. You can use the
nRunSnapRecon
registry key to start snap reconciliation to check for missing snapshots once in
every 24 hours and marks jobs corresponding to the missing snapshots as invalid.
When restoring data from a snapshot, note the following:
If the selected backup (latest or point-in-time) was a SnapProtect backup, the subsequent restore
will be a SnapProtect restore.
During Snapshot restore operations, the database is shutdown first and
then the snapshots are restored. Once restored, the database is changed to
mount mode for the recover operation.
Snapshots are mounted on the destination client where the restore is
performed. Hence, destination client should have access to the storage
array/filer where snapshot was taken. If the destination client does not have
access to storage device, then you should restore the data from snapshot using
proxy computer. You can restore an oracle database on a ASM disk group using
RMAN.
When the database is corrupted or lost, you can restore and recover it from
the latest offline or online full backup (depending on how the subclient was
configured for backups).
By default, the database is restored to the same location from where it was
backed up. Once the database is restored, it is recovered to the current time.
Use the following steps to restore and recover a database to the same host:
From the CommCell Browser, navigate to Client Computers |
<Client> | Oracle.
Right-click the <Instance>, point to All Tasks
and then click Restore.
Verify that the Restore Data and Recover options
are selected.
You can use the revert operation to bring the oracle database back to the point in
time when the SnapProtect backup was taken. However, the log volume will not be
reverted. Hence, you can use either the file system or RMAN to revert the logs
after reverting the data volume.
From the CommCell Browser, navigate to Client Computers |
<Client> | Oracle.
Right-click the <Instance>, point to All Tasks and select
Browse Backup Data.
From the Browse window, navigate and select the database to be
restored and click Recover All Selected.
From the Restore Options dialog box, click Advanced.
Select the Use hardware revert capability if available option.
The point-in-time restore is useful in the following scenarios:
If any undesired transaction occurs in the database, you can revert the
database to a state just before the transaction.
If a database fails, you can restore to the state just before the point
of failure.
When you restore and recover an entire database to a previous point-in-time from an online backup or offline backup (depending on how the subclient
was configured for backups) to the original host, it is recommended to use the
control files.
When you perform a point-in-time restore for a database, the next
scheduled backup for that database will automatically convert to a full
backup.
Use the following steps to restore and recover a database to a previous
point-in-time:
From the CommCell Browser, navigate to Client Computers |
<Client> | Oracle.
Right-click the <Instance>, point to All Tasks
and then click Restore.
Select Restore Control File check box, if you want to restore
the control file(s).
Click Advanced.
Click the Restore tab.
Click To Point-In-Time and select the data and time.
Click the Recover tab.
Click the Point-In-Time and select the data and time.
Click Ctrl&SP Files Tab, if you have selected to restore
the control file(s).
Select Restore From check box.
Click the Point-In-Time and select the data and time.
You must restore the control files to a point-in-time later than
or equal to the point-in-time set in the Restore tab.
If the computer on which you hosted a database is damaged or destroyed, you can
restore and recover the lost database with the same directory structure on to a new
host.
By default, the database is restored in the ARCHIVELOG mode, You can also
choose to restore the db in NOARCHIVELOG mode.
Use the following steps to restore and recover a database to a new host with
the same directory structure:
Prerequisites
Verify the following in both the source and destination computers:
The connection specifications (host, service name, port) in the
tnsnames.ora file on both the source and
destination computers should be different.
The <username> you use for the destination computer is different
than the username for the source computer.
Sufficient disk space is available on the destination computer to
accommodate the restored database.
Both the source and destination computers should have the following
similar features:
Operating systems
Oracle version
ORACLE_SID
init <SID>.ora file
Processor (32-bit or 64-bit)
Datafile directory structures
Setting up the Source and Destination Hosts
Create a new user account
with recovery catalog owner permission within the Recovery Catalog for the destination computer.
Use a different <username>
Example:
SQL>create user
<username> identified by <password>
2>temporary tablespace
<temp_tablespace_name>
3>default tablespace
<default_tablespace_name>
4>quota unlimited on <default_tablespace_name>;
Statement processed.
SQL>grant connect, resource,
recovery_catalog_owner to <username>;
Statement processed.
Manually transfer the Oracle password file orapw<Oracle SID name> from the
source computer to the destination computer. Usually, this file resides in ORACLE_HOME/dbs.
Export the recovery catalog data for the catalog user.
For example, if the user ID for the
recovery catalog owner is user1, you need to export the database
backup information for user1.
Import the recovery catalog data to the new user account for the
destination computer.
Example using IMPORT CATALOG Command:
RMAN>IMPORT CATALOG user1/user1@src;
Copy the recovery catalog’s connect string entry in the
tnsnames.ora
file from the source host to the destination host.
Make sure that the ORACLE_SID and ORACLE_HOME are appropriately
configured on the destination computer.
Example:
For Unix:
#export ORACLE_SID= <target database SID>
#export ORACLE_HOME= <Oracle home directory>
For Windows:
C:\set ORACLE_SID= <target database SID>
C:\set ORACLE_HOME= <Oracle home directory>
Install the Oracle iDataAgent and configure
it as client
in the same CommServe in which the source computer resides.
Create and configure a new Oracle instance, similar to the one existing
in the source computer on the destination computer. Ensure that this
instance is in NOMOUNT mode.
Restoring the Database
From the CommCell Browser, navigate to Client Computers |
<Client> | Oracle.
Right-click the <Instance> point to All Tasks and then
click Restore.
Select the name of the client computer from the Destination Client
list.
Select Restore Control File check box.
Click Advanced.
Click the Options tab.
If the database is in NOARCHIVELOG mode, then select No Redo Logs.
In addition to restoring a database, you can also restore specific tablespaces
or datafiles that were lost due to an error or corruption. By default, the
selected tablespaces/datafiles are restored to the original location from the
latest online backup.
Use the following steps to restore the datafile(s) or tablespace(s):
From the CommCell Browser, navigate to Client Computers |
<Client> | Oracle.
Right-click the <Instance>, point to All Tasks
and then click Browse Backup Data.
Click OK.
In the right pane of the Browse window, select the datafiles
or tablespaces you want to restore and click Recover All Selected.
Archive logs can be restored separately or along with the database. If there is a database failure and you need to recover the database to
the recent state, you will be able to restore all the logs along with the database.
Use
the following steps to restore all the archived logs (note that this is the
default option):
From the CommCell Browser, navigate to Client Computers |
<Client> | Oracle.
Right-click the <Instance>, point to All Tasks
and then click Restore.
Select the Restore Archive Log check box.
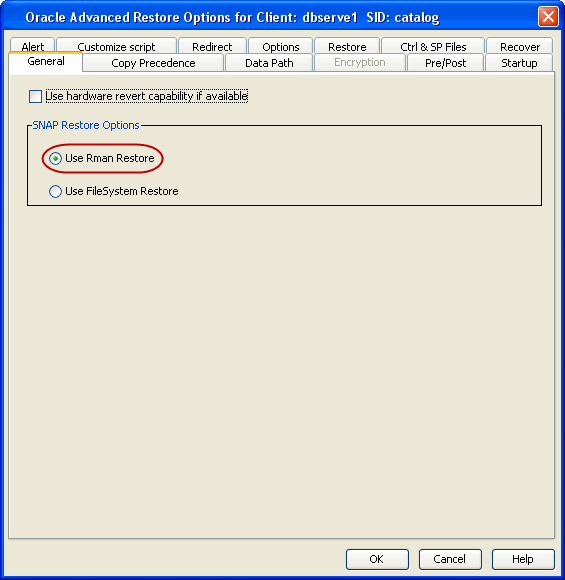
Click Advanced.
In the Snap Restore Options, select the Use FileSystem
Restore Check box
Database tables can be restored from a SnapProtect backup using RMAN. In order to
restore database tables, you need to perform a SnapProtect backup with table browse
enabled.
Use the following steps to restore database tables:
From the CommCell Browser, navigate to Client Computers | <Client>
| Oracle.
Right-click the <Instance> and click All Tasks
|
Browse Backup Data.
Select the Table View checkbox.
Click OK.
In the Browse window, select the tables that you want to restore
and click Recover All Selected.
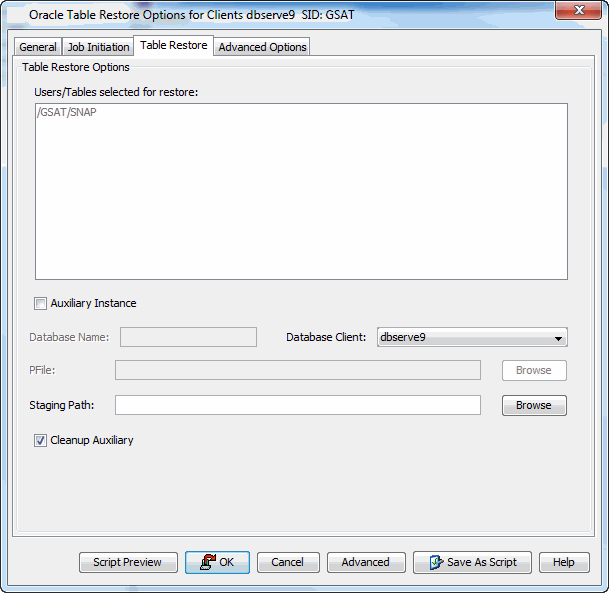
Click the Table Restore tab.
Select the Auxiliary Instance checkbox if you want to specify an auxiliary
instance for the restore.
When specifying the auxiliary instance, ensure that the database is
in NOMOUNT mode.
In the Database Name text box, type the auxiliary database name.
In the PFile textbox, type the path to the PFile. Alternatively,
click Browse to locate the PFile.
In the Database Client box, select the client for the auxiliary
instance.
When you provide an auxiliary instance, make sure that the
temp.dbf file is removed from the
operating system in the specified auxiliary instance datafile location.
By default, when you restore database tables to a target instance, the
system automatically duplicates the source database to an auxiliary
instance in a temporary staging location specified during the restore
operation. The database will be automatically imported from this
auxiliary instance after the restore.
Use the following steps to set up a specific database as an auxiliary
instance. This is useful when you want to restore a table to a specific
failure point.
1.
Copy the init<SID>.ora file from the
source database to the auxiliary database instance.
2.
Update the database name and the database file locations in the
init<SID>.ora file for the auxiliary database instance.
3.
Add the DB_FILE_NAME_CONVERT and LOG_FILE_NAME_CONVERT
parameters in the
init<SID>.ora file. These parameters will redirect the datafiles,
temp files, and log files to the auxiliary instance.
Add the log_archive_dest_1
parameter is added to the init<SID>.ora file
on the auxiliary instance.
5.
Restart the Oracle Services, if using Windows clients.
6.
Add the destination instance name in the
Listener.ora and Tnsnames.ora files.
If using a different host, add the duplicate database instance name in the
Listener.ora file on the destination host
and Tnsnames.ora files on the destination
and source hosts. Also, add the original database name in the Tnsnames.ora
file on the destination host.
By default, when you restore database tables to a target instance, the
system automatically duplicates the source database to an auxiliary
instance in the specified temporary staging location. Once the database
is duplicated, you can import the tables to the target instance.
However, if required, you can also use an user-defined auxiliary
instance for the restore operation. This is used when you want to
restore a table to a specific failure point.
When restoring tables to a different host, if a
user-defined auxiliary instance option is selected for the restore, you
need to recover the database to a specified point-in-time or SCN number.
You cannot recover the database to the current time using an
user-defined auxiliary instance.
Setting Up the Auxiliary Instance
1.
Copy the init<SID>.ora file from the
source database to the auxiliary database instance.
2.
Update the database name and the database file locations in the
init<SID>.ora file for the auxiliary database instance.
3.
Add the DB_FILE_NAME_CONVERT and LOG_FILE_NAME_CONVERT parameters in the
init<SID>.ora file. These parameters will redirect the datafiles,
temp files, and log files to the auxiliary instance.
Add the log_archive_dest_1
parameter is added to the init<SID>.ora file
on the auxiliary instance.
5.
Restart the Oracle Services, if using Windows clients.
6.
Add the destination instance name in the
Listener.ora and Tnsnames.ora files.
If using a different host, add the duplicate database instance name in the
Listener.ora file on the destination host
and Tnsnames.ora files on the destination
and source hosts. Also, add the original database name in the Tnsnames.ora
file on the destination host.
In the Location box, select or type
OracleAgent from the list.
In the Type box, select Value.
In the Value box, set the database's character set as per your database's
character set and then click OK.
For example, if the database’s nls character set value is ZHS16GBK, you
can set NLS_LANG registry key to AMERICAN_AMERICA.ZHS16GBK. By default this value
is set to AMERICAN_AMERICA.US7ASCII.
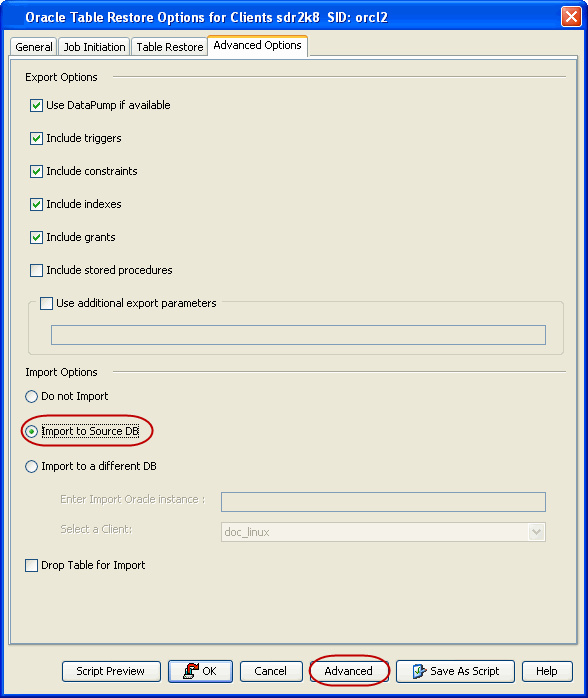
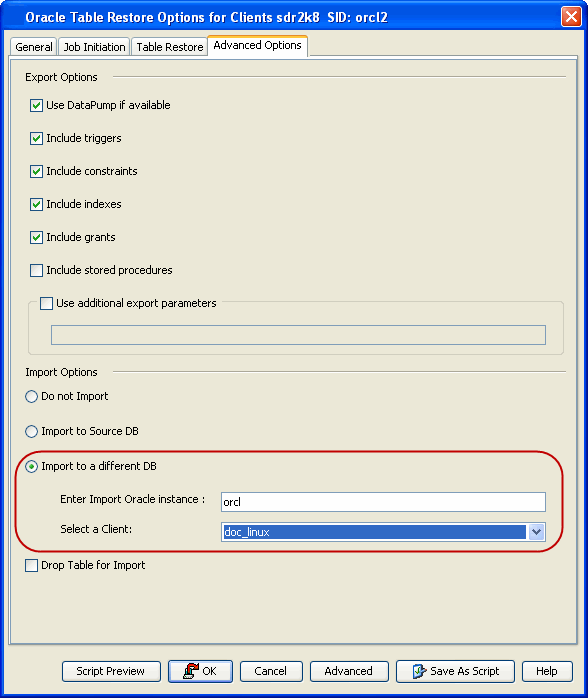
During table restores, the tables are exported from the auxiliary instance to
the destination client and later imported to the target database. By default,
the following data objects are exported along with the tables:
Triggers
Constraints
Indexes
Grants
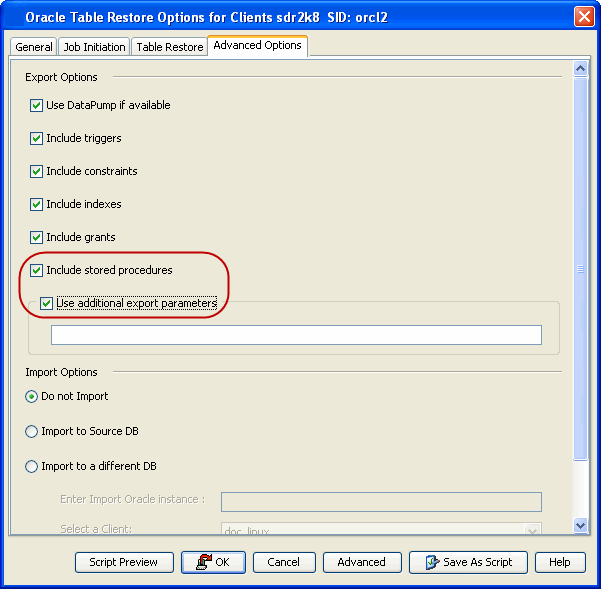
However, the stored procedures associated with the selected tables are not
exported by default. Use the following steps to export the stored procedures and
additional export parameters, such as (COMPRESS or PARALLEL):
Stored procedures are restored from the Schema level. Schema is the
collection of data objects created by the user to contain or reference their
data. Hence, if one of the table within the schema is selected for restore, all
the stored procedures for that schema will also get restored.
When exporting the tables, the datapump export utility is used if it is
supported by the Oracle application. The datapump utility facilitates the export
of stored procedures. In oracle versions that do not support datapump export
utility, you will not be able to include stored procedures during export.
From the CommCell Browser, navigate to Client Computers |
<Client> | Oracle.
Right-click the <Instance>, point to All Tasks and select
Browse Backup Data.
Select the Table View check box and click OK.
From the Browse window, navigate and select the tables to be
restored and click Recover All Selected.
Click the Table Restore tab.
In the Staging Path box, type the location where the auxiliary
instance will be restored.
Click the Advanced Options tab.
Select the Include Stored Procedures checkbox.
Select Use additional export parameters checkbox and type the
parameters to be exported.
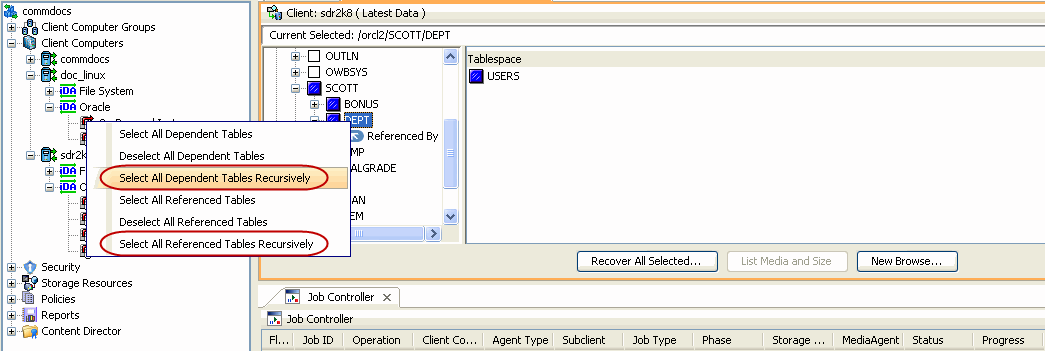
When you browse using the table view, you can also view
the dependent and referenced tables associated with the tables selected for the restore.
Dependent tables are the parent tables (containing the primary key) that the
selected table (containing the foreign key) depends upon. Similarly, Referenced
tables are the child tables (containing the foreign key) that references the
selected table (containing the primary key).
By default, all the dependent and referenced tables will be included in the
restore operation. Use the following steps to exclude the dependent/referenced
tables:
From the CommCell Browser, navigate to Client Computers |
<Client> | Oracle.
Right-click the <Instance>, point to All Tasks and select
Browse Backup Data.
Select the Table View check box and click OK.
From the Browse window, navigate to the table to be restored.
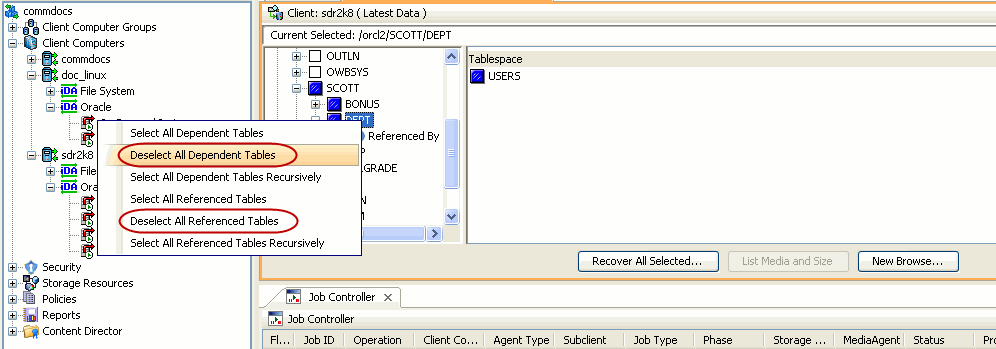
Right-click the <table> and click Select/Deselect All
Dependent Tables to exclude all the dependent tables.
Similarly, click
Deselect All Referenced Tables to exclude all the referenced tables.
Click Restore All Selected.
Click the Table Restore tab.
In the Staging Path box, type the location where the auxiliary
instance will be restored.
By default, the restore operation will overwrite the existing tables in the
destination database during the restore. You can also configure the restore
operation to delete the existing tables before performing the restore.
Manually drop/delete the existing tables at the destination instance and then
import the tables.
Use the following steps to automatically delete existing tables on the
destination instance during restore. Note that you can also manually drop/delete
the existing tables at the destination instance and perform the restore without
enabling this option.
From the CommCell Browser, navigate to Client Computers |
<Client> | Oracle.
Right-click the <Instance>, point to All Tasks and select
Browse Backup Data.
Select the Table View check box and click OK.
From the Browse window, navigate and select the tables to be
restored and click Recover All Selected.
Click the Table Restore tab.
In the Staging Path box, type the location where the tables will
be restored.
In order to perform a restore operation, the database should be in the MOUNT
mode. If the database is not in mounted state, you are prompted to switch
the database to the mounted state and then perform the restore.
Use the following steps to automatically switch the database to mount mode
prior to restore:
From the CommCell Browser, navigate to Client Computers |
<Client> | Oracle.
Right-click the <Instance>, point to All Tasks
and then click Restore.
When you perform a point-in-time recovery of an Oracle database with RESETLOGS, a new incarnation of the database is created. All archive log files
generated after resetting the logs will be associated to the new incarnation.
However, in order to perform a point-in-time recovery from a backup of a
previous incarnation, you need to reset the current incarnation to the previous
incarnation value. Use the following steps to set
the incarnation value:
From the CommCell Browser, navigate to Client Computers |
<Client> | Oracle.
Right-click the <Instance>, point to All Tasks
and then click Restore.
Click Advanced.
Click Options tab.
Select the database incarnation value from Set DB Incarnation
list.
You can perform a restore operation faster when you set a maximum
number of concurrent open datafiles for RMAN to read simultaneously. Use
the following steps to enhance your restore operation:
From the CommCell Browser, navigate to Client Computers |
<Client> | Oracle.
Right-click the <Instance>, point to All Tasks
and then click Restore.
Click Advanced.
Click Options tab.
Select the number of open files from Max Open Files list.
When restoring from a SnapProtect and RMAN mixed environment, the data can be restored from a SnapProtect or
RMAN backup jobs depending on the browse time and whether the database full
backup is a SnapProtect or RMAN backup job.
Consider the following scenarios:
Scenario 1
The backup jobs are performed in the following sequence:
Full SnapProtect backup job
RMAN archive log job
In this scenario, when you restore a control file, SP file from autobackup or
backup piece, the restore is always performed from the full SnapProtect backup
job.
Similarly, when restoring only the archive logs, the logs are restored from
the SnapProtect backup job instead of the latest archive log backup.
Scenario 2
The backup jobs are performed in the following sequence:
Full SnapProtect backup job
Full RMAN backup job
RMAN archive log job
In this scenario, the restores are performed from the latest backup job
(SnapProtect or RMAN) depending on the specified time.
If the SnapProtect full backup job and RMAN full backup job were executed in
parallel, by default, the SnapProtect full backup job is used for the restore
operation.
In a SnapProtect and RMAN mixed environment, you can configure to restore
certain database components, such as control file, SP file, or archive logs from
RMAN backup jobs by creating the sSNAPRESTORE registry key on the CommServe
using the following steps. Once the restore is complete, make sure to delete
this key to enable restores from SnapProtect backups.
From the CommCell Browser, right-click the <CommServe>, and then click
Properties.
By default, the system will use the File System for copying
the data to the media. The system will scan the file, generate and read the
collect file, extract the file list and copies the data on to the tape using MediaAgent's data mover.
In order to perform the file system snap to tape copy on a proxy computer,
ensure that the MediaAgent and File System iDataAgent
are installed on the proxy computer.
From the CommCell Console, navigate to Client Computers |
<Client> | Oracle | <Instance>.
Right-click the
subclientand click Properties.
Click SnapProtect Operations.
Select SnapProtect.
Click Available Snap Engines drop-down box and select the
storage array.
You can also use RMAN for copying the data to the media.
When data is moved from snap to
media, the RMAN backup
interface is used for block level backup operations. Also, these backup
operations are
recorded on the RMAN catalog. RMAN is required in the case of Automatic Storage
Management (ASM) Oracle Databases, since ASM data
is not available on the file system. You can also run RMAN
restores/reports from these backups.
Prior to using RMAN for copying the data to the media, ensure the
following:
The Oracle iDataAgent must be
installed on the proxy computer.
The Oracle instance on the proxy computer should have the same name as
that in the source computer.
The Oracle database installed on the proxy and source computers should be
compatible.
For backups involving ASM instances, both ASM and the RDBMS instances
have to be configured on the proxy computer.
The catalog user and the catalog database must be the accessible by the
source and the proxy Oracle instances.
The proxy and source computer should have the same directory structure
e.g. dump, diagnostic and data directories.
Oracle database requires the ASM to be registered with Oracle Cluster
Registry (OCR), since the ASM instance is a resource in CRS repository. It will ensure the RMAN to successfully mount the disk
group.
If multiple source client database instances are configured to run RMAN
backup copy on the same proxy MediaAgent, the backup copy may fail due to
instance and database name conflicts. The conflicting database and instances
need to be moved to a different proxy MediaAgent in such cases.
From the CommCell Console, navigate to Client Computers |
<Client> | Oracle | <Instance>.
Right-click the
subclientand click Properties.
Click SnapProtect Operations.
Select SnapProtect.
Select the storage array from the Available Snap Engine
drop-down list.
Select Use RMAN for Tape Movement.
The Use RMAN for Tape
Movement option is not supported
for software snapshots.
Click OK.
RMAN Incremental Backup Copy
Oracle RMAN incremental backup copy can be performed on a proxy
server.
Prior to performing the RMAN incremental backup copy, ensure the
following:
The database physical schema is the same in both the snap and the
current backup (i.e. no addition or deletion of tablespaces between time of
snap and current backup).
The Oracle user ID/group ID on source and proxy should be the same
otherwise the RMAN backup copy will fail due to permission issues.
Copy the Oracle parameter file (pfile) and password file from the
source to the proxy computer's $ORACLE_HOME/dbs/ directory.
Create the bdump, udump, adump, cdump and diagnostic_dest
directories. Ensure that the directories are in the same location as the
source.
Create the DB_CREATE_FILE_DEST and LOG_ARCHIVE_DEST directories. If
there are multiple archive destinations, then create the directories for
each of the archivelog destinations.
Copy the catalog connection information from the source to the proxy
in the tnsnames.ora.
Startup the proxy instance in NOMOUNT mode.
Configure the proxy Oracle Instance on the CommCell Console.
Click Use Proxy drop-down box and select the configured
proxy from the dropdown list.
Select Use RMAN for Tape Movement and click OK.
The Incremental option is now available for backup.
By default, during RMAN backup copy the data
snaps are mounted in the same location as source on proxy MediaAgents. In case of ASM
databases, the ASM Disk Groups are not renamed during RMAN backup copy. This is to facilitate incremental
RMAN backup copy where the
datafile paths need to be in the same path as source.
However, if you use the same proxy MediaAgent for multiple databases
RMAN backup copy may fail if the file system mount points or ASM Disk Group names of different
Oracle instances conflict with each other.
In such cases, use the following steps to make the data snaps to be mounted on a
different path or in case of ASM databases, to rename the ASM Disk Groups uniquely:
From the CommCell Browser, navigate to Storage Resources |
MediaAgents.
Right-click the <Proxy MediaAgent>, and then click Properties.
You can perform a restore from the backup copy by setting the appropriate copy
precedence number. Use the following steps to restore the data from backup copy
using the File System backup:
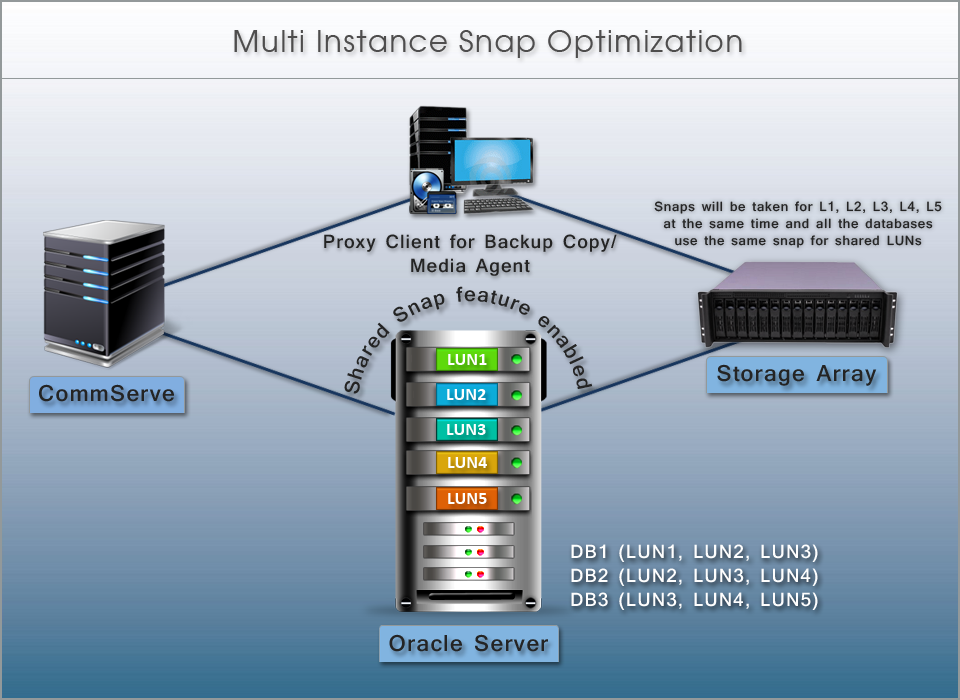
During a SnapProtect backup, snapshots will be created for each LUN
associated with a database. Snapshots will be created even when multiple
database instances share one or more LUNs. In such a case, the shared
LUNs will be backed up multiple times - once as part of every instance
using the LUN. When you enable the optimization and group all instances
that share a set of LUNs into a single schedule policy, each shared LUN
will be backed up only once. This will reduce the number of snapshots on
the storage, thus saving time and storage resources.
Since multiple
databases use one set of snapshots for backup, you can revert all the LUNs
and databases in a single revert job. Without this optimization,
reverting one database may corrupt data files of another database that
shares the LUN(s).
Follow the steps given below to configure multiple
instances using a shared storage on a client:
Ensure that you have installed the Oracle
iDataAgent
and MediaAgent on all the source and proxy clients. See
Oracle
iDataAgent
and MediaAgent deployment for step-by-step procedure on how to install the
oracle iDataAgent and MediaAgent.
Configure the client and instance using the steps described in
Getting Started - Oracle Configuration.
Ensure that you perform a manual discovery of instances.
Create a storage policy to perform SnapProtect operations. See
Create a Storage Policy
for step-by-step instructions for creating a storage policy. See
Create a Snapshot Copy
to enable
a snapshot on the copy.
Ensure that all the following additional requirements are satisfied on
all the clients for successful snap or clone operations in a shared LUN
environment:
All the subclients of a client in the same schedule policy should use the
same storage policy.
All the subclients of a client in the same schedule policy should use the
same proxy client.
Use the
sMULTIAPPCONSISTENTSNAP registry key set to Y on all the clients to
perform a snap for multiple databases in the same job.
Configure the
nDECLUSTER_LVM registry key on all the nodes and Proxy machine
if cluster is configured and set it to 1.
If the storage array is EMC clariion or EMC
Symmetrix, use the
SYMAPI_HOME_DIR registry key to the
directory where the Symmetrix SYMAPI library is present on all the clients
and restart the Calypso services. In case of EMC Symmetrix, all
the source devices should be in the same device group for consistency.
Enable the
bConsistentActivate
registry key on all the clients , if the array is EMC clariion or EMC Symmetrix. For Symmetrix storage array, you can enable the
bSymmSmartClone, if you do not want to wait till the background copy
completes for clone.
REDO Log for No archive log database should be on the volume for which snap
should be supported.
Data and log volumes should not be shared and each database should have
unique paths on the volumes like /data/db1, /data/db2, /log/db1, /log/db2 etc.
Execute the following Qscript to enable the multi instance snap
optimization:
qoperation execscript -sn
SetKeyIntoGlobalParamTbl.sql -si EnableOracleMultiInstanceSnap -si y -si
1
For clone operations, perform the following in
addition to the above configuration:
While creating a new subclient, select the clone engine from the Available Snap Engine
drop-down list in the
SnapProtect Operations tab.
Create a separate schedule policy for clone operations.
Create one client group and add all the clients for which snap/clone
jobs will be performed
Hourly/snap schedule policy
Create hourly schedule policy which will be used to run snap jobs
for every hour
Daily/clone schedule policy
Create daily schedule policy which will be used to run clone jobs
once for daily.
FullScan (Y/N)
If the value is "n", then it is incremental scan and as part of
incremental scan it will check only newly created/discovered instances.
subclients will be created for them only. Otherwise it will check all
the instances in that client group and create subclients if any instance
do not have the required subclients.
When you execute the script, the system will check all the instances in that
client group and perform the following steps:
If the subclients are not already created, it will create the following
two subclients for snap and clone correspondingly:
<instancename>_snap
<instancename>_clone
It will assign EMC TimeFinder Snap Snap Engine to <instancename>_snap
subclient and EMC TimeFInder Clone to <Instancename>_clone subclient. See
Modify Snap Engine for a
subclient section to change the Snap Engine.
By default, the system will perform a File System backup copy. Use RMAN Movement to Tape
is also selected for these subclients.
If you are using NoArchiveLog mode Database,
disable Use RMAN Movement to Tape.
It will add all the snap subclients(<instancename>_snap) to hourly
schedule policy and all clone subclients(<instancename>_clone) to daily
schedule policy.
If you want to exclude instances from creating subclients and associating
them to shared schedule policy, update the instance description with
exclude with cvsnap schedule. Then the above script will not create
subclients for those instances. See Update instance description
to change the instance description using command line.
Once you execute the script, assign the storage policy and proxy client to
all the subclients using the CommCell Console or command line.
When you configure a proxy for RMAN backup copy, make sure to satisfy the
following requirements:
Make sure that the data, log, diag, FRA and all the dump directories on
the proxy are identical to the source.
Oracle gid and uid should match the source computer's oracle user.
Oracle instances on the proxy should be configured similar to those at
source and should be in started mode. You need to configure the instances on
the CommCell console.
A snap or clone operation is performed for all the instances at the same time
in a shared LUN environment using the schedule policy created specifically for
this purpose. You can perform a snap or clone operation immediately or at
a scheduled time.
When you perform a SnapProtect backup or a clone operation, the system
performs the following:
A single job among multiple jobs will be selected and this job becomes
the master job.
Master job will collect all the data mount points for all the databases
which are included in the schedule policy and performs the following:
If the database is in archive log mode and open, it will be change
it to a hot backup mode. This will be performed for all the archive log
databases.
If the database is in noarchive log mode and open, it will
completely depend on consistent option provided by snap engine and will
also take a snap for REDO log location.
If the database is noarchive log DB, it will not change the database to
a hot backup mode..
If one of the databases is down or in started mode, it will skip
that database for snap operation.
SnapProtect will be performed for all the data mount points at the same
time. After Snap operation, the databases are changed from hot backup mode.
Master job switches the log for archive log DB and will take the backup
of controlfile to archive log location or data file location for archive log
DB and No archive log DB correspondingly.
Similar to data, all the mount points for log will be collected and
snaps will be performed.
Once archive indexing is completed, the master job is marked as
complete.
Once the master job is completed, all the other jobs will continue and
verify whether the snaps are already taken. If they know that the snaps are
already taken, they just clone the archive files, perform archive index and
completes the job.
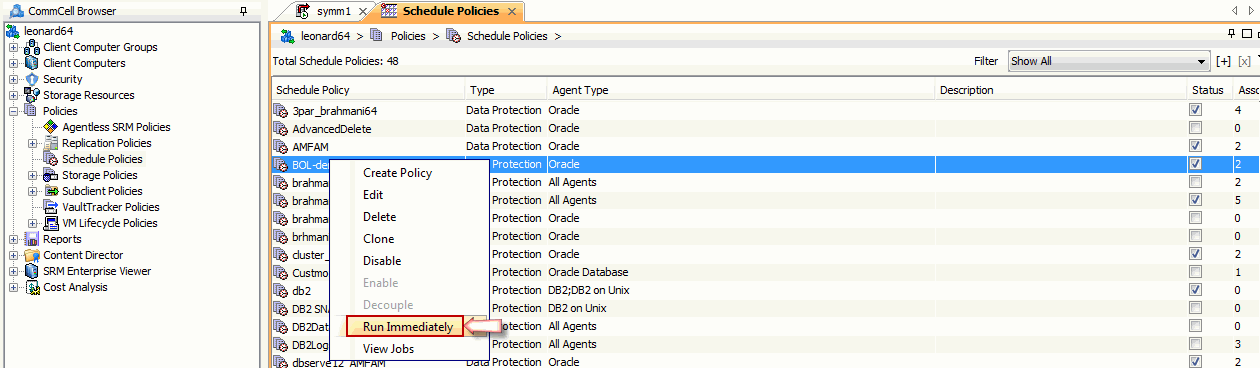
Use the following steps to perform a SnapProtect backup:
From the CommCell Browser, navigate to Policies |
Schedule Policies.
Right-clickthe <Schedule
Policy> in the right pane and click Run Immediately.
You can track the progress of the job from the Job
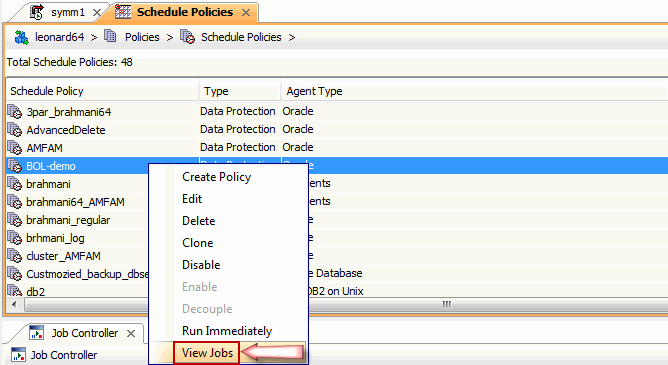
Controller window of the CommCell console.
Once the job is complete, view the job details from the
Backup History. Right-click the Schedule Policy and select
View Jobs.
Click OK.
Right-click the job to:
Browse the databases that were backed up.
List Snaps
View RMAN Logs.
Resubmit the job.
View job details.
View media associated with the job.
View events associated with the job.
View or send the log file that is associated with the job.
Scheduling a SnapProtect Backup for all the instances in a shared LUN
environment
Use the following steps to schedule a SnapProtect backup for all the
instances in a shared LUN environment:
1.
From the CommCell Browser, navigate to Policies | Schedule Policies.
Right-clickthe <Schedule
Policy> in the right pane and click Edit.
2.
Click Add button.
3.
Click the Backup Options tab.
Click Full.
4.
Select the appropriate scheduling options.
For example:
Click Daily.
Check the days you want to run the SnapProtect backup job.
Change the Start Time to 9:00 PM.
Click Options.
5.
Select the appropriate advanced schedule options.
For example:
Click Start date.
Select the end dates or times after which you want the stop the
scheduled job.
Change the Repeat Times.
Specify the Time Zone for the schedule.
Click OK.
6.
Click OK to close the Backup Task Options dialog
box.
Click OK to close the Scheduled Policy dialog box.
The
SnapProtect backup job for instances in a shared storage will execute as per the schedule.
You can restore each database or some of the datafiles/table spaces from one
database on a client.
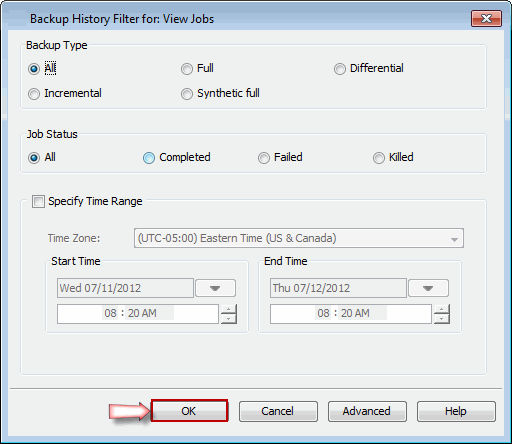
Use the following steps to restore a database:
From the CommCell Browser, navigate to Client Computers |
<Client> | Oracle.
Right-click the <Instance>, point to View
and then click Backup History.
In the Backup History Filter for <Instance> dialog box, click
OK.
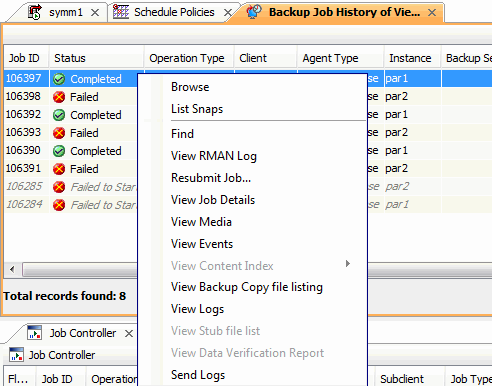
Right-click the SnapProtect job you want to restore and click
Browse.
In the Browse Options dialog box, click OK.
In the right pane of the Browse window, select an entire
instance or the datafiles
or tablespaces you want to restore and click Recover All Selected.
In the Restore Options dialog box, click Advanced.
Click the Options tab.
Select None from the Reset Logs list.
For No
archive log database, select Yes from the Reset Logs
list as the restore will always be Point-in-time restore and REDO
logs which were existing in snap/clone will only be applied. You
should perform a full database restore for no archive log database.
Select Switch Database mode for Restore check box.
If you perform a revert from a SnapProtect job from a schedule policy, it will revert
all the databases which were snapped in that SnapProtect backup job to the same point-in-time.
Ensure that you have performed a SnapProtect backup for all the databases which
share the same LUNs.
Ensure that both the data and log volumes are reverted for successful revert
operation. By default, the data volumes only are reverted. Perform the following to
revert the log volumes also in addition to data volumes:
From the CommCell console, navigate to Client Computers |
<Client>
Right-click the <client>, and then click Properties.
In the Location box, type or select
OracleAgent from the list.
In the Type box, select
Value.
In the Value box, type Y and then click OK.
Use the following steps to revert a SnapProtect job:
From the CommCell Browser, navigate to Client Computers |
<Client> | Oracle.
Right-click the <Instance>, point to All Tasks and then click Browse Backup Data.
From the Browse Options dialog box, click OK.
Select the data you want to revert and click Recover All Selected.
Even if you select one instance,
it will revert all the databases that are included in the
SnapProtect job.
From the Restore Options dialog box, select Restore Control
File.
Click Advanced.
Select the Use hardware revert
capability if available
option.
A warning message displaying that the oracle multi instance snap
optimization feature is enabled and selecting hardware revert option will
result in restoring all the instances which are included in the shared
snapprotect backup. The message informs you that the hardware revert
can only be performed in-place and it will be automatically selected. The
message will also warn you that the selection of revert option will
overwrite the entire disk and all the existing data will be lost. Select
Yes if you still want to continue. Select No if you do not want
to continue.
Click Options tab.
Select Yes from the Reset Logs list.
Select Switch Database mode for Restore.
Click OK to confirm the revert operation.
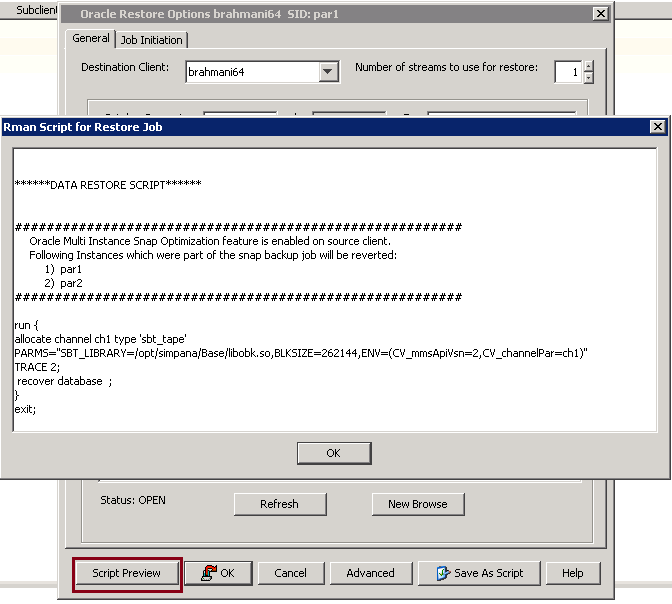
Click OK from the Advanced Restore Options dialog box.
Click Script Preview to verify the instances that are being
reverted in the current revert operation.
Click OK to start the revert operation.
if the database is in mount mode while
taking a SnapProtect backup, then the same status is
preserved even after the revert operation.
Once a revert is completed, resync the catalog using RMAN to register the new
incarnation.
Once the SnapProtect jobs are completed, you can perform or schedule backup copy
jobs. You can run parallel backup copy for all the SnapProtect jobs which are
performed using a schedule policy in one operation. In case of parallel backup
copy, mount all the snaps in the first backup copy job itself. The other jobs
will use these mount points and backup their corresponding databases.
From the CommCell Browser, navigate to Policies | Storage Policies.
Right-clickthe <Storage
Policy> in the right pane, point to All Tasks and click
Run Backup Copy.
Select Number of simultaneous jobs to run from the
list.
Click Job Initiation tab.
Select Immediate to perform the backup copy job. You can
also click Schedule to perform the job at a scheduled time.
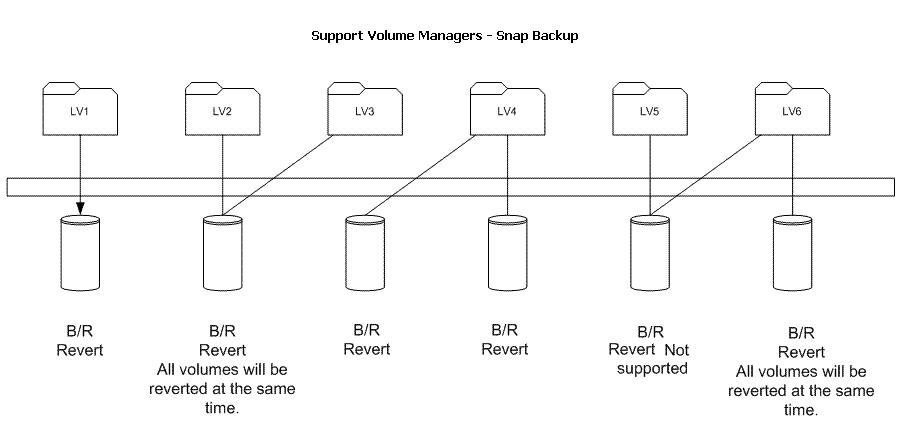
When using the Solaris Volume Manager, ensure
that a complete disk is used for a metaset. Also, ensure that the
metaset is owned by single host and the ownership of the metaset is
attained before performing the SnapProtect backup operations.
Supported Configurations:
One Physical Volume containing one Logical Volume
One Physical Volume containing one or more Logical Volumes
Multiple Physical Volumes containing one Logical Volume
Multiple Physical Volumes containing one or more Logical Volume
The adjacent diagram summarizes the Volume Manager support for SnapProtect
backup.
Several additional options are available to further refine your backup operations.
The following table describes the additional options:
Option
Description
Related topics
SCSI Reservation
SCSI reservation can be enabled for SnapProtect backup
for all the agents. Use the registry key
nSCSIReserveForSnap
to enable SCSI reservation. Enabling SCSI Reservation prevents other applications
(SCSI3 compliant) from using the reserved SCSI Device (i.e. the mounted
snapshot).
If this option is enabled and the hardware
does not support this type of operation, subsequent data protection
jobs may fail.
The Pre/Post commands for SnapProtect backup
can either be executed on the proxy or the source computer. You can use
the Pre/Post Process tab of the Subclient Properties dialog
box to select where you wish to execute the Pre/Post commands. SnapProtect
backup supports Pre/Post commands for the agents that support it.
Use of Pre/Post Snap commands is not supported when using Data Replicator as the storage array.
For more information on using the Pre/Post
commands, see
Pre/Post
Processes.
View Snapshot Details
You can view the details of a snapshot for an agent, job,
or a snapshot copy. When you right-click any of these entities, you will
be able to browse all the snapshots corresponding to the selected entity.
From the CommCell Browser, right-click the entity that contains
the snapshots you want to browse, and click All Tasks |
List Snaps.
The Snaps created during SnapProtect operation dialog box displays
a list of all the snapshots created for the selected entity and displays important information about each snapshot, including the source
mount path, snap mount path, the storage array, and the source client.
Right-click the snapshot and click Details to view the snapshot
properties.
Select a Job for Backup Copy
You can select a specific job for creating backup copy.
Once selected, the Move Snap to Tape field for the specific job will be
changed to Picked (i.e., the next backup copy operation will move this job
to media).
Right-click a storage policy containing SnapProtect backup jobs,
and then click View Jobs.
Right-click the job and then click Pick for Backup Copy.
Disable a Job for Backup Copy
You can prevent a job from being moved to media. You
can apply this option to those jobs that were previously selected for moving
to media. On selecting this option, the Move Snap to Tape field for the
specific job will be changed to Not Picked (i.e., the next backup copy operation
will not move this job to media).
Right-click a storage policy containing SnapProtect backup jobs
and then click View Jobs.
Right-click the job and then click Do not Backup Copy.
Offline Snap Copy Job Summary Report
Offline Snap Copy Job Summary Report provides
job summary details of backup copy jobs for moving snapshots to media.