When restoring VMware data, it is important to consider the backup-level that
was originally performed. The following table illustrates the types of restores
available for each backup level:
Backup Level
Restore Level
Notes
Disk-Level
Disk-Level (as virtual machine)
Disk Level (as VMDK file)
Disk-Level with Enable Granular Recovery enabled
Disk-Level (as virtual machine)
Disk-Level (as VMDK file)
File-Level
For File-level restores, the following apply:
The MediaAgent must be a Windows-based computer when restoring
from Windows servers.
The Index Cache must be on an NTFS disk.
To perform Linux file-level restores, the
LinuxMetadataSupport registry key must first be configured on
the computer on which the Virtual Server iDataAgent is installed
prior to performing the backup.
You can restore files only from ext2, ext3
and NTFS file systems.
Volume-Level
Volume-Level (as physical volume)
Volume-Level (as VHD)
Volume-Level (as VMDK)
Supported only with volumes formatted with the NTFS file system.
Volume-Level with Enable Granular Recovery enabled
Volume-Level (as physical volume)
Volume-Level (as VHD)
Volume-Level (as VMDK)
File-Level
For File-level restores, the following apply:
The MediaAgent must be a Windows-based computer when restoring
from Windows servers.
The Index Cache must be on an NTFS disk.
File-Level
File-Level
Supported only with volumes formatted with the NTFS file system.
To fasten and ease the restore operation, you can restore multiple virtual
machines in a single job. Follow the steps given below, to restore multiple virtual machines:
From the CommCell Console, navigate to the <Client> | Virtual
Server.
Right-click the subclient that contains the data you want to restore,
point to Browse Backup Data.
In the Browse Options window, click OK.
From the Browse window, select the virtual machine in the left
pane. The configuration and VMDK files of the virtual machine are displayed
in the right pane.
Click Recover All Selected in the bottom of the window.
From the General tab of the Restore Options for All Selected
Items dialog box:
Click Virtual Machines.
All the selected virtual machines are displayed in the VM and
Disk
column.
Enter corresponding values for each virtual machine you want to
restore.
To select multiple virtual machines hold down the SHIFT key and select the virtual machines you want to restore.
Click OK. All the virtual machines that were selected are
restored in a single job.
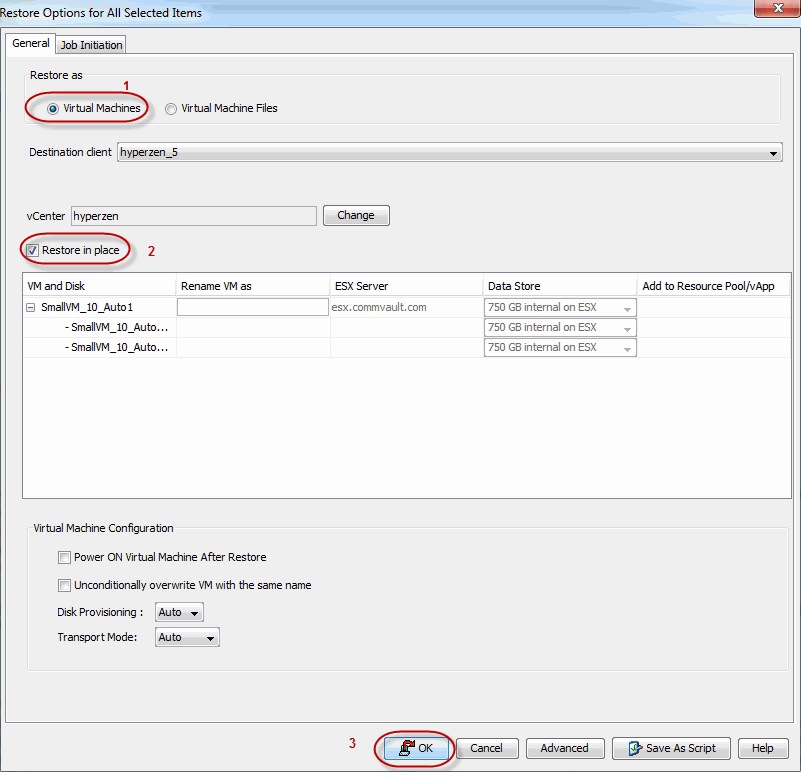
When restoring data, the Virtual Server iDataAgent provides the facility to
restore data to the same destination host, and placing
all of the disks back to their original datastores. Follow the steps given below
to perform an in-place restore:
From the CommCell Console, navigate to the <Client> | Virtual
Server.
Right-click the subclient that contains the data you want to restore,
point to Browse Backup Data.
In the Browse Options window, click OK.
From the Browse window, select the virtual machine(s) in the left
pane. The configuration and VMDK files of the virtual machines are displayed
in the right pane.
Click Recover All Selected in the bottom of the window.
From the General tab of the Restore Options for All Selected
Items dialog box:
Click Restore in place.
Click OK. When a virtual machine is
restored, it will be restored to the same destination per the time of backup.
Virtual machines can be restored to a
different destination host from which the data originated; this is referred to
as an out-of-place restore. The following sections provide the options available
for an out-of-place restore.
By default, the virtual machine is associated to the
client machine, as it was at the time of backup. However, an entire virtual
machine can be restored to a different client, by following the steps given
below:
From the CommCell Console, navigate to the <Client> | Virtual
Server.
Right-click the subclient that contains the data you want to restore,
point to Browse Backup Data.
In the Browse Options window, click OK.
From the Browse window, select the virtual machine in the left
pane. The configuration and VMDK files of the virtual machine are displayed
in the right pane.
Click Recover All Selected in the bottom of the window.
From the General tab of the Restore Options for All Selected
Items dialog box:
Click Virtual Machines.
Choose a different Destination Client from the dropdown list.
An entire virtual machine can be restored to a datastore of the original Virtual
Center or to a different one using the credentials of the Virtual Center.
Specifying a different location provides the flexibility to distribute restored
virtual machines to a location with greater space and resource availability,
should the virtual machine's original location prove not optimal.
When restoring a virtual machine, a Disk level backup must have been used to
back it up. Follow the steps given below to restore the virtual machine to a
different vCenter:
From the CommCell Console, navigate to the <Client> | Virtual
Server.
Right-click the subclient that contains the data you want to restore,
point to Browse Backup Data.
In the Browse Options window, click OK.
From the Browse window, select the virtual machine in the left
pane. The configuration and VMDK files of the virtual machine are displayed
in the right pane.
Click Recover All Selected in the bottom of the window.
From the General tab of the Restore Options for All Selected
Items dialog box:
Click Virtual Machines.
Choose a different Virtual Center by clicking on the Change
button.
Enter the name of the Virtual Center, that you want your virtual
machine to be restored into.
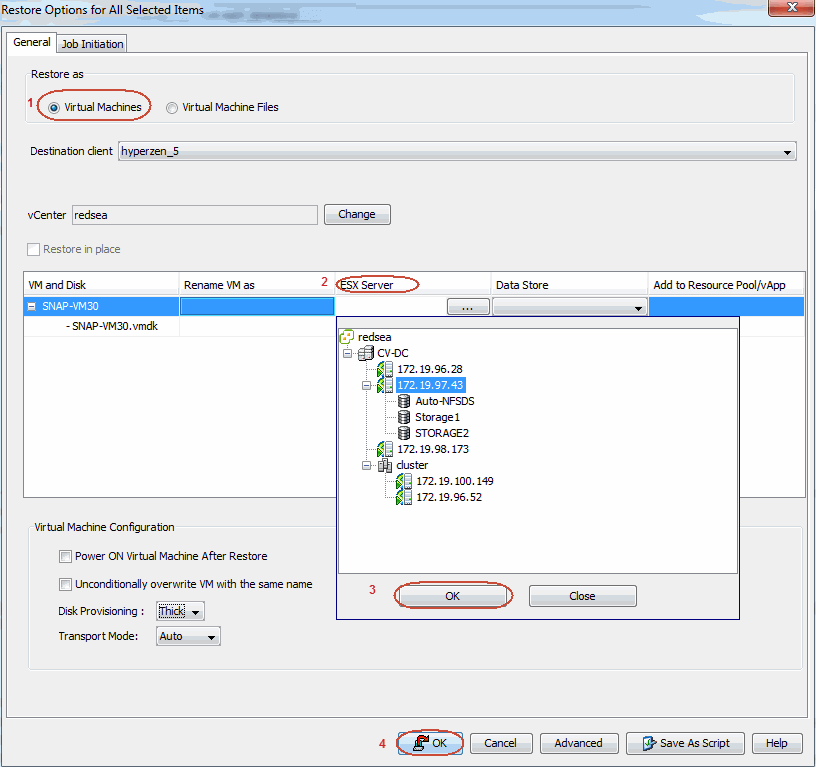
By default, the virtual machine is restored to the ESX
server, as it was at the time of backup. However, an entire virtual machine can
be restored to a different ESX server, by following the steps given below. Specifying
a different location provides the flexibility to distribute restored virtual
machines to a location with greater space and resource availability should the
virtual machine's original location prove not optimal.
Before restoring a virtual machine ensure the following:
A Disk Level backup is performed for the virtual machine.
The ESX server supports the hardware version of the virtual machine. If
the hardware version of the virtual machine is not supported by the ESX
server, the restore job will complete successfully but the virtual machine
will be inaccessible.
From the CommCell Console, navigate to the <Client> | Virtual
Server.
Right-click the subclient that contains the data you want to restore,
point to Browse Backup Data.
In the Browse Options window, click OK.
From the Browse window, select the virtual machine in the left
pane. The configuration and VMDK files of the virtual machine are displayed
in the right pane.
Click Recover All Selected in the bottom of the window.
From the General tab of the Restore Options for All Selected
Items dialog box:
Click Virtual Machines.
Choose a different ESX Server by clicking on theBrowsebutton.
Select a different ESX Server from the Browse window.
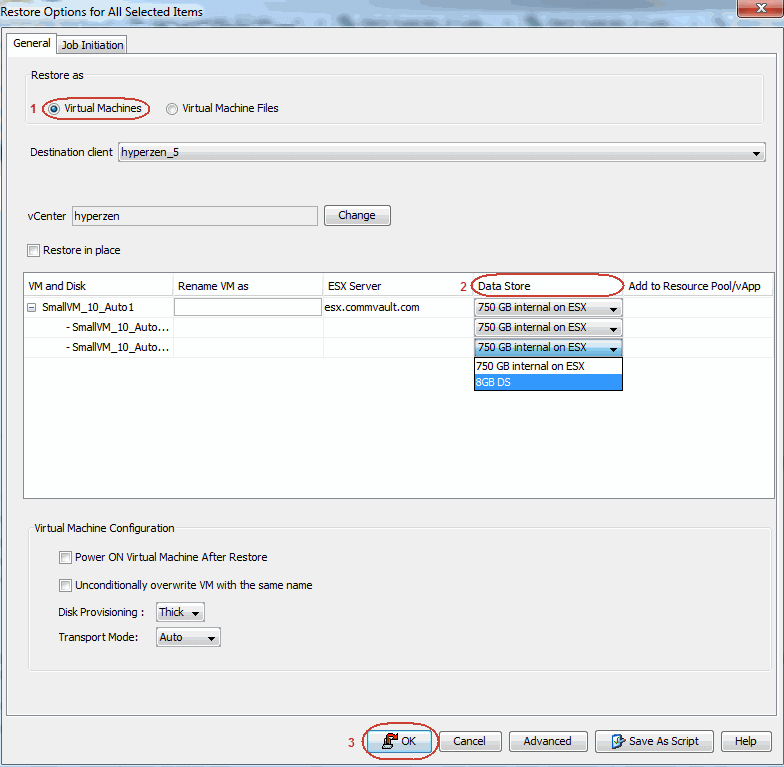
You can specify a different datastore on the destination host by following the
steps given below. When restoring a virtual machine, a Disk Level backup must have been used to
back it up. After restore, the virtual machine is
automatically associated to the new data store selected.
From the CommCell Console, navigate to the <Client> | Virtual
Server.
Right-click the subclient that contains the data you want to restore,
point to Browse Backup Data.
In the Browse Options window, click OK.
From the Browse window, select the virtual machine(s) in the left
pane. The configuration and VMDK files of the virtual machines are displayed
in the right pane.
Click Recover All Selected in the bottom of the window.
From the General tab of the Restore Options for All Selected
Items dialog box:
Click Virtual Machines.
Choose a different Data Store from the dropdown list.
If a virtual machine has multiple disks a destination datastore can
be selected for each disk.
By default, when a virtual machine is restored it will be
restored to its original resource pool. You can select a specific resource pool/vApp on the host that the
virtual machine can be
restored into. vApp is a customized form of a resource pool. Follow the steps given below to add/change a virtual machine to a Resource Pool/vApp:
From the CommCell Console, navigate to the <Client> | Virtual
Server.
Right-click the subclient that contains the data you want to restore,
point to Browse Backup Data.
In the Browse Options window, click OK.
From the Browse window, select the virtual machine in the left
pane. The configuration and VMDK files of the virtual machine are displayed
in the right pane.
Click Recover All Selected in the bottom of the window.
From the General tab of the Restore Options for All Selected
Items dialog box:
Click Virtual Machines.
Add the virtual machine to a Resource Pool/vApp by clicking on theBrowsebutton.
Select a different Resource Pool/vApp from the Browse window.
By default, the Virtual Machine is restored with
the original name, exactly as it was at the time of backup. This can be
changed to a more appropriate name by following the steps given below:
From the CommCell Console, navigate to the <Client> | Virtual
Server.
Right-click the subclient that contains the data you want to restore,
point to Browse Backup Data.
In the Browse Options window, click OK.
From the Browse window, select the virtual machine in the left
pane. The configuration and VMDK files of the virtual machine are displayed
in the right pane.
Click Recover All Selected in the bottom of the window.
From the General tab of the Restore Options for All Selected
Items dialog box:
Click Virtual Machines.
Type in a different name to the virtual machine by double clicking the
Restore as text box.
Click OK. When the virtual machine is
restored, it is restored with the new name.
Ensure that Service Pack 2 has been installed on the CommServe and Client computers prior to
using this feature.
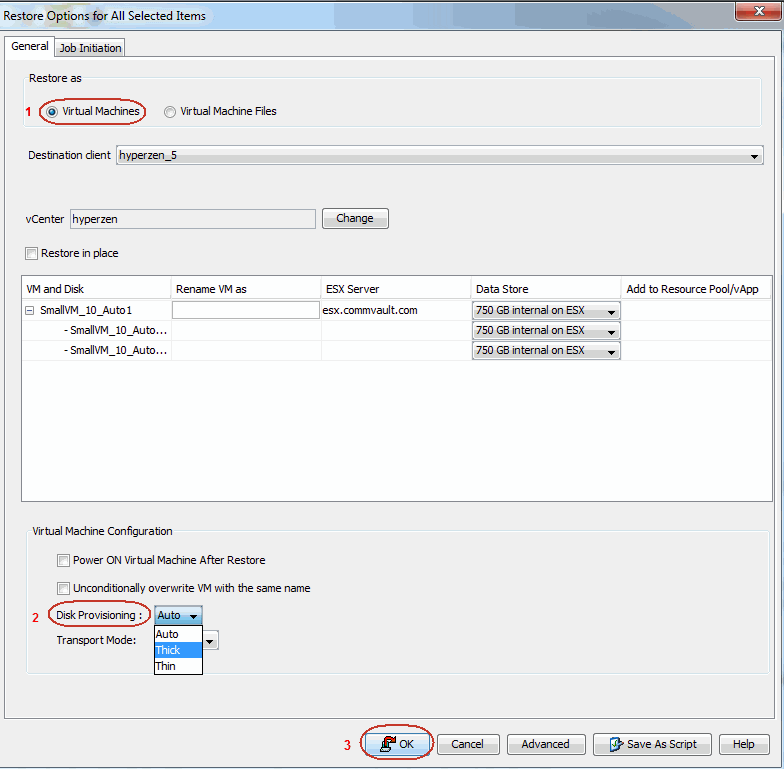
By default the disk is restored with its original
provisioning type,
as it was at the time of backup. The disk
provisioning types available are:
Auto: same as the source virtual machine, chosen during backup.
Thick: Thick provisioning allocates and commits full size to
the data store.
Thin: Thin provisioning allocates full size and commits only as much storage space as the disk needs for its
initial operation.
Follow the
steps given below to change the
provisioning type on restore:
From the CommCell Console, navigate to the <Client> | Virtual
Server.
Right-click the subclient that contains the data you want to restore,
point to Browse Backup Data.
In the Browse Options window, click OK.
From the Browse window, select the virtual machine in the left
pane. The configuration and VMDK files of the virtual machine are displayed
in the right pane.
Click Recover All Selected in the bottom of the window.
From the General tab of the Restore Options for All Selected
Items dialog box:
Click Virtual Machines.
Choose an appropriate Disk provisioning option from the drop
down list.
Click OK. When the virtual machine is
restored, it is restored with the disk provisioning type selected.
Ensure that Service Pack 2 has been installed on the CommServe and Client computers prior to
using this feature.
By default, the software automatically defaults to the
auto transport mode. Choosing Auto, software will automatically select the
best suitable transport mode based on the setup. Follow the
steps given below to restore virtual machines with a different Transport Mode
option:
From the CommCell Console, navigate to the <Client> | Virtual
Server.
Right-click the subclient that contains the data you want to restore,
point to Browse Backup Data.
In the Browse Options window, click OK.
From the Browse window, select the virtual machine in the left
pane. The configuration and VMDK files of the virtual machine are displayed
in the right pane.
Click Recover All Selected in the bottom of the window.
From the General tab of the Restore Options for All Selected
Items dialog box:
Click Virtual Machines.
Choose an appropriate Transport Mode option from drop down
list.
Click OK. When the virtual machine is
restored, it is restored with the transport mode you selected.
Ensure that Service Pack 2 has been installed on the CommServe and Client computers prior to
using this feature.
By default, this option is deselected. When Virtual machines with the same name
exist on the
destination host, you can choose the overwrite an existing virtual machine
option, to free up space on the datastore. By doing this,
the existing virtual machines are deleted and the newly restored virtual
machines replace them.
Follow the steps given below to overwrite virtual machines with same name:
From the CommCell Console, navigate to the <Client> | Virtual
Server.
Right-click the subclient that contains the data you want to restore,
point to Browse Backup Data.
In the Browse Options window, click OK.
From the Browse window, select the virtual machine in the left
pane. The configuration and VMDK files of the virtual machine are displayed
in the right pane.
Click Recover All Selected in the bottom of the window.
From the General tab of the Restore Options for All Selected
Items dialog box:
Click Virtual Machines.
Select Unconditionally overwrite VM with same name option to
overwrite an existing virtual machine name.
Ensure that Service Pack 2 has been installed on the CommServe and Client computers prior to
using this feature.
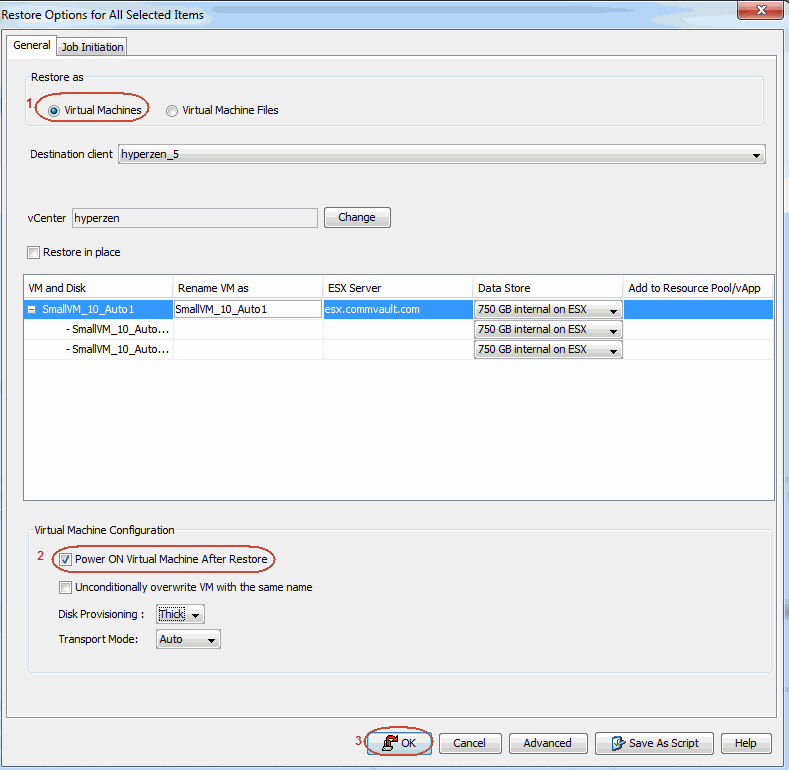
Once
a virtual machine has been restored, it can be automatically powered on be
following the steps given below:
From the CommCell Console, navigate to the <Client> | Virtual
Server.
Right-click the subclient that contains the data you want to restore,
point to Browse Backup Data.
In the Browse Options window, click OK.
From the Browse window, select the virtual machine in the left
pane. The configuration and VMDK files of the virtual machine are displayed
in the right pane.
Click Recover All Selected in the bottom of the window.
From the General tab of the Restore Options for All Selected
Items dialog box:
Click Virtual Machines.
Select Power On Virtual Machine After Restore to power on the virtual machine immediately following restore
completion.
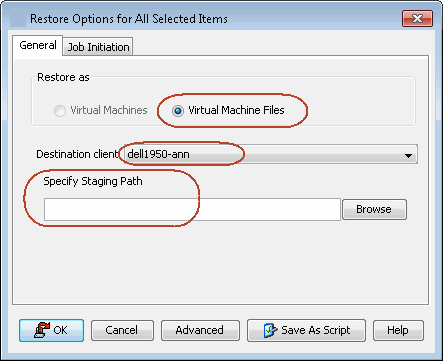
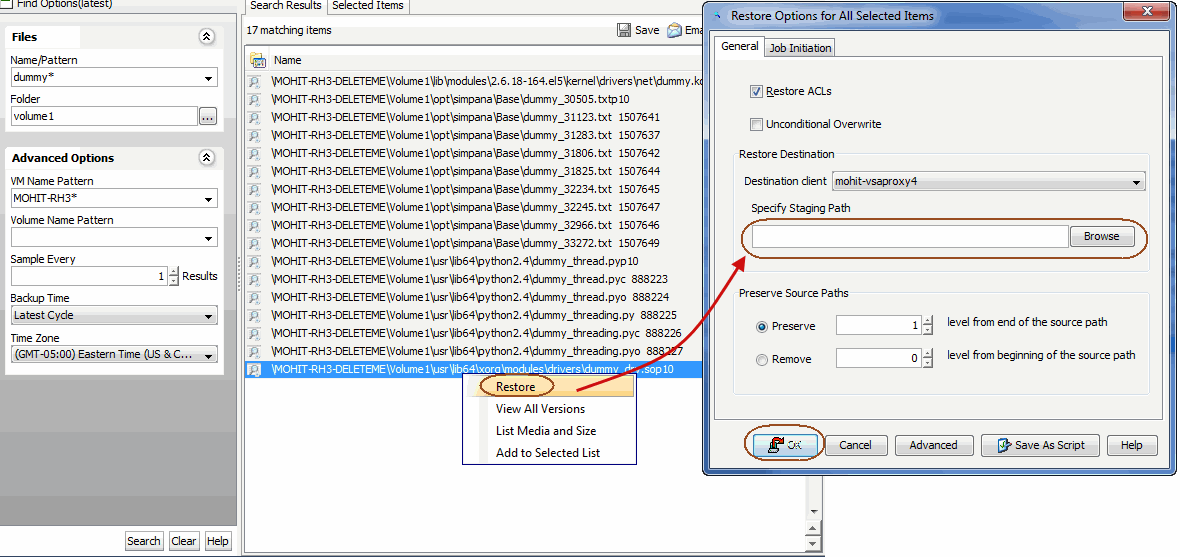
You can restore single or multiple VMDK files from a virtual machine.
From the CommCell Console, navigate to the Client Computers | <Client> | Virtual
Server | <Instance> | <BackupSet>.
Right-click the subclient that contains the VMDK file you want to
restore and select Browse Backup Data.
In the Browse Options window, click OK.
The Browse window displays list of backed up virtual machines in
the left pane. The configuration and VMDK files of the virtual machine are displayed
in the right pane.
Select the required VMDK file from the right pane,
Click Recover All Selected in the bottom of the window.
From the General tab, select a Destination client (e.g. a
proxy computer).
Click Browse and specify the Staging Path.
Click OK.
The VMDK file will be restored to the location specified in the staging path.
For example: C:\Program Files\Calypso\Base\VMWARE\VDDK\bin>vmware-mount.exe
Z: /d
When restoring the VMDK files, do not include
the configuration files like vmsd. It is recommended that you select and
restore the .VMDK files to mount as Volume.
In some cases, it may be desirable to mount virtual machine VMDK files directly
using the VMware Disk Mount utility following a restore operation. Doing so mounts
all the VMDK file data as a complete volume, providing easy access to specific
data residing on the original VMDK file.
To mount VMDK files from disk-level backups execute the following at the
command line:
vmware-mount.exe <DriveLetter> <Path to disk>
For example: C:\Program Files\VMware\VMware DiskMount
Utility>vmware-mount.exe Q: "G:\DiskFiles\scsi0-0-0-EXCH-VM2.vmdk"
To unmount VMDK files from disk-level backups execute the following at the
command line:
Vmware-mount.exe /d <DriveLetter>
For example: C:\Program Files\VMware\VMware DiskMount
Utility>vmware-mount.exe /d Q: "G:\DiskFiles\scsi0-0-0-EXCH-VM2.vmdk"
To mount VMDK files from volume-level backups execute the following at the
command line:
vmware-mount.exe <DriveLetter> <Path to disk> E
For example: C:\Program Files\VMware\VMware DiskMount
Utility>vmware-mount.exe Q: "G:\DiskFiles\C.vmdk"
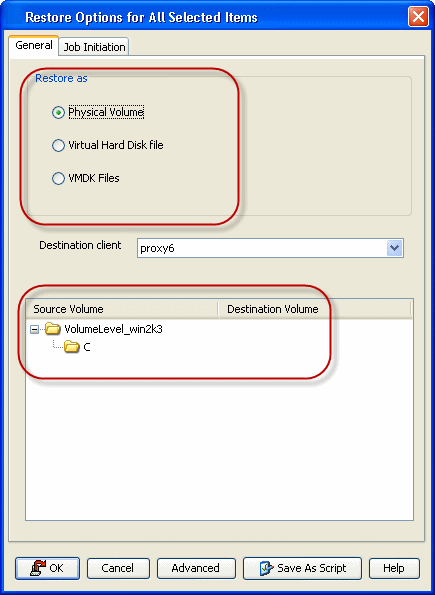
Volumes can be restored to a physical volume, a VMDK file, or a VHD file
format. The volumes that are supported are for Windows-based VMware
Virtual Servers and must have been formatted with the NTFS file system.
When
restoring a volume, a Volume Level backup must have been used to
back it up.
From the CommCell Console, perform a Browse and Restore
operation.
In the Browse Options window, click Entire Volume and
click OK.
In the Browse window, click a volume in the right pane
and click Recover All Selected.
From the General tab, click either:
Physical Volume, whichautomatically mounts the volume
on the destination VMware virtual machine.
Virtual Hard Disk file, which provides the facility to
manually mount the volume on another virtual machine of any
virtualization vendor type (such as Hyper-V) to mine specific data.
VMDK Files, which provides the facility to manually mount the
volume on another virtual machine to mine specific data.
Choose the Destination Client (e.g., a proxy computer).
If restoring a physical volume and if you want to restore the volume on a different volume from the
source, double-click Destination Volume and click ... to
browse and select a volume.
To restore files and folders to a Windows client, the client must have one of
the following components installed:
Windows File System
iDataAgent
Restore Only Agent for Windows File System.
Consider that the following before restoring files and folders from a virtual
machine:
The virtual machine has the MBR partition. If the virtual machine
has GPT partition, you can restore files from a backup copy. For more
information, refer to
Restore
Data from a Backup Copy.
You cannot restore any archived files and folders.
It is recommended to perform the file-level restores from disk or
volume-level backups only when you are restoring small files. For example,
restoring a 2GB file from a disk-level backup is not recommended.
You can restore files from NTFS file systems with the following limitations:
The formatted cluster size (allocation unit) must be 1024 or greater.
You cannot restore any archived files and folders.
You cannot restore any file that has zero bytes, symbolic links, or hard
links associated with it.
You cannot restore files that have been dehydrated by Windows 2012 dedup.
You cannot restore files from volumes created on Windows Storage Spaces.
If you cannot restore a file, you can restore the complete virtual
machine or the disk that contains the file.
When restoring a file or folder on a virtual machine, the Enable Granular Recovery
must have been selected when the backup was performed.
From the CommCell Console, perform a Browse and Restore
operation.
In the Browse Options window, click Individual files/folders.
Click OK.
In the Browse window, click a file or folder in the right pane,
and then click Recover All Selected.
From the General tab, specify a Staging Path. This is the
destination path to which the file will be restored.
Click OK.
The Preserve Source Path/Remove Source Path
feature is supported for File level restores from File level backup
jobs. It is not relevant for Volume Level and Disk Level backups and restores.
You can restore files and folders from a Linux virtual machine. Before restoring
the files and folders, ensure that the virtual machine satisfies the following
prerequisites:
The virtual machine has the ext2 or ext3 file system.
Image Level iDataAgent or
Restore Only Agent for Image Level iDataAgent
for Unix is installed on the Linux virtual machine.
A Disk-Level backup has been performed and the Enable Granular
Recovery has been selected when the backup was performed.
Do not restore Windows backup data to a Linux
client.
You cannot restore any file that has zero bytes, symbolic
links, or hard links associated with it. You must restore the complete
virtual machine.
From the CommCell Console, perform a Browse and Restore
operation.
In the Browse Options window, click Individual files/folders.
Click OK.
In the Browse window, select a file or folder in the right pane
and click Recover All Selected.
From the General tab:
Choose the Destination Client
from the
dropdown list.
The destination client must have ext2 or ext3 file system.
Enter the Staging Path of the Linux client or click Browse
to locate the path.
The Restore ACLs option is not supported for
this operation.
The Preserve Source Paths option is not supported when
you are restoring files or folders from a virtual machine.
When performing a file-level restore from a Linux virtual machine to a Linux client, select
the Unconditional Overwrite option to restore folder permissions.
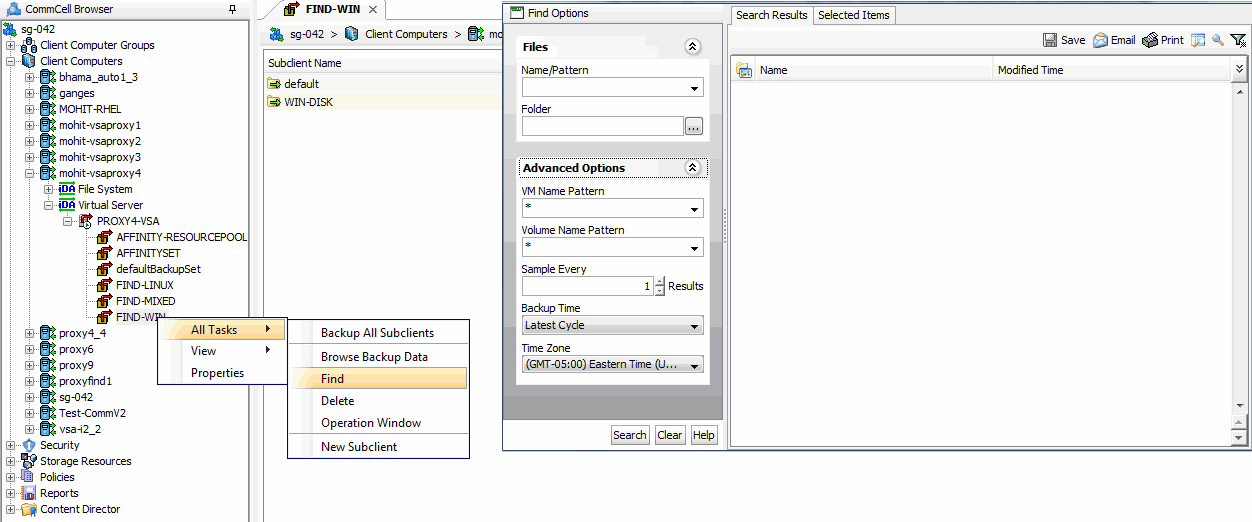
Use Find to search and locate files or folders from a data protection backup. Find is
available from a backup set, subclient, or by right-clicking a virtual machine, volume
or a folder from a Browse and Restore operation. If you perform the Find
operation at the backupset level, the last backed up subclient will be searched.
It is recommended to perform the Find operation at a subclient level to get
accurate results.
Ensure that the following prerequisites are satisfied before using the Find
feature:
Ensure that you are not using
Linux MediaAgent to backup the data. You cannot find files or folders from the
data that is backed up using a Linux MediaAgent.
If you want to find files or folders on a Linux virtual machine, ensure
that the virtual machine has ext2 or ext3 file systems.
You can find files or folders from a SnapProtect Backup only for Windows
virtual machines.
If you want to restore a specific file or folder from a backup set or
subclient, you can search the file or folder in the backup set or subclient.
Before searching the subclient, ensure that all the files and folders in the
subclient are included in the index. The files and folders are included in the
index when you perform the File Level backup or Enable Granular Recovery before
performing the Volume Level or Disk Level backup.
From the CommCell Browser, navigate to Client Computers |<Client>|
Virtual Server | <Instance>.
Right-click Backup Set or Subclient, click
All Tasks | Find.
Enter the file name in the Name/Pattern box. You can use
wildcards to specify the pattern of file names.
These wildcards, or a combination of these
wildcards, are supported in the Subject field:
* for any number of
characters e.g., Accounting*.
? for any one character
e.g., user_group?.
[] for a range of characters
e.g., [a-k]Lee.
[!] for a negation of a
range of characters e.g., [!a-k] Lee.
Enter the path of the location where you want to search the file. Do not
type the drive letter while specifying the path.
Click Search.
The files that match the criteria are displayed in Search
Results.
If a file or folder exists on multiple virtual machines and you want to
restore files from specific machines, follow the steps given below to search the
file:
From the CommCell Browser, navigate to Client Computers |<Client>|
Virtual Server | <Instance>.
Right-click Backup Set or Subclient, click
All Tasks | Find.
Enter the file name in the Name/Pattern box. You can use
wildcards to specify the pattern of file names.
Enter the path of the location where you want to search the file. Do not
type the drive letter while specifying the path.
Click Advanced Options.
Enter the name of Virtual Machine in the VM Name Pattern box. You
can also use wildcards to specify the pattern of virtual machine names.
Click Search.
The files that match the criteria are displayed in Search
Results.
When you are using the Find option for a subclient or a backupset you cannot
specify time range. You can find files and folders from the latest backup cycle.
If you want to find data backed up during a specific time period, follow the
steps given below:
From the CommCell Browser, navigate to Client Computers |<Client>|
Virtual Server | <Instance>.
From the CommCell Browser, navigate to Client Computers |<Client>|
Virtual Server | <Instance>.
Right-click Backup Set or Subclient, click
Browse Backup Data.
Select Specify Browse Time.
Select a date and time to Browse Data Before it.
Click OK.
Right-click a volume, virtual machine or a folder and select Find.
Enter search criteria (e.g., File name or Folder name) as
explained in the previous sections.
Click Search.
The files that match the criteria are displayed in Search
Results.
From the CommCell Browser, navigate to Client Computers |<Client>|
Virtual Server | <Instance>.
Right-click Backup Set or Subclient, click
All Tasks | Find.
Click Advanced Options.
In Sample Every, specify the rate at which files are
sampled to determine whether they match the search criteria. For
example: If 20 files on a virtual machine are matching the search
criteria and specified sampling rate is 5, then every 5th file is
displayed in the search result.
Keep in mind that the order in which
files are sampled is based on the order in which the files
were backed up.
The
default value of 1 indicates that
every file will be sampled.
Click Search.
The files that match the criteria are displayed in Search
Results.
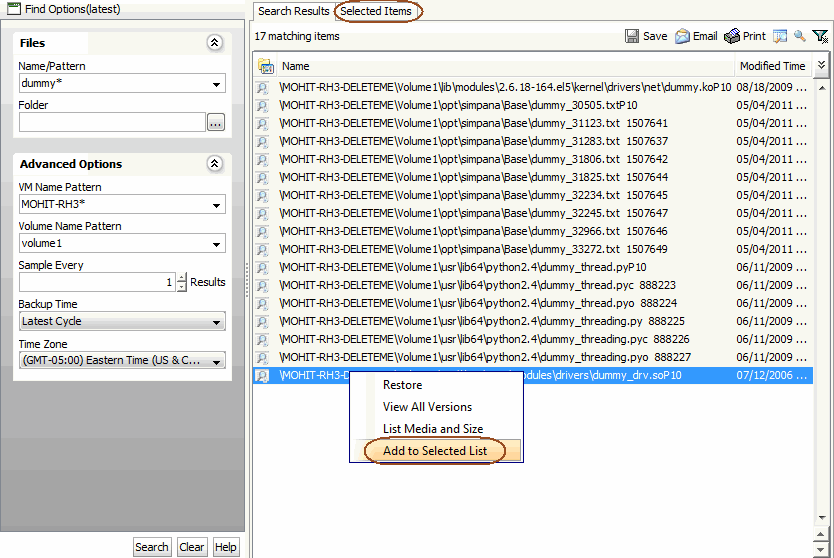
You can control the the items you need to restore by moving items to the Selected List. You
can narrow down the
list from the Search Results so that you are able to recover only
the items from the Selected List.
From the CommCell Browser, navigate to Client Computers |<Client>|
Virtual Server | <Instance>.
Right-click Backup Set or Subclient, click
All Tasks | Find.
Enter search criteria (e.g., File name, Folder, VM Name, etc.) as
explained in the previous sections.
Click Search.
The files that match the criteria are displayed in Search
Results.
Right-click a file and select Add to Selected List.
Click the Selected Items tab and the file will be displayed.
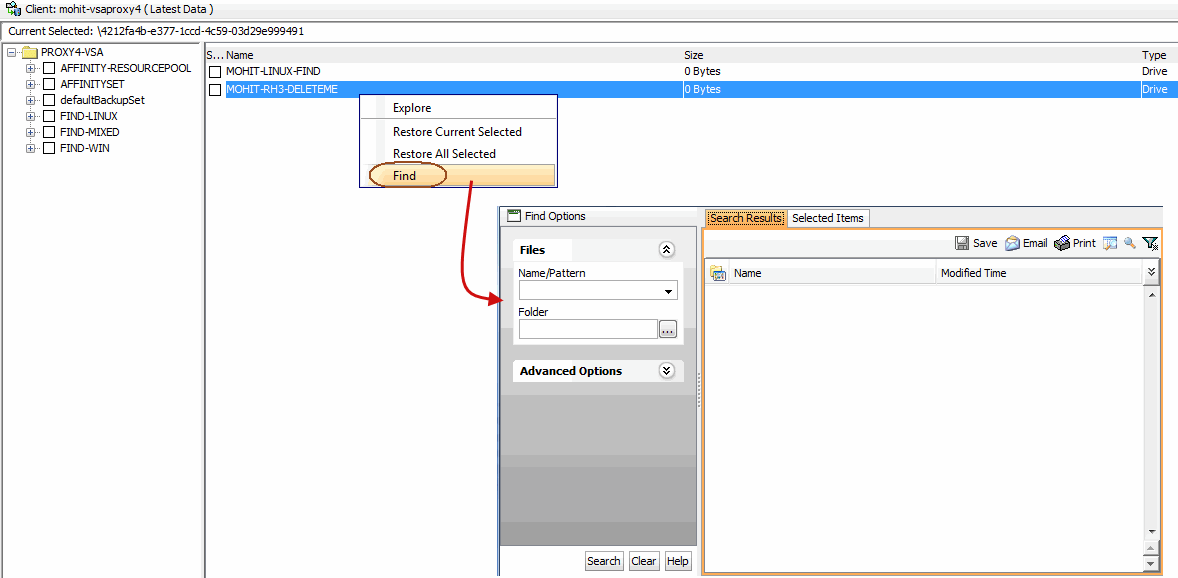
When you access Find as part of a Browse operation, keep in mind that the time range values are not pre-populated by any previously selected time range settings entered on the Browse Options or Advanced Browse Options dialog.
From the CommCell Browser, navigate to Client Computers |<Client>|
Virtual Server | <Instance>.
Right-click Backup Set or Subclient, click
Browse Backup Data.
Right-click a volume, virtual machine or a folder and select Find.
Enter search criteria (e.g., File name or Folder name) as
explained in the previous sections.
Click Search.
The search results are displayed in the right pane.
For container, volume, and file-level restores from disk and volume-level backups
using any Unix (AIX, HP-UX, or Solaris) MediaAgent, perform the following steps:
From the CommCell Console, click Control Panel and then
double-click Media Management.
Click the Resource Manager Configuration tab.
Enter the Value 1 for the Allow restore jobs to use
alternative Media Agent and Drive Pool to access required media
parameter.
Click OK.
From the CommCell Console, navigate to Client Computers |
Virtual Server
Right-click an instance and click All Tasks | Browse.
Select a Windows MediaAgent.
Select a restore type and click OK.
Select the virtual machine from which you want to restore the files and
folders. The List Media dialog box appears.
Click Select All.
Click Restore Index. The index of the Unix MediaAgent
will be restored to the selected Windows MediaAgent. All the
volumes, files and folders on the selected virtual machine will be
displayed.
The index restore operation can be avoided if the index cache is shared
between the Unix and Windows MediaAgents. For more information about sharing the
index cache, refer to
Configure a MediaAgent for Index Cache Sharing.
Select the guest files and folder for restore and click Recover All
Selected. You cannot select an entire volume for restore.
New virtual machines can be created with select volumes or disks from Container
restores of disk-level backups. The VMware Converter utility is used to accomplish
this. To do so:
Perform a Browse and Restore operation.
From the Browse window, select the container that was restored from
the virtual machine to which it was restored.
Select the .vmx file from the location containing the container.
Click OK.
Provide the credentials for the Virtual Center or ESX Server to which you
want to restore the .vmx file.
If the credentials provided are for the Virtual
Center, you must also select the desired ESX Server to which you want to restore
the .vmx file.
Select the Select volume copy from Data copy option.
Deselect any volumes you do not want to restore.
The virtual machine will be restored with the selected volumes.
The option to browse the backup data provides the facility to view and
selectively restore/recover the data that was backed up. The browse option can be invoked from the client, agent, instance, backup set,
or subclient level depending on the functionality of a given agent.
Depending on the agent, there are several additional options to customize your
browse, including:
Capability to browse the most recent (latest) data.
Capability to browse data in a specified time range.
Capability to limit the browse to a specified path.
Facility to specify the page size of the browse window.
Ability to browse the image of the data as it existed at the specified browse
time.
Ability to browse from a specified storage policy copy.
Ability to browse folders/files owned by specific users.
Use the following steps to browse data:
From the CommCell Browser, navigate to <Client>.
Right-click Instance or Backup Set or
Subclient, click All Tasks | Browse/Browse
Backup Data.
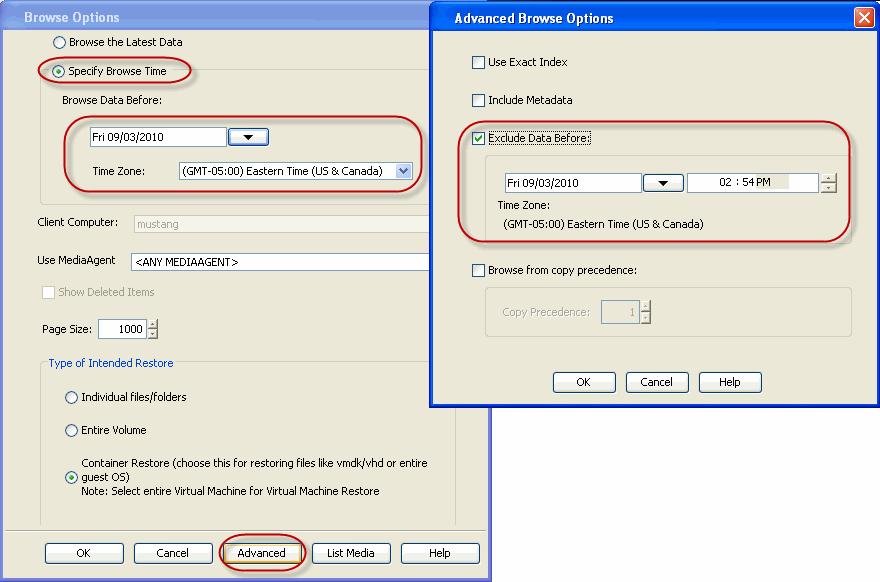
To browse data that is older than the most recent full backup specify a
Browse Data Before date that pre-dates the full backup. Remember, the
Browse Data Before date establishes the ending point of the search. Consequently,
using a Browse Data Before date that pre-dates the most recent full backup
starts the search in the previous full backup cycle. This is only valid if the data in that full backup cycle has not expired.
The Restore By Jobs feature provides the facility to select a specific backup
job to be restored. This method of restoring data is considerably faster as it
reads continuously on the tape and retrieves the data and does not depend on the
indexing subsystem to get the seek offsets on the media.
This feature can be used in different scenarios such as the following:
To restore point-in-time data associated with a specific backup job,
such as full, incremental, differential, etc.
To restore CommServe DR data for the disaster recovery or for creating
a hot-site purposes.
To restore multiplexed data from the same client.
Consider the following when restoring by jobs:
Run a restore by jobs whenever you want to restore the entire contents
of the job.
Avoid running restores by jobs for jobs associated with the default
subclient. If you do this, the entire contents of the machine will be
restored. As such, this may cause problems (e.g., the machine might run out
of space) or produce undesirable results (e.g., you might end up restoring
operating system files or directories that you really do not want to
restore).
Avoid modifying the contents of any associated subclients since this may
result in the retrieval of older data.
Use the following steps to restore data by jobs.
From the CommCell Browser, right-click the level whose data you want to
browse, click View History, and then click the Backup History.
From the Backup History Filter window, select the filter options,
if any, that you want to apply and click OK.
From the Backup Job History window, right-click the backup job that need
to be restored and select Browse.
From the Browse Options
dialog box,
click OK to execute the browse using the Browse the Latest Data
option.
From the Browse window, select the instance node in the left pane
and then select the required data and logs in the right pane, and click the Recover All Selected button at the bottom of the
window.
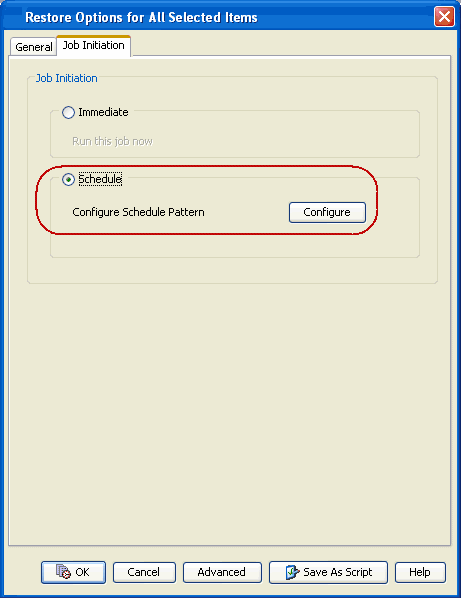
Once you initiate the restore operation, a restore job is generated in the Job
Controller. Jobs can be managed in a number of ways. The following sections provide
information on the different job management options available:
Jobs that fail to complete successfully are automatically restarted based on
the job restartability configuration set in the Control Panel. This configuration
can be changed at any time; however, changes to this configuration will affect all
jobs run in the entire CommCell.
It is also possible to override the default CommServe configuration for individual
jobs by configuring retry settings when initiating the job. This configuration,
however, will apply only to the specific job.
Restore jobs for this Agent are re-started from the beginning.
Configure job restartability at the CommServe level
In the CommCell Console, click the Control Panel icon, then double-click
Job Management.
In the Job Restarts tab of the Job Management dialog box, select
a job type from the Job Type list, and then select the Restartable
check box.
To change the maximum number of times the Job Manager will try to restart
a job, select a number in the Max Restarts box.
To change the time interval between attempts by the Job Manager to restart
the job, select a number of minutes in the Restart Interval (Mins) box.
Click OK to save your changes.
Configure Job Restartability for an Individual Job
From the Restore Options dialog box, click Advanced, then
select the Job Retry tab and specify the following as desired:
Total Running Time - The maximum elapsed time, in hours and minutes,
from the time that the job is created.
Number of Retries - The number of times that Job Manager will
attempt to restart the job.
Kill Running Jobs When Total Running Time Expires - Option to
kill the job when the specified Total Running Time has elapsed, even if
its state is "Running".
If a restore job fails to complete successfully, you can resubmit the job without
the need to reconfigure the original job's restore options using the Resubmit
Job feature. When a job is resubmitted, all the original options, restore destinations,
and other settings configured for the job remain in tact.
Resubmit a Restore Job
From the CommCell Browser, right-click a client computer whose data recovery
history you want to view, click View,then click to view a job
history.
From the Job History Filter dialog box, select Restore.
If you want to view more advanced options for restores, from the Job
History Filter, select Restore, then click Advanced.
From the Data Recovery History Advanced Filter select the destination
client computer of the restores you would like to view, then click OK.
The system displays the results of the options you selected in the Data
Recovery Job History window.
The following controls are available for running jobs in the Job Controller window:
Suspend
Temporarily stops a job. A suspended job is not terminated;
it can be restarted at a later time. Only preemptible jobs can be suspended.
Resume
Resumes a job and returns the status to Waiting,
Pending, Queued, or Running depending on the availability of resources or
the state of the operation windows and activity control settings.
Restore jobs for this Agent are resumed from the beginning.
Kill
Terminates a job.
These controls can be applied to:
All jobs in the Job Controller.
All selected jobs in the Job Controller providing you have the correct security
associations at the proper level for each job selected.
All data protection operations running for a particular client or client/agent.
All data protection operations running for a particular MediaAgent.
Control A Job
From the Job Controller of the CommCell Console, right-click the job and
select Kill, Suspend, or Resume as desired.
When killing a job:
Click Yes when the confirmation prompt appears if you are sure
you want to kill the job. The job status may change to Kill Pending
for a few moments while the operation completes. Once completed, the job
status will change to Killed and it will be removed from the Job
Controller window after five minutes.
When suspending a job:
The job status may change to Suspend Pending for a few moments
while the operation completes. The job status then changes to Suspended.
When resuming a job:
As the Job Manager attempts to restart the job, the job status changes
to Waiting, Pending, or Running.
Several additional options are available to further refine your restore
operations. The following table describes these options, as well as the steps to
implement them.
Be sure to read the overview material referenced for each feature prior to using
them.
Option
Description
Related Topics
Use hardware revert capability if available
This option allow you to revert the data to the time when the snapshot was
created. Selecting this option brings back the entire virtual machine to the
point when the snapshot was created, overwriting all the modifications
to data since the snapshot creation.
Revert operations for a virtual machine are supported on NetApp File Servers but
not from SnapVault or SnapMirror snapshots.
Other file servers are not supported. To perform a revert operation, the SnapRestore license is required on the NetApp file server.
From the CommCell Browser, navigate to Client Computers |
Virtual Server | <Instance>
Right-click <backup set> and click All Tasks | Browse Backup Data.
From the Browse Options dialog box, select Container Restore
and click OK.
Select the virtual machine that you want to revert and click Recover All Selected.
From the Restore Options dialog box, click Advanced.
Select the Use hardware revert
capability if available
option.
Click OK to confirm the revert operation.
Click OK from the Advanced Restore Options dialog box.
This option allows you to automatically detect regular expressions
(wildcard characters) in the virtual machines assigned to a subclient.
This allows you to restore the files and folders in virtual machines which contain regular
expressions in their name (e.g., c:\[test1]).
From the CommCell Browser, click
Client Computers | Virtual Server | <instance name>
| BackupSet. The
default and other subclients (if available) are displayed on the right-hand
windowpane.
Right-click the backupset that contains the
data you want to restore. Click All Tasks and then click Browse
Backup Data.
From the Browse Options window, select the Type of Intended
Restore and click OK.
From the browse window, select the data to be restored and click
Recover all Selected.
From the Restore Options for All Selected Items dialog box, click
Advanced.
From the Advanced Restore Options (General) tab, select
Automatically Detect Regular Expressions option.
Click OK.
Impersonate User
This information is needed only if you intend to restore data to a
mapped network drive, shared network drive, or directory to which you do
not have access privileges.
You can impersonate a windows logon
information with an account that has access rights to restore data.
From the CommCell Browser, click
Client Computers | Virtual Server | <instance name>
| BackupSet. The
default and other subclients (if available) are displayed on the right-hand
windowpane.
From the CommCell Browser, right-click the backupset that contains the
data you want to restore. Click All Tasks and then click Browse
Backup Data.
From the Browse Options window, select the Type of Intended Restore
and click OK.
From the browse window, select the data to be restored and click
Recover all Selected.
From the Restore Options for All Selected Items dialog box, click Advanced.
From the Advanced Restore Options (General) tab, select
Impersonate User option.
In User Name and Password boxes, enter a user name
and password which has access privileges. In Confirm Password
box, type the password again.
Click OK.
Startup Options
The Job Manager will use the startup priority setting when allocating the
required resources. This is useful if you have jobs that are very important and
must complete, or jobs that can be moved to a lower priority.
From the CommCell Browser, click
Client Computers | Virtual Server | <instance name>
| BackupSet. The
default and other subclients (if available) are displayed on the right-hand
windowpane.
From the CommCell Browser, right-click the backupset that contains the
data you want to restore. Click All Tasks and then click Browse
Backup Data.
From the Browse Options window, select the Type of Intended Restore
and click OK.
From the browse window, select the data to be restored and click
Recover all Selected.
From the Restore Options for All Selected Items dialog box, click Advanced.
From the Advanced Restore Options (Startup) tab, select UseDefault Priority
option.
Select Change Priority option to change the priority for a
job, between 0 (highest priority) and 999 (lowest priority).
Select Start up in Suspended State option to specify the selected
job to start in the Job Controller in a suspended state.
When you select Restore from copy precedence option, the system recovers or
retrieves data from the selected storage policy copy (Synchronous Copy or
Selective Copy). If data does not exist in the specified copy, the data recovery
or retrieve operation fails even if the data exists in another copy of the same
storage policy.
When cleared, (or by default) the system recovers or retrieves data from the
storage policy copy with the lowest copy precedence. If the data was pruned from
the primary copy, the system automatically recovers or retrieves from the other
copies of the storage policy in the lowest copy precedence to highest copy
precedence order.Once the data is found, it is recovered or retrieved, and no
further copies are checked.
From the CommCell Browser, click
Client Computers | Virtual Server | <instance name>
| BackupSet. The
default and other subclients (if available) are displayed on the right-hand
windowpane.
From the CommCell Browser, right-click the backupset that contains the
data you want to restore. Click All Tasks and then click Browse
Backup Data.
From the Browse Options window, select the Type of Intended Restore
and click OK.
From the browse window, select the data to be restored and click
Recover all Selected.
From the Restore Options for All Selected Items dialog box, click Advanced.
From the Advanced Restore Options (Copy Precedence) tab, select
Restore from copy precedence option.
Select the number to change the selected copy's precedence. The numbers
will move a copy to a higher or lower precedence in increments of 1.
Data Recovery operations use a specific data path (Library, MediaAgent, Drive
Pool, and Drive) to perform the restore operations as configured in the
CommCell. By default, the system automatically identifies the data path for the
restore operations. You can change the data path at the restore level by
selecting a specific MediaAgent, library, drive pool or drive in the Advanced
Restore Options dialog.
The following are some of the important situations where you may need to
change the data path:
To free heavily loaded resources such as MediaAgents and libraries.
A library suffers severe hardware damage and you need to move its media
to a different library in order to access data secured by data protection
operations.
A drive pool within a library is being used much more frequently than
another, and a storage policy copy from the more active drive pool can be
assigned to the less active one.
From the CommCell Browser, click
Client Computers | Virtual Server | <instance name>
| BackupSet. The
default and other subclients (if available) are displayed on the right-hand
windowpane.
From the CommCell Browser, right-click the backupset that contains the
data you want to restore. Click All Tasks and then click Browse
Backup Data.
From the Browse Options window, select the Type of Intended Restore
and click OK.
From the browse window, select the data to be restored and click
Recover all Selected.
From the Restore Options for All Selected Items dialog box, click Advanced.
From the Advanced Restore Options (Data Paths) tab, select the MediaAgent
and Library that you wish to perform the restore.
Select the Drive Pool and Drive for optical and tape
libraries.
Select the name of the Proxy server if you wish to restore using
a proxy server.
You can configure encryption for the specific subclient during the data recovery
operation. You must configure encryption at the client level first and then at
the subclient level to encrypt data during data recovery operations using the
CommCell Console.
If you configure data encryption with a Pass-Phrase and do
not elect to export the pass-phrase to destination clients, you will be required to enter the pass-phrase during immediate data
recovery operations. Scheduled data recovery
operations require you to export the pass-phrase.
From the CommCell Browser, click
Client Computers | Virtual Server | <instance name>
| BackupSet. The
default and other subclients (if available) are displayed on the right-hand
windowpane.
From the CommCell Browser, right-click the backupset that contains the
data you want to restore. Click All Tasks and then click Browse
Backup Data.
From the Browse Options window, select the Type of Intended Restore
and click OK.
From the browse window, select the data to be restored and click
Recover all Selected.
From the Restore Options for All Selected Items dialog box, click Advanced.
From the Advanced Restore Options (Encryption) tab, enter a pass-phrase
in the Pass Phrase dialog box.
Enter the pass-phrase again in the Re-enter Pass Phrase dialog
box.
The restore jobs can be restarted either by a user or automatically by the Job
Manager. You can specify the maximum elapsed time before a job can be restarted
or killed and the maximum number of restart attempts.
From the CommCell Browser, click
Client Computers | Virtual Server | <instance name>
| BackupSet. The
default and other subclients (if available) are displayed on the right-hand
windowpane.
From the CommCell Browser, right-click the backupset that contains the
data you want to restore. Click All Tasks and then click Browse
Backup Data.
From the Browse Options window, select the Type of Intended Restore
and click OK.
From the browse window, select the data to be restored and click
Recover all Selected.
From the Restore Options for All Selected Items dialog box, click Advanced.
From the Advanced Restore Options (Job Retry) tab, select Enable Total Running Time
option.
Select Enable Number of Retries option.
Select Kill Running Jobs When Total Running Time Expires option.
Virtual machines can be restored to any datastore on the ESX Server
using the credentials of the default ESX Server or the Virtual Center.
You can Override the default selection and select the desired location
to which the virtual machine will be restored. These options provide the
flexibility to distribute restored virtual machines to a location with
greater space and resource availability.
From the CommCell Browser, click
Client Computers | Virtual Server | <instance name>
| BackupSet. The
default and other subclients (if available) are displayed on the right-hand
windowpane.
From the CommCell Browser, right-click the backupset that contains the
data you want to restore. Click All Tasks and then click Browse
Backup Data.
From the Browse Options window, select the Type of Intended Restore
and click OK.
From the browse window, select the data to be restored and click
Recover all Selected.
From the Restore Options for All Selected Items dialog box, click Advanced.
From the Advanced Restore Options (ESX Browse) tab, select
Default Selection option. Select the ESX Server from
the drop down list.
Select the Override Default Selection to change the default
selection.
Enter the desired Virtual Center/ESX Server name.
Select Server Logon Account and enterthe User Account.
Click Configure Password to create a password.
Click Browse Virtual Center/ESX Servers for destination option to
select the desired location to which the virtual machine will be restored.
Click OK.
Alert
The Alert option is used for setting up the criteria to raise notifications/alerts
for job statuses such as failure, success, or any other conditions triggered by the
restore job. Adding alerts helps the user or the user group to get the
notification automatically about the status of the restore job.
From the CommCell Browser, click
Client Computers | Virtual Server | <instance name>
| BackupSet. The
default and other subclients (if available) are displayed on the right-hand
windowpane.
From the CommCell Browser, right-click the backupset that contains the
data you want to restore. Click All Tasks and then click Browse
Backup Data.
From the Browse Options window, select the Type of Intended Restore
and click OK.
From the browse window, select the data to be restored and click Recover all Selected.
From the Restore Options for All Selected Items dialog box, click
Advanced.
From the Advanced Restore Options (Alerts) tab, Click Add
Alert.
From the Add Alert Wizard window, select the Threshold and Notification Criteria.
Click Next.
Command Line Interface enables you to perform restore operations from
the command line. The qcommands can be executed from the command line or
can be integrated into your own scripts or scheduling programs.
In addition, you can also generate scripts for specific operations
from the CommCell Console using the Save As Script option. These scripts
can later be executed using the commands from the command line
interface.
CommCell Readiness
Report provides you with important information about the potential
problems that can impact your restore operations before they occur.
Restore Job Summary Reportprovides you the summary of all
restore jobs during a specified time period for each client. Select
Restore option from the Job Summary Report Selection dialog box, to view
the Restore Job Summary Report.