

|
|
The Exchange Agents are designed to protect an entire Exchange Server database. Follow the steps given below to install the 64-bit Exchange Agents on Exchange Server 2007/2010 or on Non-Exchange Server.
Where to Install |
Related Topics |
The Exchange Agents can be installed in one of two ways:
Make sure the computer satisfies the minimum requirements specified in the System Requirements. |
Provides step-by-step procedure to download the latest packages for software install. Verify that the computer in which you wish to install the software satisfies the System Requirements. Provides comprehensive information on firewall. |
The below mentioned prerequisites are for Mailbox Agents only. Ensure that you have the following:
To assign full access follow the steps given below:
Full Control
All Extended Rights
Send As
Receive As
Get-MailboxDatabase -server (server name) | Add-ADPermission -user "backup account" -ExtendedRights Receive-As
| Run the above PowerShell every time a new database is added. |
|
When installing 32-bit agents on a x64 virtual server, the 32-bit File System iDataAgent must be installed on each physical node in the cluster prior to installing the 32-bit agents on the virtual server. For example, to support a two-node cluster with one Exchange virtual server instance supporting both x64 and 32-bit Agents, a minimum of two installation instances (one 32-bit and one x64) are required on the virtual server and each physical node. This configuration will result in six client objects in the CommCell console; three x64 instances and three 32-bit instances. The sample image shown on the right illustrates the required configuration for installing 32-bit Exchange Agents in an x64 cluster. |
 |
| 1. |
Log on to the computer using an account with the following privileges:
|
|||
| 2. | Run Setup.exe from Software Installation Package. | |||
| 3. |
Select the required language. Click Next. |
 |
||
| 4. | Select the option to Install Calypso
on this 64-bit computer. NOTES:
|
 |
||
| 5. | Click Next. |
 |
||
| 6. | Click OK. |
 |
||
| 7. |
Select I accept the terms in the license agreement. Click Next. |
 |
||
| 8. |
Select Configure a Virtual Server. Click Next to continue. |
 |
||
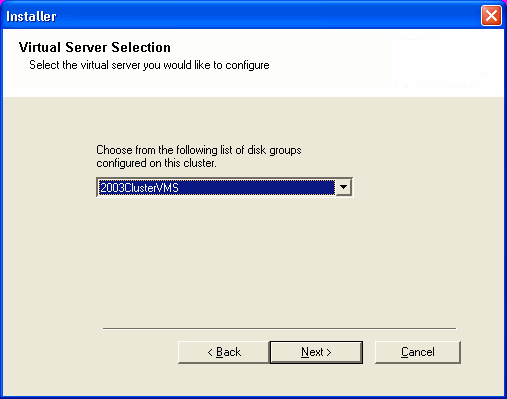
| 9. |
Select the disk group in which the cluster group resides. Click Next to continue. |
 |
||
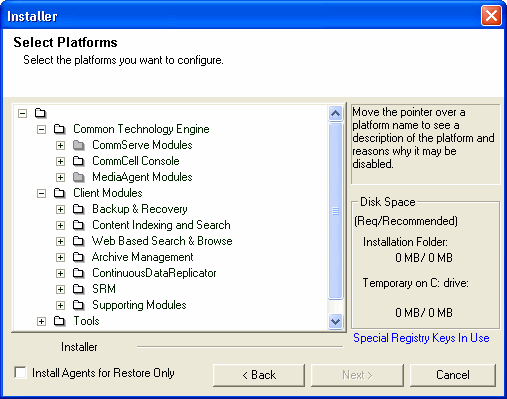
| 10. | Expand Client Modules | Exchange | File System and select Exchange Database iDataAgent. |
 |
||
| 11. |
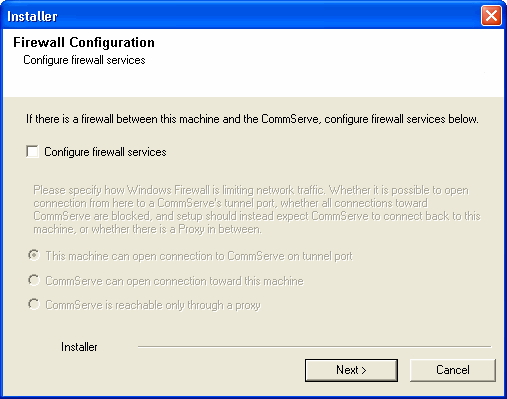
If this computer and the CommServe is separated by a firewall, select the Configure
firewall services option and then click Next.
For firewall options and configuration instructions, see Firewall Configuration and continue with the installation. If firewall configuration is not required, click Next. |
 |
||
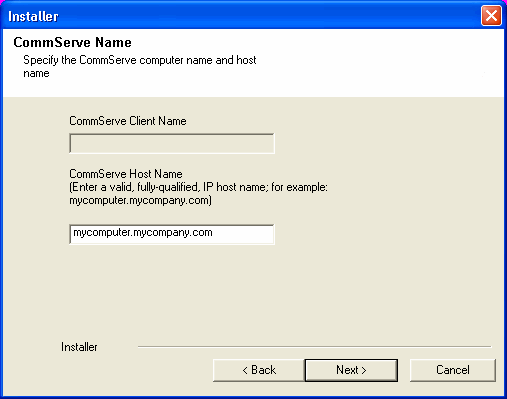
| 12. |
Enter the fully qualified domain name of the CommServe
Host Name. Click Next.
|
 |
||
| 13. | Click Next. |
 |
||
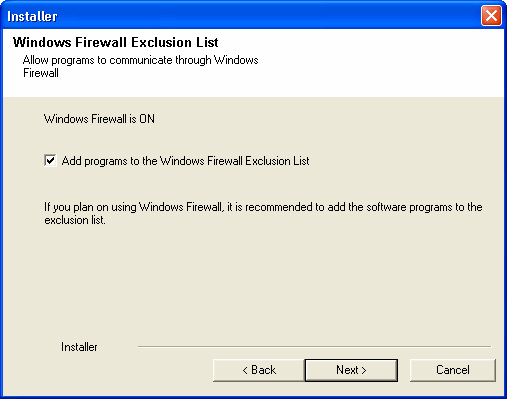
| 14. |
Select Add programs to the Windows Firewall Exclusion
List, to add CommCell programs and services to the Windows Firewall
Exclusion List. Click Next.
|
 |
||
| 15. | Click Next. NOTES
|
 |
||
| 16. |
Verify the default location for software installation. Click Browse to change the default location. Click Next.
|
 |
||
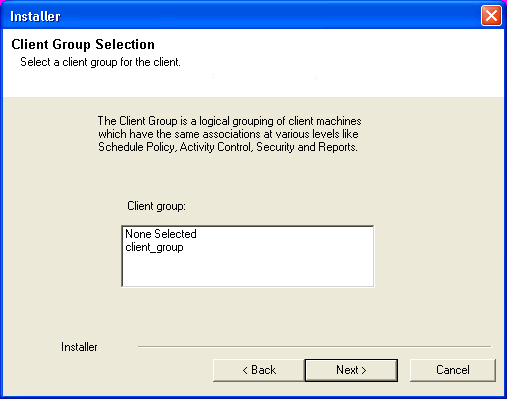
| 17. |
Select a Client Group from the list. Click Next.
|
 |
||
| 18. | Click Next. |
 |
||
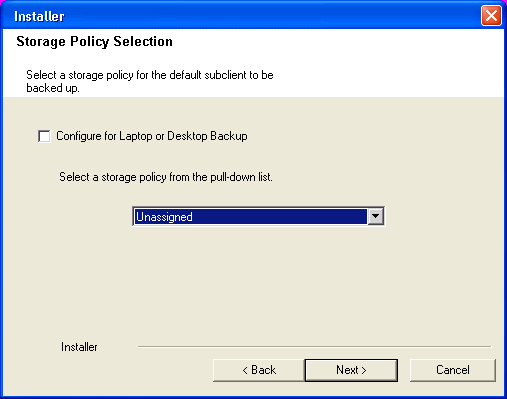
| 19. | Select a Storage Policy. Click Next. |
 |
||
| If you do not have Storage Policy created, this message
will be displayed. Click OK.
|
 |
|||
| 20. |
Select the backup type for Exchange Database backups. Choose either of the
following options, then click Next.
|
 |
||
| 21. |
Enter the user credentials to access the Exchange Server to perform the backup
operation.
|
 |
||
| 22. | Click Next. |
 |
||
| 23. |
The install program displays a reminder to verify that Circular Logging is disabled before performing any database backup operations. To verify that Circular Logging is disabled:
Click OK. |
 |
||
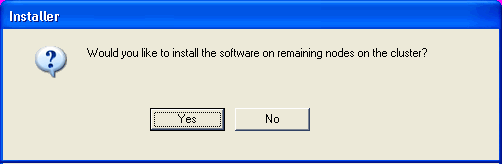
| 24. |
To install the software on the remaining nodes of the cluster, click Yes. To complete the install for this node only, click No. |
 |
||
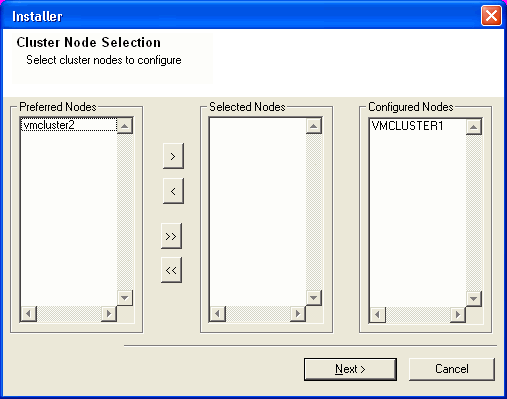
| 25. |
Select cluster nodes from the Preferred Nodes list and click the arrow
button to move them to the Selected Nodes list. Once you complete your selections, click Next.
|
 |
||
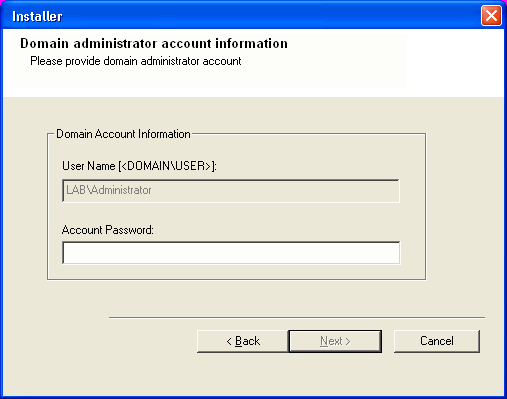
| 26. |
Specify User Name and Password for the Domain Administrator
account Information to perform the remote install on the cluster
nodes you selected in the previous step. Click Next. |
 |
||
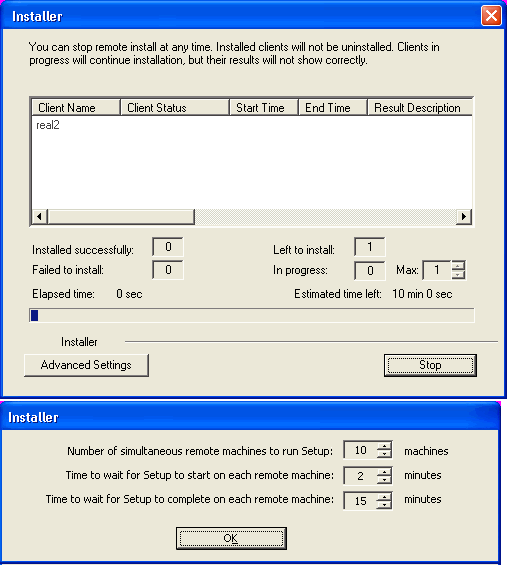
| 27. |
The progress of the remote install for the cluster nodes is displayed; the
install can be
interrupted if necessary.
Click Stop to prevent installation to any nodes after the current ones complete. Click Advanced Settings to specify any of the following:
|
 |
||
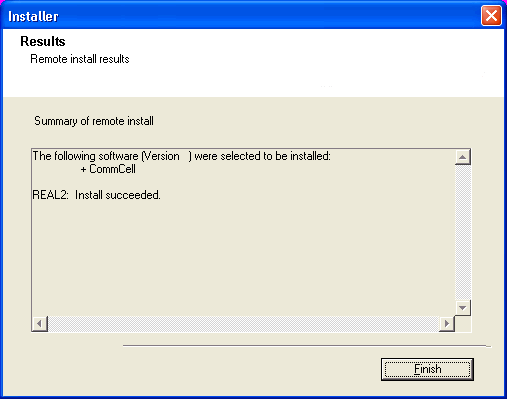
| 28. |
Read the summary for remote installation to verify that all selected nodes were installed
successfully. Click Next.
|
 |
||
| 29. | Click Next. |
 |
||
| 30. | Click Finish. |
 |
||
 |
If you already have a storage policy selected in
step 19, Click
If you do not have Storage Policy created, continue with the following step. |
|||
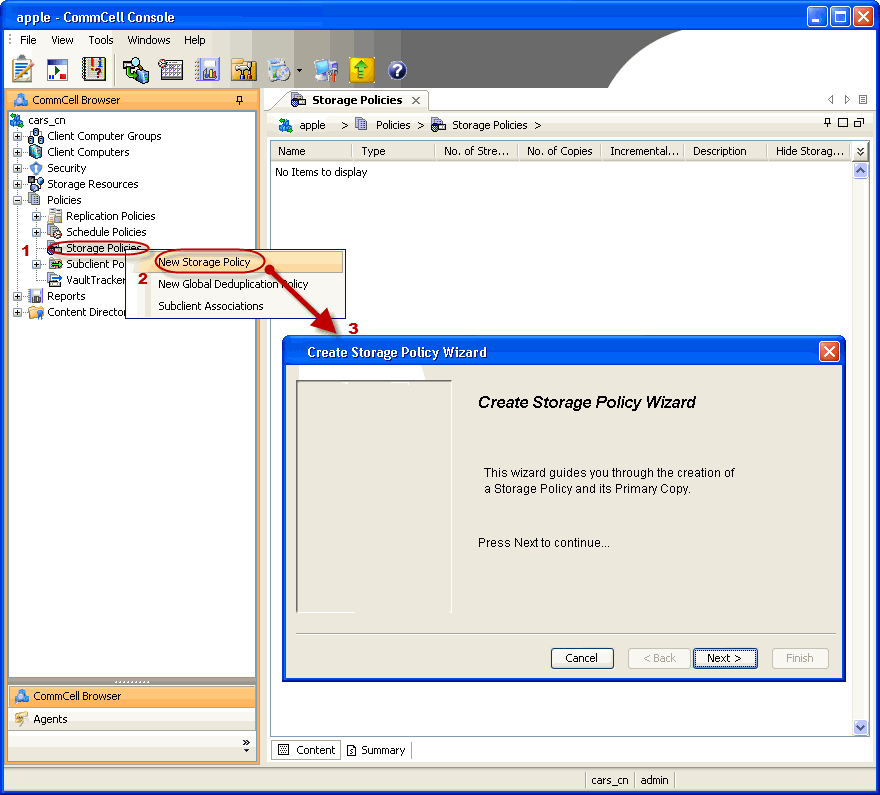
| 31. | Create a Storage Policy:
|
 |
||
| 32. |
Enable the following registry key to create job specific profiles:
|
Once it has been installed onto the physical nodes, the Exchange Agents (such as Exchange Mailbox iDataAgent, Exchange Public Folder iDataAgent, Exchange Mailbox Archiver and/or Exchange Public Folder Archiver) and Windows File System iDataAgent can be installed from the active node to the virtual server using the following steps described below to install Exchange Agents.
The software can also be automatically installed on all available passive nodes when the software is installed onto the virtual server, or you can choose to install any passive node(s) separately.
Before installing the Exchange Agents, create the bAllowMultiInstances and bAllow32BitInstallOn64Bit registry keys.
| 1. | Create the bAllowMultiInstances registry key. | To create the registry key, see the following steps:
|
| 2. | Create the bAllow32BitInstallOn64Bit registry key. | To create the registry key, see the following steps:
|
| 1. |
Log on to the computer using an account with the following privileges:
|
|||
| 2. | Run Setup.exe from Software Installation Package. | |||
| 3. |
Select the required language. Click Next. |
|
||
| 4. | Select the Calypso
32-bit Software install options to install software. NOTES
|
 |
||
| 5. | Click Next. |
|
||
| 6. | Click OK. |
|
||
| 7. |
Select I accept the terms in the license agreement. Click Next. |
|
||
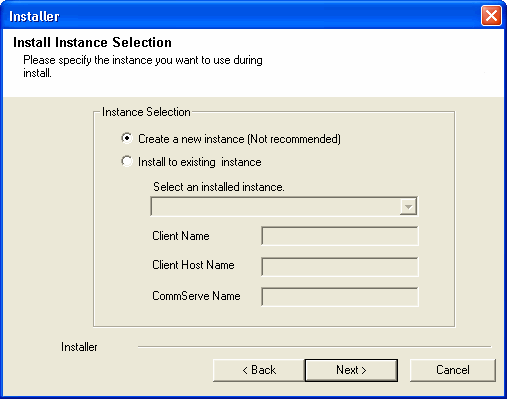
| 8. | Select Create a new instance option to install the
Exchange Agents on separate instance. NOTES
|
 |
||
| 9. |
Select Configure a Virtual Server. Click Next to continue. |
|
||
| 10. |
Select the disk group in which the cluster group resides. Click Next to continue. |
|
||
| 11. | To install the Exchange
iDataAgents expand Client Modules | Exchange, and
select one or more of the following:
To install the Exchange Archiver Agents, expand Client Modules | Archive Management, and select one or more of the following:
Click Next.
|
|
||
| 12. |
If this computer and the CommServe is separated by a firewall, select the Configure
firewall services option and then click Next.
For firewall options and configuration instructions, see Firewall Configuration and continue with the installation. If firewall configuration is not required, click Next. |
|
||
| 13. |
Enter the fully qualified domain name of the CommServe
Host Name. Click Next.
|
|
||
| 14. | Click Next.
|
|
||
| 15. |
Select Add programs to the Windows Firewall Exclusion
List, to add CommCell programs and services to the Windows Firewall
Exclusion List. Click Next.
|
|
||
| 16. | Click Next. |
|
||
| 17. |
Verify the default location for software installation. Click Browse to change the default location. Click Next.
|
|
||
| 18. |
Select a Client Group from the list. Click Next.
|
|
||
| 19. | Click Next. |
|
||
| 20. | Select a Storage Policy. Click Next. |
|
||
| If you do not have Storage Policy created, this message
will be displayed. Click OK.
|
|
|||
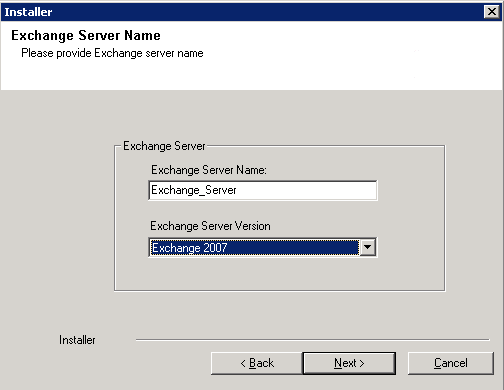
| 21. | Select Exchange Server Name and Exchange Server
Version from drop-down list. Click Next.
|
 |
||
| 22. | Click Next. |
|
||
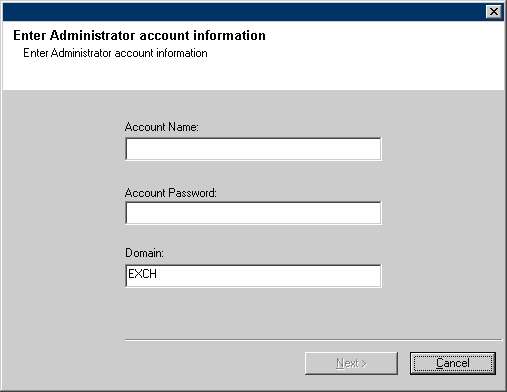
| 23. |
Enter the following Exchange Administrator information then
click
Next.
|
 |
||
| 24. |
To install the software on the remaining nodes of the cluster, click Yes. To complete the install for this node only, click No. |
|
||
| 25. |
Select cluster nodes from the Preferred Nodes list and click the arrow
button to move them to the Selected Nodes list. Once you complete your selections, click Next.
|
|
||
| 26. |
Specify User Name and Password for the Domain Administrator
account Information to perform the remote install on the cluster
nodes you selected in the previous step. Click Next. |
|
||
| 27. |
The progress of the remote install for the cluster nodes is displayed; the
install can be
interrupted if necessary.
Click Stop to prevent installation to any nodes after the current ones complete. Click Advanced Settings to specify any of the following:
|
|
||
| 28. |
Read the summary for remote installation to verify that all selected nodes were installed
successfully. Click Next.
|
|
||
| 29. | Click Next. |
|
||
| 30. | Click Finish. |
|
||
|
If you already have a storage policy selected in
step 20, Click
If you do not have Storage Policy created, continue with the following step. |
|||
| 31. | Create a Storage Policy:
|
|
||
| 32. |
Enable the following registry key to create job specific profiles:
|
|
|