All virtual machines in a specific datastore can be backed up and restored
together as follows:
Create a new subclient that will be dedicated to the datastore
containing the virtual machines you want to back up. Consider giving this
subclient the name of the datastore you are backing up for easy
identification in the CommCell Console. Refer to
Creating User-Defined
Subclients for complete step-by-step instructions.
From the backup set in which the new subclient is created, configure
automatic discovery of virtual machines based on datastore affinity. You can
then assign the desired datastore to the new subclient. Refer to
Discover by Datastore Affinity for complete step-by-step instructions.
Schedule routine backups of the subclient. Refer to
Scheduling a
Backup for complete step-by-step instructions.
When a restore is needed, you can restore all virtual machines within
the datastore by performing a browse operation on the subclient, selecting
all virtual machines displayed in the Browse window, and selecting
either the original datastore or a new datastore as the destination from the
Restore Options dialog box.
Refer to the following for complete step-by-step instructions:
The above-mentioned steps can also be customized to group backups and
restores of other entities, such as ESX Server, Resource Pools, etc.
The backup throughput is Very Low during the Full Backup.
If you are performing a full backup of virtual machines which have thin
provisioned disks on NFS datastore, the backup throughput may be less than a
VMFS datastore.
VMware does not support the retrieving allocated blocks on NFS volume.
Therefore, during the full backup, the software reads
the complete disk and writes only valid data blocks on the media and ignores the
white spaces. This reduces the backup throughput
during the full backup. In case of incremental backups, software uses
Change Block Tracking (CBT) and thus reads and backs up only the changed data.
For more information, refer to “Changed Block tracking on Virtual disks"
section in the following document:
If the Thin provisioned disk is on VMFS volume, the software reads and backs
up only the allocated part of the disk.
How Do I Ensure Migrated Virtual Machines Are Backed Up?
If you change a virtual machine's GUID when you migrate the virtual machine
from one storage location to another, auto discover does not recognize the
migrated virtual machine, and the virtual machine is no longer automatically
backed up.
When you migrate a virtual machine from one storage location to
another, maintain the virtual machine's GUID.
If you change the virtual machine's GUID during migration, manually add
the virtual machine to the subclient content after the migration is
complete.
How Do I Exclude Virtual Machines from Backups?
Virtual machines can be excluded from backups by using regular expressions to
filter them out during the discovery process. There are two ways to do this:
Assign expressions for the virtual machines to be excluded (such as *exch*
for virtual machine names starting with exch) to the Do Not Back
Up subclient.
Assign expressions for only the virtual machines you wish to back up to
a user-defined subclient.
For example, if you only want to back up virtual machines with names
beginning with win and sql, then you can create a user-defined
subclient with the expressions *win* and *sql* assigned to it.
Thus, only virtual machines containing these expressions in their names will
be backed up.
Note, however, that the default subclient does not support regular
expressions for excluding virtual machines from backups.
How do I exclude certain folders from file-level backups?
Folders residing in specific drives cannot be filtered during vSphere VADP
file-level backups. You can, however, replace the drive letter in the filter
with an asterisk ('*'). Note, however, that this option will filter out the
selected folders and files from all drives.
For Example:
To filter [C:\**\Windows*\**], the following filter can be used:
[*:\**\Windows*\**]
To filter [C:\**\Program Files*\**], the following filter can be used:
[*:\**\Program Files*\**]
Also note that global filters are not supported with volume-level backups.
I have virtual machines using the same GUID across vCenter/ESX
servers. How can I back these up?
If there are multiple virtual machines with same GUID:
Configure the instance with Virtual Center option
Right-click the BackupSet and select
Properties
Select the Automatically add
new VMs that do not qualify for membership in
any of the subclients option.
Run a Full backup. This will automatically fix the virtual machines with
duplicate GUID's and update the subclient.
Can I restore multiple virtual machines from the Backup Set level?
You can restore multiple virtual machines from the backup set level as long
as you are restoring the virtual machines to a different destination. If you
want to perform in-place restore of multiple virtual machines, you must perform
the browse and restore operation at the subclient level and not at the backup
set level.
The GUIDs of some virtual machines have changed since they were discovered.
How do I ensure these are included in backups?
If the GUIDs of the virtual machines associated to a subclient are modified:
Run a manual discovery. Follow the steps given below to run a manual
discovery:
Right-click the Subclient and select
Properties
Select the Content tab and click Configure
From the Guest Host Configuration dialog box, click
Discover
The GUIDs of the virtual machines that were modified, will be marked for
deletion
Re-associate the virtual machines in order for the backup to continue.
Are backups of vCloud Director 1.0 provisioned virtual machines and vApps
supported?
Yes, virtual machines created with vCloud Director are supported for backups,
including SnapProtect. No special configuration is required. In addition to the
standard protection and recovery capabilities, affinity-based automatic
discovery can leverage Organization and Virtual Data Centers as discovery
criteria as those entities appear as resource pools. Full virtual machine and
vApp restores are supported, including single-file recovery.
Why is an Incremental Backup converted to a Full Backup, after an In-place
restore?
After performing an In-place restore, the first run backup job will always be
converted to a Full backup. The system assumes that it is a newly created
virtual machine and hence defaults to a full backup.
How do I install a separate instance of the VDDK on a computer?
Version 5.0 update 2 of the VDDK is supported for backups if it is installed
manually in Virtual Server iDataAgent proxy machines, and is
automatically installed with Service Pack 6A or higher.
To install a newer version of VDDK on a 32-bit computer, perform the following steps:
VDDK must first be installed on the proxy server to its default location.
For example, C:\Program Files\VMware\VMware Virtual Disk Development Kit
To install a newer version of VDDK on a 64-bit computer, perform the following steps:
VDDK must first be installed on the proxy server to its default location.
For example,
C:\Program Files (x86)\VMware\VMware Virtual Disk Development Kit
Create a new folder and point it to the path below on the proxy computer.
For example, C:\Program Files\VMware\VMware Virtual Disk Development Kit\
From the VDDK x64 installation directory C:\Program Files (x86)\VMware\VMware Virtual Disk Development Kit\bin, unzip the
vddk64 folder to a temporary location. Once unzipped, copy the bin,
lib, and plugins folders to the new folder created in the previous step.
Create the following registry key:
HKEY_LOCAL_MACHINE\SOFTWARE\VMware, Inc.\VMware Virtual Disk Development Kit\InstallPath
with the following string value: (this should be the path created in Step 2)
C:\Program Files\VMware\VMware Virtual Disk Development Kit\
How do Backup and Restore operations handle Independent/RDM Disks?
If a virtual machine undergoing a backup job includes independent disks, physical
or virtual RDMs,
these disks will be skipped. During a full VM restore the independent disk/Physical
or virtual RDMs
will get restored as a regular disk with 0MB data.
If a subclient contains virtual machines with independent
disks/physical or virtual RDMs, the backup job will always complete with the status
"Completed w/ one or more errors". However, if you create the
IgnoreUnsupportedDisks registry key on the proxy computer, the backup job
will complete successfully.
How do Backup and Restore operations handle Virtual RDM Disks?
Virtual RDMs are protected by the backup job (but not during IntelliSnap
backup). However at the time of restore, the data is restored as a regular VMDK
on a datastore. A virtual RDM is not re-created and the data is not restored to
the virtual RDM’s device.
How can the Virtual Server
iDataAgent be set up to
See the Storage Network?
In an isolated network, add an additional network connection to the proxy
computer.
Using the Virtual Server iDataAgent in HotAdd mode Configurations
While deploying the Virtual Server iDataAgent, install the software on a
datastore with the largest VMFS block size. This is necessary to ensure that
the Virtual Server iDataAgent can mount and back up virtual machines
residing on all datastores.
Helper virtual machines are not required for Hot-Add Virtual Server
iDataAgent servers utilizing VADP.
Upgrading the Virtual Server iDataAgent from Version 8.0.0
VDDK 1.2 is installed to the Base folder with the Virtual Server iDataAgent.
Software version 8.0 Virtual Server iDataAgent machines that were upgraded to v9
will need to have the Virtual Disk Development Kit registry key that was
manually created during the installation of VDDK 1.1 deleted. Failure to do so
will result in the VDDK 1.1 to still be utilized or fail if it has been
uninstalled. (VDDK 1.1 does not support HotAdd mode on ESX 4.1)
Using vStorage API
The vStorage API can be used to restore backups performed with VCB. The
backup data will first be staged to the proxy then vStorage will perform the
restore.
Backups performed using the vStorage API cannot be restored through the
VMware converter. Converter does not understand the format of vStorage.
Change Block Tracking
When Change Block Tracking is unavailable backups will revert to CRC to
determine changed blocks. Since the Virtual Server iDataAgent needs to read the
entire virtual machine disk, CRC incremental backups may take almost as long as
full backups. However, the amount of data transferred and stored by an
incremental backup is limited to the changed blocks within the virtual disk.
Correcting CBT on the problematic virtual machine is recommended as quickly as
possible to take full advantage of VADP based incremental backups. Tools are
available to check the correct installation of the VDDK and for verifying and
correcting CBT issues. Contact your Software Provider for information on these
tools.
Supported vCenter Converter Version
VMware vCenter Converter Standalone 4.3 no longer supports VCB sources
for restores. Version 4.0.1 must be used.
Fault Tolerant VM’s are not supported for snapshot operations and cannot
be backed up.
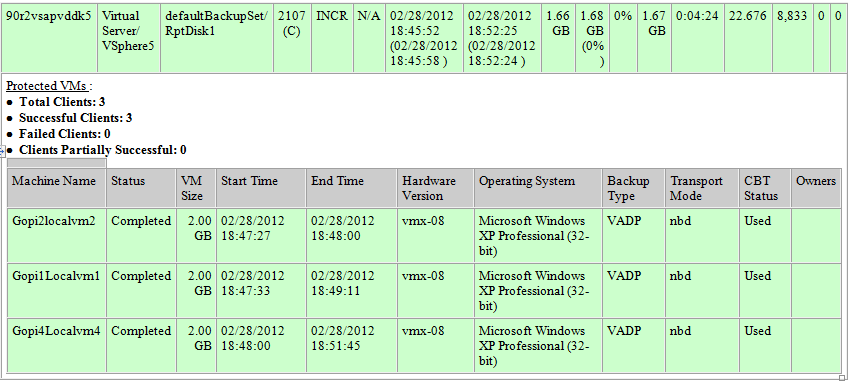
How Do I Include the status of Protected Virtual Machines in Backup Job Summary Reports?
The Backup Job Summary report can show a detailed status of each virtual machine
included in the backup. Follow the steps given below to include the status of
protected virtual machines in the Job Summary Report:
On the CommCell Console toolbar, click the Reports button.
The
Report Selection dialog box appears.
From the Reports pane, select Job Summary.
On the General tab, select Data Management, and then select
Backup.
Click the Selection tab, and then select the Include Protected VMs check box.
Click Run.
The report appears in your default Web browser. It
contains a detailed status of all the virtual machines included in the
backup.
For snap backups, VM details appear in all columns, except for
the columns that are not applicable, such as Backup Type,
Transport Mode, and CBT Status.
For jobs that ran before the Service Pack 5B update, Machine
Name and Status appear, but all other columns display N/A.
File Level and Volume Level standard backups display N/A in the
VM Size and CBT Status columns.
What are the requirements to enable thin provisioned disk restores?
VM Hardware version 7 or higher
Source VM Disk backup on a VMFS datastore
Disk level backups can use allocated block tracking, which is part of VMware
Changed Block Tracking (CBT). When enabled, allocated block tracking identifies portions of
the virtual machine disk that have not been used, so those portions can be
skipped during backup or restore.
Thin provisioned disk restores are supported only if allocated block tracking
was used for the backup. Only source
disks using lazy zero provisioning can be restored from thick provisioning to
thin provisioning; disks using eager zero are always restored using thick
provisioning.
If allocated block tracking was not active for the backup, the restore
operation includes all of the blocks of the disk that were read during backup.
This can result in thick provisioning for the restore, even if thin provisioning
was requested.
The disk restore operation recovers all space that is reported in use (not
zeroed out), so the VMDK can be larger than the size that was reported by the
guest OS.
To restore ext4 files, or other Linux files that need to retain ACLs and
permissions, restore the virtual machine disk (VMDK) to a new destination server and datastore, then
ask your vCenter administrator to add the required files to the original VM or a
test VM.
In the CommCell Browser, go to Client Computers | <Client>
| Virtual Server | <Proxy> | <BackupSet>.
Under <BackupSet>, right-click the subclient and select Browse
Backup Data.
On the Browse Options dialog, ensure that Container Restore
is selected and click OK.
On the resulting content selection tab, expand the backup set and select
the virtual machine disk that contains the files to be restored.
Click Recover All Selected.
On the Restore Options for All Selected Items dialog: Select the
destination client, specify the folder where the VMDK file is to be
restored, and click OK.
The vCenter administrator can add the VMDK files to the original VM or
to a test VM using the Upload File option from the Datastore Browser
in the vSphere client.
When the files are added to the VM, the Linux administrator can import
the disks, mount the disks, and copy the restored files.
The original ACLs and permissions for the files are retained.
For VM backups, capacity licensing is based on the total backup size,
calculated as the sum of backup sizes for all VM backup jobs after white spaces
(blocks of zeros) are removed. The license counts the backup size of all
configured subclients; virtual machines that are included in multiple subclients
will be counted multiple times. The backup size is measured for usage tracking
and shown on the Backup Job Summary Report.
The backup size
can be different from the guest host size or used space value shown for the VM in the disk properties dialog
by Microsoft Windows.
The following factors can affect the backup size calculation:
The presence of virtual machine snapshots.
The presence of sparse files or deleted files in the guest can cause the
backup size to vary.
The backup size reported for VMDKs in a VM can vary depending on white
space and change allocation tracking for that VM.
For example:
A Windows VM with a single volume of 80 GB has 30 GB occupied and 50 GB free.
The guest size would be 30 GB.
The backup size is the amount of data transferred and written for that
backup, which can be up to 80 GB.
The backup size reflects the size after eliminating white spaces; but data that
was written and deleted still counts as reserved (allocated) space. The layering effects of multiple virtual file systems can cause differences between
the size reported by the guest host running within the VM and
the reported backup size. Frequent deletion of large files can easily cause
these numbers to be out of sync.
Version 9.0 reports on all allocated blocks in the VM. The amount reported for
allocated blocks can be the same size or larger than what is actually in use and
can contained reserved space for deleted items. For each VMware instance,
Version 9.0 has an additional reporting column of the
actual size of VMs.
The following measures can help reduce backup size:
Delete or move unnecessary data before virtualizing physical machines.
This saves resources and time, and ensures that new VMs only contain used
blocks.
If you already have a large number of VMs with significant reserved and
unused blocks, use a tool such as the Windows SDelete utility to release
reserved space on VMs, as described in
SDelete v1.61.
Ensure that VM templates used for provisioning do not contain
unreferenced blocks in the VMDK.
Wherever possible, configure virtual machine disks with the VMware Thin
Provisioned disk option enabled. Thin provisioning ensures only valid blocks
occupy space in the VMDK file. With thin
provisioned VMs, VMware APIs only return occupied blocks.