|
|
| 1. |
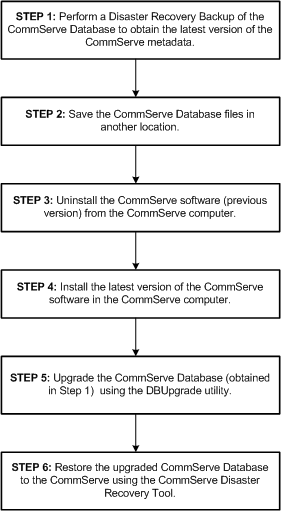
Perform a Disaster Recovery Backup on the CommServe
(old version) to obtain the latest version of the CommServe Database
Engine. |
For step-by-step instructions, see
Start a Disaster Recovery Backup. |
| 2. |
Save the CommServe Database files in another location. |
For information on the list of files see
Export Phase - Disaster Recovery Backup to Disk. |
| 3. |
Uninstall all components (previous version)
from the CommServe computer. |
See Uninstalling Components
for more information on uninstalling Agents. |
| 4. |
Install the current version of the CommServe software.
This will automatically install the 64-bit version, both binaries and
CommServe Database Engine. |
See Install the CommServe Software
for more information on installing CommServe software. |
| 5. |
Upgrade the CommServe Database saved in another
location (step 2) using the
DBUpgrade utility. |
See
Upgrade the CommServe Using the DBUpgrade Utility for instruction.
The DBUpgrade utility is available in the Resource Pack. |
| 6. |
Restore the Disaster Recovery Backup which includes the
upgraded Database (step 5) in the CommServe. |
For step-by-step instructions, see
Restore a Disaster Recovery Backup. |
| 7. |
If the Media Agent was installed perform the following:
- Verify that all libraries and drives are properly detected by
the operating system.
- From the CommCell Console open the Library and Drive
Configuration window and make sure that libraries and drives are
configured.
|
See Driver
Configurations for more information on detecting drives from the
operating system. See
Library and Drive Configuration for more information on configuring
libraries and drives. |
| 8. |
If you have other components, like the File System iDataAgent,
install them now. |
See
Installation for more
information on installing components. |
|
|
General
- Install post-release updates or Service Packs that may have been released
after the release of the software. If you are installing a Service Pack,
verify and ensure that it is the same version as the one installed in the
CommServe computer. Alternatively, you can enable
Automatic Updates for
quick and easy installation of updates in the CommCell component.
- If Activity Control was disabled on the client prior to the
upgrade, enable it after the upgrade using the Activity Control tab
from the Client Computer Properties dialog box in the CommCell
Console.
-
Some existing features may not function as expected when the CommServe is
upgraded and the Clients/MediaAgents remain in a older version of the software.
See Backwards
Compatibility Issues for more information on such features.
- See also Post Upgrade Considerations section in the following
procedures:
|
