Data Replication
Topics |
How To |
Related Topics
Overview
Replication Scenarios
Replicating Data with
ContinuousDataReplicator
Replication Logs
Interruptions and Restarts
Throttling
Replication Prediction
Orphan Files
How to use CDR to Replicate Data
Fan-Out Considerations
Best Practices
Data Replication is the process of copying specified, file-level content from
one computer, the source computer, to another, the destination computer. This is
achieved through an initial transfer of the specified data, after which the replicated
copy is kept updated in nearly real time with any changes that are made to
the data on the source computer. This replicated copy on the destination computer
provides on-going, nearly-real-time disaster recovery protection for the source
computer, unlike most data protection solutions which require significant time to
perform a complete data protection operation. In addition, data replication provides
a basis for additional data protection activities, such as Recovery Points (snapshots)
and backups of Recovery Points, which are discussed in more detail below.
Several common scenarios for data replication are illustrated below, but these
by no means illustrate all of the ways in which data replication can be configured.
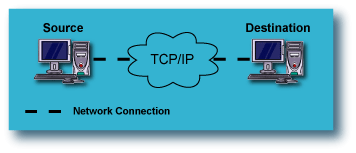
Replication from one Source computer to one Destination computer:
|
This is the most fundamental configuration for data replication. A single
computer on the LAN or WAN has its data replicated to another computer,
either local or remote. This provides protection of the source
computer against catastrophic failure of the computer itself.
|
 |
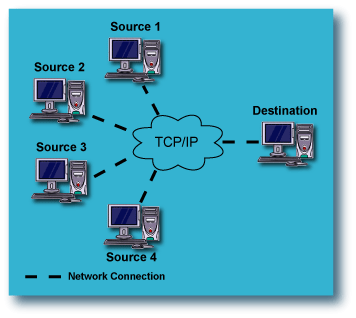
Fan-In Configurations: Replication from multiple Source computers to
a single Destination computer:
|
In a Fan-In configuration, multiple computers on the LAN or WAN have their data
replicated to a single computer, either local or remote. This provides
protection of all of the source computers against catastrophic failure, while
maximizing the use of resources by directing all the data to a single
destination computer.
On Windows, most of the configuration of replication and Recovery Point
options can be accomplished from the
Fan-In tab of the Agent Properties on the destination
computer, and these settings are automatically applied to all the source
computer. On UNIX, replication and Recovery Point options must be
configured on each source computer.
Scalability
Although the scalability of a Fan-In setup can vary based on network and system
resources, it is recommended that each Fan-In setup contains no more than 100
source clients.
For maximum performance and robustness, the total number of Replication Pairs
configured for the same source volume should be kept to a minimum. If multiple
Replication Pairs must be configured for the same source volume, the recommended
upper limit is five.
In this configuration for data replication, For more information, see
Using
ContinuousDataReplicator in a Fan-In Configuration.
|
 |
Recovery Points for Fan-In Configurations
Recovery Points created for a Fan-In configuration use VSS or ONTAP as the
snap engine for creating snapshots. The use of snap engine is based on the
destination being used. When the destination is a fixed volume then VSS is used
and when the destination is a filer then ONTAP is used for the creating
snapshots.
Consider the following for ONTAP snapshots:
- Specify the user authentication details to be used for creating ONTAP
snapshots. The user information must be specified both in the
General tab of the replication set properties on the source and in the
Fan-In tab of the agent properties on the destination.
- Mounting of ONTAP snapshots is not supported in a Fan-In configuration.
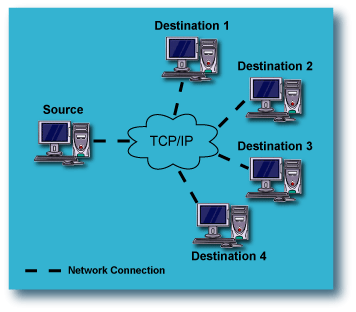
Fan-Out Configurations: Replication from one Source computer to multiple
Destination computers:
|
This configuration for data replication, referred to as "Fan-Out", adds
significantly to the protection afforded to the source computer, because
of the redundancy. A single computer on the LAN or WAN has its data replicated
to multiple computers, any of which can be either local or remote. This
provides protection against catastrophic failure of an entire
site, as well as the source computer itself. For more information, see
Fan-Out Considerations below.
|
 |
Back to Top
ContinuousDataReplicator (CDR) can be used in a limitless variety of enterprises
to replicate data within a CommCell,
fully integrating with other Agents, all of which
are controlled through the CommCell
Console. For more information about CDR, see
Overview - ContinuousDataReplicator.
Using CDR, content for replication can be defined at the directory or volume
level on a source computer and replicated to a destination computer. Once the initial
transfer is complete, a driver on the source computer performs the following:
- continuously monitors changes to the files contained in the defined directories
or volumes
- logs all new files, and changes to existing files
- automatically transfers the log to the destination computer, thus replicating
all new files and changes to existing files, from the source computer to the
destination computer in nearly real time. (See Replication
Logs for specific information about frequency and timing of data replication.)
A persistent connection is used as a data transfer mechanism, optionally compressing
and encrypting data across the network, and through this facility, the destination
computer is kept in sync with the defined content on the source computer. If the
connection is interrupted at any point, the log continues to be maintained on the
source computer, and once the connection is restored, CDR will automatically re-sync
with the destination computer, bringing the replica up-to-date. Note that re-syncing
is time and disk space intensive, and thus to be avoided if possible. For some additional
discussion of this subject, see
Interruptions and Restarts. If multiple Replication Pairs are active, CDR uses multiple
threads to perform these operations on all Replication Pairs in parallel. CDR
operations on a T1 link are fully certified. The success of CDR operations on a
slower link is not guaranteed.
The process of starting data replication with CDR involves several job
phases, as follows:
- Baselining
- SmartSync
- Replication
For more detailed information about Job Phases and Job States, see
Monitoring Data Replication.
Back to Top
CDR maintains logs on the source computer, logging all file write activity (new
files and changes to existing files) involving the directories and volumes specified
in the source paths of all the Replication Pair(s) on that computer. These replication
logs are transferred to the destination computer and replayed, ensuring that the
destination remains a nearly real-time replica of the source. Note the
following differences in behavior for CDR on Windows and CDR on UNIX:
- For CDR on Windows, log files are
transferred periodically, not continuously; the period is based on either the amount
of change activity (logs are transferred when they reach 5MB in size) or at a specified
time interval if there is not sufficient change activity to fill the log. This time
interval is 15 minutes by default, and can be adjusted in the Job Management Control
Panel. For step-by-step instructions, see
Specify the CDR Log File Update
Interval. Log files are stored on the destination computer in allocated disk
space.
- For CDR on UNIX, logs are sent to the destination computer in real time,
and replayed from the destination computer's memory. There is no periodic
time interval, nor the use of disk space to store log files on the
destination.
For CDR on Windows, Replication Logs are replayed serially on the destination
computer, not in parallel. Thus,
if you have many Replication Pairs all configured to use the same destination computer,
it should be able to receive and replay the Replication Logs at the same rate at
which they are arriving. Ensure that the destination computer is suitable in the following areas;
otherwise a backlog of Replication Log files will cause the allocated Log space
to diminish to the point that throttling of the source computer(s) will result:
- processing power and memory
- I/O capacity
- disk space allocated for Replication Logs
For CDR on UNIX, Replication Logs for different Replication Sets are replayed
in parallel, as multiple replay threads are utilized on the destination
computer. Ensure that the destination computer is suitable in the following areas;
otherwise a backlog of Replication Log files greater than memory capacity will
cause the Replication Pair to be aborted:
- processing power and memory
- I/O capacity
- Select a suitable volume for the source replication
logs, which has sufficient space for the expected amount of log file activity
and accumulation, for your environment.
- Replication Logs may not be located on a volume which is monitored by CDR,
and thus should be located on a volume which is not used as either a source
or a destination by any Replication Pairs.
- Replication Logs should not be located on a volume also used for the
QSnap COW cache.
- Do not specify a removable drive as the Replication Log location.
- For CDR on a cluster, Replication Logs must be located on a local
volume, not a volume which is part of the cluster resource group.
- For CDR on UNIX, changing the log location on the source computer will cause the
CVRepSvc service to be recycled; this will
cause all Replication Pairs to stop replication briefly and then resume.
Sufficient log file space is required on the source computer, and for CDR on
Windows, on the
destination computer as well; if a source computer runs out of log space
(Windows) or attempts to create new entries in a log file before the old entries
have been transferred (UNIX), logging will stop and all logs will be deleted;
thus, to avoid an interruption and restart,
it is important to have sufficient space allocated for logs. For minimum log space requirements, see
System Requirements - ContinuousDataReplicator.
These minimums should be considered a recommended starting point; allow more space
than recommended if it is available.
Consider the following when allocating space for logs:
- Log file sizes will reflect the actual size of the files added or the
extent of changes made to files in
the source path.
- The existing size of the data in the source path and the expected rate of
additions and file changes, for all the Replication Sets and Pairs that will
be configured on a given computer. Larger amounts of data, and high rates of
change typically result in greater amounts of log space being required on the
source computer.
- Capacity of, or throttling limits imposed upon the network used for replication.
If network capacity is low, log space requirements will increase on the source,
as data is not transferred quickly enough.
- Potential network outages or loss of connectivity. During such times, logs
will continue to accumulate on the source, and sufficient space must be available
to accommodate these circumstances. In the case of a source computer configured
with multiple destinations, loss of connectivity with any one destination computer
will prevent the logs from being deleted on the source computer in a timely
manner. For additional information, see
Fan-Out Considerations below.
- For a computer that serves both as a source computer and a destination computer,
log space must be sufficient to accommodate the requirements of both of the
capacities in which it serves.
- For a computer configured as a destination for multiple source computers
(Fan-In), allocated log file space should be matched to the aggregate needs
of all of its source computers. (For CDR on Windows, this is a disk space
requirement; for CDR on UNIX, this is a memory requirement.)
- Utilize the Space Check feature to configure a
Disk Space Low Alert
(and Space Check Interval, if appropriate) for the source log volume, so that
you will be notified when free space is running too low; refer to
Space Check for the Quick Recovery and ContinuousDataReplicator Agents.
For step-by-step instructions, see
Configure Alerts.
- For CDR on Windows, configure the free disk space threshold for the source log volume in the
ContinuousDataReplicator
Properties (Operational Parameters) window, so that data replication will
be aborted well before the free space on the source log volume becomes too low,
which can cause unpredictable results. To avoid this, set the Low Watermark
for the source log volume in the Operational Parameters tab of the CDR Properties
on the source computer to 10% or higher; see
Configure Throttling
for CDR Replication Activities. In the event this threshold is reached,
a "Log File Volume Reached Low Watermark" alert
and Failed Replication - Application
Management alert will be issued; for more information
about this alert, see
Alerts - Application
Management.
You will have to make sufficient
space available on the source log volume, and manually start the Replication
Pair with Full Sync.
The location of log file space is specified when
you Install ContinuousDataReplicator,
and can be changed in the CommCell Console. To configure the Replication
log file location, see
Specify CDR Log File Location
on Source and Destination Computers for step-by-step instructions.
- Each log will continue to be saved on the source computer until all destination
computers signal that they have received that log and are finished replaying
it. After this confirmation, the log will be marked for deletion on the source
and the system will periodically delete such logs.
- For CDR on UNIX, the system reuses log files in a rotating manner once the allocated log file space becomes full,
so the logs will never be deleted.
- For CDR on Windows, logs on the destination computer are marked for deletion after they have been replayed, and the system will periodically
delete these files as well.
- If you manually delete a log file on the source computer, obviously it
cannot be transferred to the destination and replayed. This will result in
the destination no longer being completely in sync with the source. To
resync the source and destination:
- For CDR on Windows, it will be necessary to abort activity for all affected Replication
Pairs and
restart them again using Start Full Re-Sync. For instructions on aborting
and restarting replication, see
Start/Suspend/Resume/Abort
Data Replication Activity.
- For CDR on UNIX, the Replication Pairs will automatically SmartSync
before returning to Replication.
Back to Top
By default, CDR will always try to handle interruptions by seamlessly
restarting replication, or if that is not possible, restarting with Smart
Re-Sync; however, some interruptions are of such a nature or duration that a
Full Re-Sync will be required.
Smart Re-Sync is the default behavior of CDR when activities are interrupted
and cannot be seamlessly restarted at the same point again. In general, CDR endeavors to do the following in such
cases, wherever possible:
- continue logging on the source
- continue replaying logs on the destination which were received before
the interruption
- restart activities exactly where they were interrupted, or as close to
that point as possible
For examples of commons types of interruptions, and how Smart Re-Sync handles
the recovery, refer to
System Behavior when
Replication is Interrupted.
For a detailed listing of each phase, and the specifics of the exact point at
which Smart Re-Sync restarts activities, refer to
Job Phases.
Full Re-Sync should be necessary only in cases such as the following:
- the data on the
destination is altered by means outside of the replication process, e.g.,
manually deleted or modified, etc.
- an interruption is of long enough duration that the logs overflow on the
source
In such a case, all existing content in the
destination path is considered inconsistent and Full Re-Sync is recommended to
rebuild it again based on the current data in the specified source path. When
you start replication from the Replication Set or Replication Pair level, you
can specify Full Re-Sync, causing the Replication Pair to begin at the
Baseline Scan phase.
Changes to the following configuration items will not be effective until data replication
activity has been interrupted and restarted:
The following will require data replication to be interrupted and restarted:
- For CDR on Windows. if chkdsk is run on a hard disk used for
either a source or destination, the affected Replication Pairs in the
Replicating state must be aborted and restarted using Smart Re-Sync.
- By default, CDR will always replicate only the new or updated data in the source
path. If data is deleted on the destination, since there has been no change on the
source, that data will not be replicated again, unless you abort the Replication
Pair and perform the following to recopy the data from the source to the
destination again:
- For CDR on Windows, perform a Full Re-Sync.
- For CDR on UNIX, perform a Smart Re-Sync.
There are several ways in which data replication activity can be interrupted,
and CDR recovers from each of them in a similar manner. The table below provides
a listing of common causes of interruption, and the effect of them on
Baselining, SmartSync, and data replication, as well as how CDR recovers from
them. For specific details about how restarts are handled in each particular
phase, refer to the Comments section of the table in the
Job Phases section.
|
INTERRUPTION |
EFFECT OF INTERRUPTION & SMART RE-SYNC |
|
Abort a Replication Pair during Baselining phases |
Baselining activities stop on the source. When the Replication Pair is restarted,
Baselining activities will resume, restarting at the beginning of the
phase if necessary, then SmartSync and data replication activities will
begin automatically. |
|
Abort a Replication Pair during SmartSync phases |
Logging stops on the source. When the Replication Pair is restarted,
SmartSync activities will resume, restarting at the beginning of a phase
if necessary, and data replication activities will begin automatically. |
|
Abort a Replication Pair during Replication phase |
Logging stops on the source. When the Replication Pair is restarted,
for NTFS or UNIX, Smart Re-Sync will continue the data replication
activities automatically; for FAT file systems, Full Re-Sync will be
necessary. |
|
Suspend a Replication Set |
Baselining, SmartSync, and data replication activities
stop for all Replication Pairs, but any logging activities will continue on the source. When
the Replication Set is resumed:
- for any Replication Pairs that were performing data
replication, CDR will transfer the accumulated logs to the destination,
and data replication will continue.
- for Replication Pairs that were in the Baselining or SmartSync
phases, how activities
begin again will depend on the exact phase the Replication Pairs were in, as
well as the operating system type.
|
|
Graceful or non-graceful shutdown of the source computer |
The destination computer continues to replay the logs it has received.
When the source computer and software are running again, Replication
Pair(s) will be in the "System Aborted" state for some time, then Smart
Re-Sync will be performed. |
|
Graceful or non-graceful shutdown of the destination computer |
Logging continues on the source. When the destination computer and
software are running again:
- for any Replication Pairs that were performing data replication,
CDR will transfer the accumulated logs to the destination,
and data replication will continue.
- for Replication Pairs that were in the Baselining or SmartSync
phases, how activities
begin again will depend on the exact phase the Replication Pairs were in, as
well as the operating system type. Refer to the Comments section of
the table in Job Phases for
specific details.
|
|
CDR software shutdown on the source |
All CDR-related activities stop. When the software is restarted, CDR
will start Smart
Re-Sync. |
|
CDR software shutdown on the destination |
Logging continues on the source.
- for any Replication Pairs that were performing data replication,
CDR will transfer the accumulated logs to the destination,
and data replication will continue.
- for Replication Pairs that were in the Baselining or SmartSync
phases, how activities
begin again will depend on the exact phase the Replication Pairs were in, as
well as the operating system type. Refer to the Comments section of
the table in Job Phases for
specific details.
|
|
Replication Service is stopped on the source |
Baselining, SmartSync, and data replication activities stop for all
Replication Pairs, but logging continues on the source, and the
destination computer continues to replay the logs it had received before
the service was stopped. When the Replication Service is started
again:
- for any Replication Pairs that were performing data replication,
CDR will transfer the accumulated logs to the destination,
and data replication will continue.
- for Replication Pairs that were in the Baselining or SmartSync
phases, how activities
begin again will depend on the exact phase the Replication Pairs were in, as
well as the operating system type. Refer to the Comments section of
the table in Job Phases for
specific details.
|
|
Replication Service is suspended on the destination |
Baselining, SmartSync, and data replication activities stop for all
Replication Pairs, and log replay stops on the destination, but logging
continues on the source. When the Replication Service is started
again:
- for any Replication Pairs that were performing data replication,
CDR will transfer the accumulated logs to the destination,
and data replication will continue.
- for Replication Pairs that were in the Baselining or SmartSync
phases, how activities
begin again will depend on the exact phase the Replication Pairs were in, as
well as the operating system type. Refer to the Comments section of
the table in Job Phases for
specific details.
|
|
Interruption of network connectivity (source and/or destination) |
Baselining, SmartSync, and data replication activities stop for all
Replication Pairs, but logging continues on the source, and the
destination computer continues to replay the logs it had received before
the network connectivity was interrupted. When network connectivity is
restored:
- for any Replication Pairs that were performing data replication,
CDR will transfer the accumulated logs to the destination,
and data replication will continue.
- for Replication Pairs that were in the Baselining or SmartSync
phases, how activities
begin again will depend on the exact phase the Replication Pairs were in, as
well as the operating system type. Refer to the Comments section of
the table in Job Phases for
specific details.
If the network interruption is for a significant amount of time, the
following will occur:
- For CDR on Windows, the status of the Replication Pair will become "Failed", and will need
to be restarted manually with Smart Re-Sync when connectivity is restored.
- For CDR on UNIX, CDR will continue to retry sending the logs to the
destination computer until network connectivity is restored.
|
|
Source computer runs out of log space (Windows) -- or --
Source computer tries to create new entries in a log before the old
entries have been transferred to the destination (UNIX) |
Logging will stop, all logs will be deleted, all Replication Pairs will
be System Aborted.
- For CDR on Windows, the system will wait 3 minutes, then check
space on the log volume. If there is sufficient space, a Smart
Re-Sync will occur; if not, the Replication Pair will be Aborted.
- For CDR on UNIX, a Smart Re-Sync will occur.
|
 |
- Multiple sources (Fan-In) or multiple destinations (Fan-Out) - each of the
cases listed will generally work the same for Fan-In and Fan-Out configurations;
bear in mind that when more than one source or destination is involved, the
implications for each one of them must be considered in this context. For additional
considerations, see Fan-Out Considerations
below.
- Data Replication will be interrupted if a hard disk used for either a source
or destination is put into the 'standby' state through the power schema configuration.
It will be necessary to abort activity for all affected Replication Sets and
restart them again using Start Full Resync after such an event.
|
For instructions on restarting replication after it has been interrupted, see
Start/Suspend/Resume/Abort
Data Replication Activity.
Back to Top
You can configure several throttling options for CDR at the
Agent level, in the
Operational Parameters
tab of the CDR Properties screen.
The following can be configured on the Source computer:
- Abort replication activity, based on the percentage of allocated log space
remaining on the source computer. (See
System Aborted.)
The following can be configured on the Destination computer, and is recommended;
it will impact all source computers that use this destination computer:
- Throttle the source computer, based on the percentage of allocated log space
remaining on the destination computer. When throttling is imposed, it will
reduce the maximum transfer rate specified as the Throttling Amount for the
source computer by 50%. Since this throttle is based on the value specified
as the Throttling Amount for the source computer, if you do not specify a
value, no throttling will be imposed.
- Stop the source computer from sending logs, based on the percentage of allocated
log space remaining on the destination computer.
The following can be configured on the Source computer:
- Throttling Amount - maximum network transfer rate in megabits per
second (Mbps).
On Windows, the setting for Throttling Amount will apply to each pipeline engaged in replication
activity, not the aggregate of all pipelines for all Replication Pairs on the
computer. With respect to the number of pipelines that will be active at any
one time, review the following based on an example of having a Throttling Amount setting
of 10Mbps:
- Each Replication Pair requires a pipeline during Baselining or
SmartSync; if you have
3 Replication Pairs in the SmartSync phases at the same time, you have 3
pipelines active, and thus a 30Mbps maximum network transfer rate for
the source client (3 pipelines at 10Mbps each.) After Baselining and
SmartSync have completed
for each Replication Pair, only 1 pipeline will remain in use, and the maximum
network transfer rate will be reduced to 10Mbps.
- Fan-Out configurations require a pipeline for each destination client;
if you have 5 Replication Sets configured to replicate data to 5 clients,
you have 5 pipelines active, and thus a 50Mbps maximum network transfer
rate for the source client (5 pipelines at 10Mbps each.)
- Other than the cases listed, Baselining or SmartSync, and Fan-Out, all other
replication activity will require 1 pipeline, and thus the Throttling Amount
specified will apply to the aggregate of all activity on the source
computer, comprised of the replication activities of all Replication Pairs.
On UNIX, the setting for Throttling Amount will apply to the aggregate of all pipelines for all Replication Pairs on the
computer. With respect to the number of pipelines that will be active at any
one time, review the following based on an example of having a Throttling Amount setting
of 30Mbps:
- Each Replication Pair requires a pipeline during Baselining or SmartSync; if you have
3 Replication Pairs in the SmartSync phases at the same time, you have 3
pipelines active, which will equally divide the specified 30Mbps maximum
network transfer rate for the source client, for a maximum rate of 10Mbps
each. After Baselining and SmartSync have completed for each Replication
Pair, only 1 pipeline will remain in use, and the maximum network transfer
rate of 30Mbps will apply to that pipeline.
- Fan-Out configurations require a pipeline for each destination
client; if you have 5 Replication Sets configured to replicate data to 5
clients, you have 5 pipelines active, which will equally divide the
specified 30Mbps maximum network transfer rate for the source client,
for a maximum rate of 6Mbps each.
If your destination computer is serving that function for multiple source
computer, you may need to set this limit on each of the source computers, such
that the destination computer has sufficient time for log replay from all source
computers. Note that the Throttling Amount must be specified first, before you
can create Bandwidth Throttling Rules (see next item.)
- Bandwidth Throttling Rules - scheduled network throttling, specifying
a time range, and a percentage of maximum transfer rate, specified as the Throttling Amount, during that time range.
Once again, the limit set here will apply to the aggregate of all activity on the source computer, comprised of the replication activities of all Replication
Pairs. This setting allows you to select high and low (or no) activity periods
in a manner similar to the 'operation window' concept used when scheduling the
activities of job-based Agents.
|
|
- When configuring throttling, you should consider what unintended affects
throttling might have on operations. As one example, if you have a source computer
that has significant file write activity, and you impose network bandwidth throttling
which makes it impossible to transfer the logs quickly enough to the destination
computer to keep pace with the rate of change on the source computer, log file
space requirements would increase dramatically on the source computer. In such
a case, provision must be made for sufficient log file space, based on the expected
activity and throttling.
- An example of a beneficial use of throttling involves configurations where
multiple source computers are all configured to use the same destination computer.
In this case, you may want to impose throttling on the source computers to allow
the destination computer enough time to keep pace with all the log files it
is receiving, and ensure sufficient log space on the destination computer as
well to accommodate all of the logs it will be receiving.
- You can configure Alerts to be generated when throttling is imposed, or
when 80 percent or more of a volume's disk space is consumed, for all of the
client computer's volumes. For more information, see
Alerts and Monitoring.
- On Windows in a clustered environment, when a cluster node is
the active node for more than one virtual server at the same time,
throttling rules are applied equally to all of the virtual servers hosted by
that physical node, using
the highest numbers specified for any one of them. For example, consider an
active node hosting three virtual servers simultaneously, with throttling
configured as follows on each of the virtual servers, VS1, VS2, and VS3:
| Throttling Parameter |
VS1 |
VS2 |
VS3 |
| Throttling based on percentage of free log
space on destination: |
30% |
35% |
40% |
| Stop
replication based on percentage of free log space on
destination: |
80% |
70% |
60% |
| Abort source based on percentage of free log space
on source: |
75% |
80% |
70% |
|
Network Bandwidth Throttling amount: |
10Mbps |
40Mbps |
90Mbps |
Since throttling for all Virtual Servers will be based on the
highest number specified for any one of them, all three Virtual
Servers would be subject to the throttling numbers shown in bold, not
necessarily the numbers specified individually. If throttling is imposed
based on the destination computer running low on log space, in this example,
when free log space reaches 40% on any virtual server, the maximum transfer
rate will be reduced by 50% on each of the virtual servers -- to 5Mbps on
VS1, 20Mbps on VS2, and 45Mbps on VS3.
|
For step-by-step instructions, see
Configure Throttling for CDR
Replication Activities.
Back to Top
Replication Prediction can be used to track the size of the data that has
been added or modified for the time during which a pair is active and
monitoring; for Windows file systems, monitoring is performed at the volume or
folder level; for UNIX, monitoring is performed at the file system level. This
information is used to estimate the amount of data throughput required per hour,
day, etc., and thus whether the bandwidth of the current connection will be
sufficient for the predicted data replication activity. For instance, to see how
much data will be replicated for an Exchange Server during each workday or for
the whole week, you can start monitoring all folders used by the Exchange Server
(stores, logs etc.) After 24 hours or a week, you can check the size of data
modified, and use that information to estimate bandwidth requirements.
Replication Prediction reports the following for each monitored
folder, volume, or file system:
- the monitoring interval -- start and end time
- the size of the data changed, in bytes and MB
To use the Replication Prediction, see
Perform Replication Prediction
for step-by-step instructions.
Back to Top
Files that are in the destination directory, but not the source directory,
are orphan files. You can choose to ignore, log, or delete such files that are
identified in the destination path; these settings are configured in the Orphan
Files tab of the Replication Set Properties.
To configure Orphan File settings, see
Configure Orphan File Processing
for step-by-step instructions.
To view Orphan Files, see View
Orphan Files for step-by-step instructions.
- A file that is created on the source and is then deleted before it has been
replicated, will still be created on the destination and then deleted. This
is because both the creation and deletion of the file are captured in the log
file, and this will be replayed on the destination computer. These are not treated
as Orphan Files.
- A renamed file will be replicated to the destination as a new file. The
previous copy with the old name will remain on the destination and be treated
according to your Orphan Files settings.
- If you change the orphan file settings for an existing Replication Set,
the change will only affect Replication Pairs that are created after the change,
or Replication Pairs that are aborted and restarted. Currently active Replication
Pairs will not be affected by the change until they are aborted and restarted.
- It is strongly recommended that you do not replicate to the root of the
destination client or the filer volume. If for any reason you need to
replicate to the root of the volume then ensure that the Orphan File
Processing is turned off from the Replication Set Properties.
Back to Top
The following section provides the steps required to use CDR for data replication,
based on a single source and single destination. If your environment uses a different
scenario, adjust your steps accordingly.
- Select two computers on which to install CDR, one designated
as the source computer, and one designated as the destination computer.
- If you are using QSnap, consider the following:
- To use QSnap with CDR on UNIX, before you can begin
creating Replication Sets and Replication Pairs, you must first
configure source and/or destination volumes as CXBF devices. For more
information, see QSnap for
ContinuousDataReplicator.
- When using QSnap with CDR on Windows, you may want to increase the
minimum size of QSnap's COW cache beyond the default size, on both the
source and destination computers, if sufficient space
is available. Also, you may want to select an alternate location for the COW
cache. For more information, see
QSnap - Cache Considerations for ContinuousDataReplicator.
- When using CDR on UNIX to replicate files with non-ASCII character
names, perform the procedure detailed in
Handling Files with non-ASCII Characters.
- For CDR on Windows, if you will be replicating application data, see
Change Account for
Accessing Application Servers.
- On both the source and destination computers, it is recommended that you
Configure Throttling for
CDR Replication Activities.
- It is recommended that you also
Configure Alerts.
For more information, see
Application Management
Alerts for CDR and
Job Management Alerts
for CDR.
For CDR on Windows, when using VSS or QSnap on a source computer it is recommended that you also see
Space Check for the Quick Recovery and ContinuousDataReplicator Agents
and configure the
Disk
Space Low alert to provide warning that the source computer is
running out of disk space, which will ultimately cause replication activity
to be System Aborted.
- Create a Replication
Set. (You can also use the Wizard for this, by right-clicking the CDR icon
and selecting Replication Set Creation Wizard from the All Tasks menu.)
- Optionally,
Configure CDR Recovery Points.
- Optionally,
Configure CDR for Backups of Recovery Points.
- Add a Replication
Pair. (If you created the Replication Set using the Wizard, you can skip
this step.)
- Start Data
Replication Activity.
- Monitor Data
Replication Activities.
Back to Top
For an overview of a Fan-Out configuration, see Fan-Out.
Follow the guidelines in How to
use CDR to Replicate Data to install and configure all the computers that
will function as either a source or destination.
Consider the following for Fan-Out configuration:
- VSS shadow storage space considerations:
- A snapshot is created of the source volume for each Replication Pair
during the SmartSync Scan phase, and this can lead to significant space requirements
in a Fan-Out configuration, since a separate Replication Set is required
for each different destination. As a simple illustration, if you have 5
destinations for the same source path, thus 5 Replication Sets each having
one Replication Pair, 5 snapshots will be created of the source volume.
Further, if you have 10 volumes which are each being replicated to those
5 destinations, and you start replication for all of them simultaneously,
50 snapshots will be created during the SmartSync Scan phase. It is best in such circumstances
to avoid starting all Replication Pairs simultaneously.
- The VSS cache can be configured using the
vssadmin add shadowstorage
command from a command line prompt. Refer to Microsoft documentation for
details.
- QSnap COW Cache space considerations:
- A snapshot is created of the source volume for each Replication Pair
during the SmartSync Scan phase, and this can lead to significant space requirements
in a Fan-Out configuration, since a separate Replication Set is required
for each different destination. As a simple illustration, if you have 5
destinations for the same source path, thus 5 Replication Sets each having
one Replication Pair, 5 snapshots will be created of the source volume.
Further, if you have 10 volumes which are each being replicated to those
5 destinations, and you start replication for all of them simultaneously,
50 snapshots will be created during the SmartSync Scan phase. It is best in such circumstances
to avoid starting all Replication Pairs simultaneously.
- As the SmartSync phases complete for each Replication Pair, these snapshots
are deleted by the system, but only in the order they were created for each
volume. If the first snapshot of a given volume was created for a Replication
Set using a slower destination computer, and it is the last one to complete
the SmartSync phases, no other snapshots of that volume can be deleted until
this first one is deleted.
- By default, the location for the QSnap COW Cache is on the same volume
of which the snapshot is being created, but you can also specify a separate
volume to be used for all snapshots, in the
Client Properties (Advanced)
tab. See
Change
the COW Cache Location.
- For Windows, note that since each destination computers communicates with the source
computer to indicate when it is finished with a log, a given log will not be
automatically deleted on a source computer until all destination computers
are finished with it. If one or more destinations are unavailable for any reason,
(or planning to be) in Fan-Out scenarios for prolonged period of time, the Replication
Pairs for that destination should be aborted, or the source will eventually
run out of space as all the replication logs for the offline destination(s)
accumulate.
Back to Top
It is recommended that you keep the following in mind when performing
data replication:
- Destination volume size: ensure that
the destination volume has sufficient space for all the data that will be replicated
to it. If you are replicating data from multiple source volumes to the same
destination volume (Fan-In), ensure that the destination volume is sufficiently
large for the data which will be replicated from all the source volumes. If
you are creating Recovery Points, you must also account for the space requirements
of the snapshots that will be created on the Destination; see
Recovery Points - Snapshot space requirements.
- Individual failed files or folders will not necessarily fail the replication job. Such
individual failures may just be logged and the data replication job will continue.
Check the logs periodically for such failures. See
View
the Log Files of an Active Job. In some cases, the nature of such
failures during replication may have an underlying cause which would in turn
cause CDR to switch to SmartSync, or Abort replication altogether.
- In a case of failure of the source computer, the data on the destination
computer can be used temporarily as the primary data set. Once the problem is
solved on the original source computer, the new and modified data can be replicated
from the destination computer back to the source computer. For more information,
see Replicate
the Destination Data Back to the Source Computer.
- If a SAN volume that is a source for any Replication Pair(s) is
disconnected and re-connected again, you must abort and restart at least one
of the Replication Pairs on the source computer.
- Replicating encrypted data for
CDR on Windows - when
you replicate data that was encrypted on the source computer, it will not be
accessible on the destination computer. To access the data, you must use Copyback
to recover the data to the source computer, where you will be able to access
it with the proper permissions. On the source computer, if you remove the encryption
from the data after it has been replicated, the data will not be replicated
again, so it will remain encrypted on the destination.
- Replication performance for CDR on Windows - to increase the speed at which data is replicated,
the pipeline buffer size can be reconfigured from the default size of 64KB up
to a maximum of 256KB (in increments of 32KB) using the
PipelineBufferSizeInKiloBytes
registry key. However, if the value of this key is set too high, during the
Baseline Phase or copyback to a destination computer with low kernel memory,
or in a 'Fan-In' configuration, the operation may fail because the system lacks
sufficient buffer space or because a queue was full.
- For CDR on Windows, it is possible to effect the initial transfer of data from a source to a
destination without using the Baselining Phases. This can
be useful when the connection between the source and the destination is constrained,
such as a slow WAN connection. For more information, see
Perform Initial Transfer
of Data Without Using Baselining Phases.
- For CDR on Windows, when communication is interrupted between the source and destination computers,
the source computer will make 30 attempts (this default number can be changed
using the
MaxConnectionAttempts
registry key) to reconnect to the pipeline, after which the Replication Pair(s)
will show a state of Failed. Each connection attempt takes several minutes,
an interval which is neither programmatic nor configurable.
- For CDR on Windows, the virtual memory paging file (pagefile.sys)
must be configured on a local, fixed disk.
- For CDR on UNIX, ACLs for AIX 5.3 cannot be replicated to a destination running AIX 5.2,
as the ACL format is not backward compatible. However, ACLs from AIX 5.2 can
be replicated to a destination running AIX 5.3.
- For CDR on UNIX, sparse files attributes are not transferred during the
Baselining and SmartSync phases; the
files assume the attributes of regular files on the destination. During the Replicating phase,
sparse files do retain their attributes on the destination.
-
For Windows, the
nDoNotReplicateACLs registry key can be used to disable the
replication of the security security stream of files. This stream includes user
and group access control list (ACL) settings for file access. If this registry
key is not present, ACLs will be replicated.
Back to Top