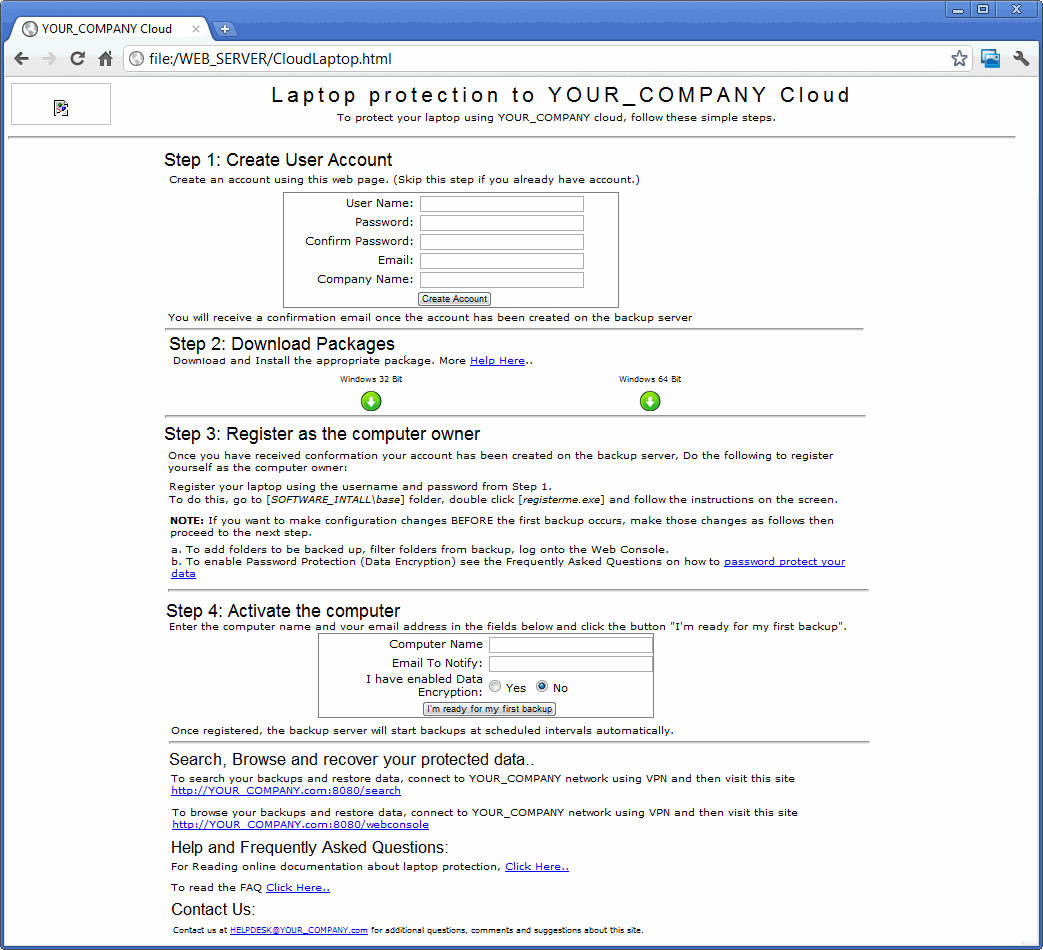
Use the following steps to set up a Cloud Laptop Protection on CommServe.
| 1. |
|
See
Create Storage Policy for step-by-step instructions. |
| 2. |
|
See
Create a Client Group for Laptop for step-by-step instructions. See
Disable Operations for step-by-step instructions.
|
| 3. |
Create a schedule policy for laptop group. While associating
client computer groups to the schedule policy, make sure only the Laptop
Backup client computer group is selected.
|
See
Create a Schedule Policy for step-by-step instructions. |
| 4. |
Create a subclient policy for laptop group. |
See
Create a Subclient Policy for step-by-step instructions. |
| 5. |
Setup Firewall depending upon your environment.
| |
The same firewall configuration configured
on laptop client computer group must also be configured on the
Waiting Room client computer group. |
|
See
Setup
Firewall Using Proxy - Laptop Backup for step-by-step instructions.
See
Setup Firewall Without Proxy - Laptop Backup for step-by-step instructions.
|
| 6. |
Create an Installation Package. This package allows end-users
to install the software without accessing the CommServe during installation
and provide the option to register the laptop later.
| |
- During selection of client computer group at
step
25, make sure to select Waiting Room client computer
group.
- You need not create additional user accounts for each user
which is described in the step 36 - 38 in
Create Decoupled Installation Package.
- Rename the package as 32-bit.exe for 32-bit software
package and 64bit.exe for 64-bit software package.
|
|
See
Create Decoupled Installation Package for step-by-step instructions. |
| |
Copy the 32-bit.exe and 64-bit.exe packages
on to Web Server. |
|
| 7. |
Setup Self Service This will allow you to set up a self-service
web console to perform backup, restore and download operations on laptop.
|
See
Setup
Self Service - Laptop Backup for step-by-step instructions. |
| 8. |
Use the following steps to download the scripts needed
to collect laptop users data:
- Click the Download Now button located on the right.
- Select a location to save the .zip file.
- Navigate to the location of the .zip file and unzip the file.
|
 |
| 9. |
- Create the following folders and place these file with them (your
paths can be changed to suite your needs, just modify the scripts accordingly):
- E:\scripts\bin
Modify this file to change the name of YOUR
SMTP MAIL server.
- E:\scripts\laptopcloud_createusers
Check and modify all lines
that begin with *** to suit your environment, remove the *** after
modifying the line.
- E:\scripts\ laptopcloud_enablecomputers
Check and modify all
lines that begin with *** to suit your environment, remove the ***
after modifying the line.
- Schedule the 2 batch files above to run for every 5 minutes around
the clock.
|
|
Use the following steps to set up data collection server.
| 14. |
On Web Page:
- Verify that the web page loads properly and can be accessed by your
users.
- Verify that when you enter a username, password and company in the
step 1 form, a file gets written to the Users folder.
- Verify that when you enter a computer and email it the step 4 form,
a file gets written to the Computers folder.
|
|
| 15. |
On Data Collector server: Verify that when the schedule
runs for the download_from_web.bat that the users and computer files
get copied to the Data Collector server in the Users and Computer
folders and that the files are deleted from the web server.
|
|
| 16. |
Commserver - User creation script:
- Verify that when the schedule for the createuser.bat file
runs that the user files get copied from the Data Collector server to
the Commserve and that the files are deleted from the Data Collector
- Verify that the user account in the file actually gets created and
assigned to the Laptops user group.
- Verify that the user account that was provided on the web server
receives a confirmation email.
|
|
| 17. |
Commserver - Computer activation script:
- Verify that when the schedule for the enablecomputer.bat
file runs that the computer files get copied from the Data Collector
server to the Commserve and that the files are deleted from the Data
Collector
- Verify that the computer gets added to the Laptops client
group.
- Verify that the computer gets removed from the Waiting room
client group.
- Verify that the email account the user entered gets added to the
laptop client description field.
- Verify that if the user has selected YES for the data encryption
option that the storage policy for that laptop gets changed to the
Laptop backups (sensitive) storage
policy.
- Verify that the user account that was provided on the web server
receives a confirmation email.
|
|
| 18. |
Provide the Cloud Laptop Web page URL to laptop users. |
|
The following steps outline what the end user can perform and experience they
should encounter.
All the above can take place without the Backup Administrator needing to do anything
for the user.