The following procedure describes the steps involved in automatically configuring
a library that is shared across a SAN with DDS, in both the clustered and non-clustered
environment. This procedure does not apply to NAS-attached libraries. See
Configure
a Library Shared Across a SAN Environment
for step-by-step instructions on configuring NAS-attached libraries.
Before You Begin
|
|
Check the following before you configure the library in the SAN
environment:
- Hardware is configured according to the conventions detailed in
Hardware Configuration Guidelines - Libraries Attached to a SAN.
- MediaAgent software is installed on every computer that is connected to
the SAN, and that will access the library. The MediaAgent software can be
installed on the computers in any order; the installation sequence does not
affect the library configuration.
- Whether the library supports the SCSI 3 drive identification
information. To detect whether the library supports SCSI 3, run the
CVScsiTool.exe available in the
<Software Installation Path>\Base folder from the
command prompt. If SCSI 3 is available, the Drive
Identifiers will be displayed under Library
Information. For detailed description of SCSI 3 drive
identification, see
Detection for libraries that support SCSI 3 drive identification information.
- Note the following for configuring a library attached to the MediaAgent
on a cluster:
- MediaAgent clustering can be supported only for libraries in
the SAN environment.
- Configure the MediaAgents on an active node. The active node takes
care of copying the necessary configuration information to the passive
nodes.
- Ensure that both the active and passive nodes are up and running
before you begin the configuration.
|
To automatically configure libraries shared across SAN
|
| 1. |
Display
the Library and Drive Configuration window.
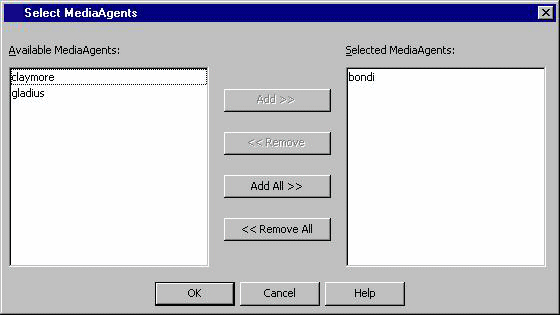
In the
Select MediaAgents dialog box, select the
name of any one MediaAgent that will share the library.
|
 |
| 2. |
Detect the devices. Use
Detection or
Exhaustive Detection as required.
If the library supports
SCSI 3 drive identification, it is not necessary to perform an exhaustive
detection.
|
 |
| |
The library and all drives are displayed for the MediaAgent that is connected
to the SAN in the Library and Drive Configuration
window. |
 |
 |
For a Solaris MediaAgent in the SAN environment, the operation will
fail to detect devices with SCSI target higher than 15 and/or LUN higher
than 7. In a such a situation additional entries must be added for such
devices in the wa.conf file. For information
on adding these entries see Add Additional Entries
in wa.conf File in the Solaris MediaAgent.
For a NetWare MediaAgent, you may see a number of drives in addition
to the drives that are actually present. These drives are displayed as empty
slots. You can ignore these empty slots and configure the library using
the drives that were detected successfully.
If any additional drives are visible on any of the MediaAgents
due to incorrect zoning you must do one of the following:
- Correct the zoning and restart the configuration process.
- Delete the additional drives before performing the next step.
|
| 3. |
Right-click the library and then click Properties. |
 |
| 4. |
From the Library Properties dialog box,
select the following option:
- Auto Configure DDS DrivePool: Enable
this option to automatically configure the DDS drive pools for MediaAgents
sharing these drives.
Optionally, consider the following options and enable or disable it if
necessary:
- Auto Configure Failover Library Controllers:
Enable this option to automatically configure the Failover
Library Controllers
in all the MediaAgents sharing this library.
- Automatically create storage policy for
new Datapaths: Enable this option to automatically create a new
Storage Policy
when the library is configured.
Click OK.
NOTES
- The option
to automatically create/configure DDS DrivePools is not available for NAS-attached libraries; Dynamic Drive Sharing must be
configured manually. For instructions on how to configure DDS for
NAS-attached libraries, see
Configure NAS-attached Libraries Shared Across a SAN .
|
 |
| 5. |
Configure the library as described in
Configure Devices.
|
| |
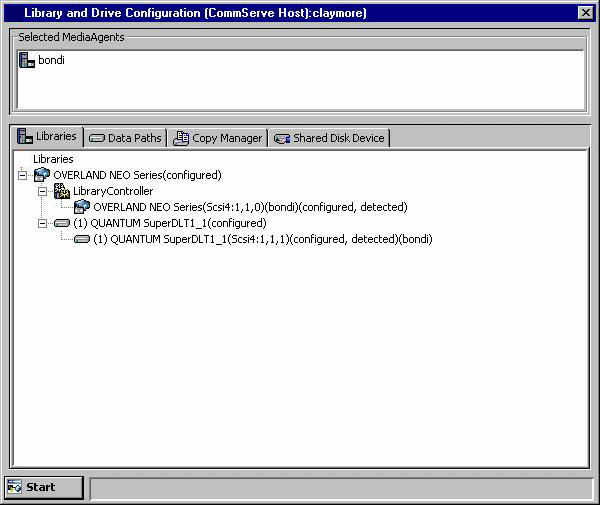
The library is configured and displayed with the
configured, detect success status in the
Library and Drive Configuration window.
The Library tab provides
the physical view of the devices (library and drives).
|
 |
| |
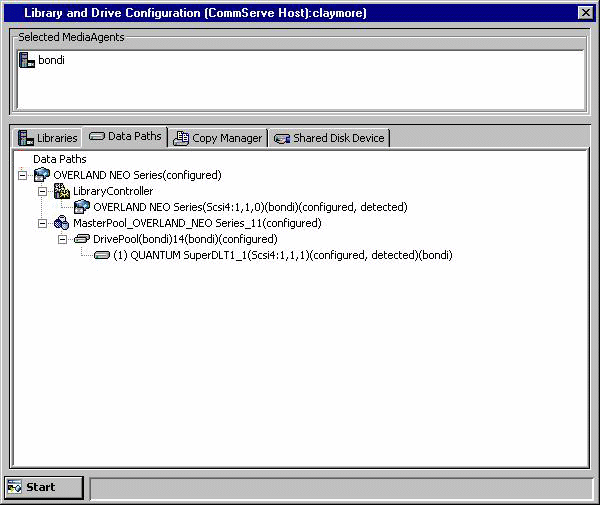
The Data Paths tab provides a logical view of the data path used to access
the devices - library, master drive pool, drive pool, drive.
|
 |
To automatically configure the data
paths in the Storage Policy Copy
|
| 6. |
Optionally, perform the following steps if you want the system to
automatically create the
alternate data paths in the Storage Policy Copy
that was created during the library configuration. NOTES
A data path is the combination of MediaAgent, Library, Drive Pool and Scratch Pool used by
the storage policy copy to access the library. When you have several
MediaAgents accessing a library, you can create a Storage Policy when
you configure the library the first time. For subsequent MediaAgents,
you can do the following:
- Create alternate data paths in the Storage Policy copies associated with
the Storage Policy, using the other MediaAgent, Library, Drive Pool and
Scratch Pool combinations.
- Disable the option to automatically create a new storage policy when the
library is subsequently configured using another MediaAgent.
|
| |
- From the CommCell Console, right click the appropriate library and
then click Properties.
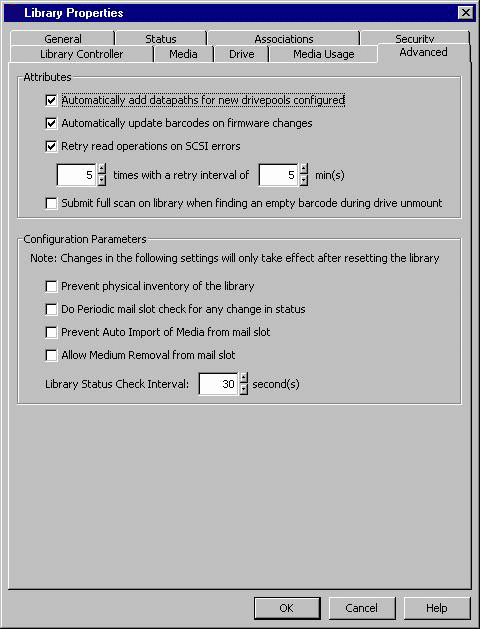
- From the Library Properties dialog
box, click the Advanced tab.
- Enable the Automatically add datapaths for
new drivepools configured option.
|
 |
| |
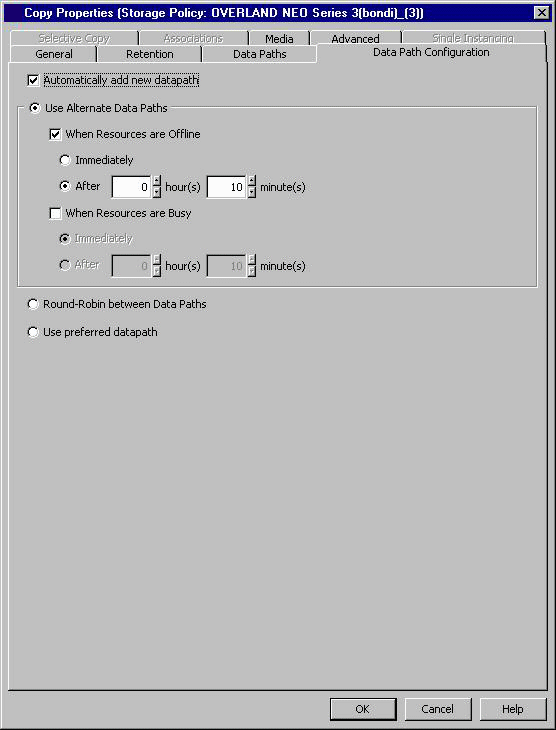
- From the CommCell Console, right-click the Storage Policy Copy that
was created during the library configuration and then click Properties.
- From the Copy Properties dialog
box, click the Data Path Configuration tab.
- Enable the Automatically add new datapaths option.
|
 |
To automatically configure the other MediaAgents that share the library
in SAN
|
| 7. |
Install the library and ensure that the operating system detects the library.
(See Driver Configurations
for information on how to check this information for various operating systems.) |
| 8. |
Install the MediaAgent software on all the other computers that will share
the library. (See MediaAgent
Deployment for information on installing the MediaAgent software.) |
| |
If you have already installed the MediaAgent software, stop and start the
MediaAgent Services on all the MediaAgents sharing this library. For more
information on stopping and starting services, see the following topics:
|
| |
Open the Library and Drive Configuration window and verify that the libraries
are configured from all the MediaAgents that share the library.
The Library tab provides
the physical view of the devices (library and drives).
|
 |
| |
The Data Paths tab provides a logical view of the data path used to access
the devices - library, master drive pool, drive pool, drive.
|
 |
Post-Configuration Considerations
|
|
After configuring all the libraries, consider disabling the hat the
Auto Configure DDS DrivePool and
Auto Configure Failover Library Controllers
options described in Step 4, if you do not want the system to automatically
configure the library whenever a new MediaAgent is installed in the SAN. |
The following procedure describes the steps involved in configuring a library
that is shared across a SAN with DDS, in both the clustered and non-clustered environment.
This procedure does not apply to NAS-attached libraries. See
Manually Configure NAS-attached Libraries Shared Across a SAN
for step-by-step instructions on configuring NAS-attached libraries.
Before You Begin |
|
Check the following before you configure the library in the SAN
environment:
- Hardware is configured according to the conventions detailed in
Hardware Configuration Guidelines - Libraries Attached to a SAN.
- MediaAgent software is installed on every computer that is connected to
the SAN, and that will access the library. The MediaAgent software can be
installed on the computers in any order; the installation sequence does not
affect the library configuration.
- Whether the library supports the SCSI 3 drive identification
information. To detect whether the library supports SCSI 3, run the
CVScsiTool.exe available in the
<Software Installation Path>\Base folder from the
command prompt. If SCSI 3 is available, the Drive
Identifiers will be displayed under Library
Information. For detailed description of SCSI 3 drive
identification, see
Detection for libraries that support SCSI 3 drive identification information.
- Note the following for configuring a library attached to the MediaAgent
on a cluster:
- MediaAgent clustering can be supported only for libraries in
the SAN environment.
- Configure the MediaAgents on an active node. The active node takes
care of copying the necessary configuration information to the passive
nodes.
- Ensure that both the active and passive nodes are up and running
before you begin the configuration.
|
To manually configure libraries shared across SAN |
| 1. |
Display
the Library and Drive Configuration window.
In the
Select MediaAgents dialog box, select the
name of only one MediaAgent that will share the library.
|
 |
| 2. |
Detect the devices. Use
Detection or
Exhaustive Detection as required.
If the library supports
SCSI 3 drive identification, it is not necessary to perform an exhaustive
detection.
The library and all drives are displayed for the MediaAgent that is connected
to the SAN in the Library and Drive Configuration
window.
|
 |
 |
For a Solaris MediaAgent in the SAN environment, the operation will
fail to detect devices with SCSI target higher than 15 and/or LUN higher
than 7. In a such a situation additional entries must be added for such
devices in the wa.conf file. For information
on adding these entries see Add Additional Entries
in wa.conf File in the Solaris MediaAgent.
For a NetWare MediaAgent, you may see a number of drives in addition
to the drives that are actually present. These drives are displayed as empty
slots. You can ignore these empty slots and configure the library using
the drives that were detected successfully.
If any additional drives are visible on any of the MediaAgents
due to incorrect zoning you must do one of the following:
- Correct the zoning and restart the configuration process.
- Delete the additional drives before performing the next step.
|
| 3. |
Configure the library as described in
Configure Devices.
|
To automatically configure the data paths in the Storage Policy Copy |
| 4. |
Optionally, perform the following steps if you want the system to
automatically create the
alternate data paths in the Storage Policy Copy
that was created during the library configuration. NOTES
A data path is the combination of MediaAgent, Library, Drive Pool and Scratch Pool used by
the storage policy copy to access the library. When you have several
MediaAgents accessing a library, you can create a Storage Policy when
you configure the library the first time. For subsequent MediaAgents,
you can do the following:
- Create alternate data paths in the Storage Policy copies associated with
the Storage Policy, using the other MediaAgent, Library, Drive Pool and
Scratch Pool combinations.
- Disable the option to automatically create a new storage policy when the
library is subsequently configured using another MediaAgent.
|
| |
- From the CommCell Console, right click the appropriate library and
then click Properties.
- From the Library Properties dialog
box, click the Advanced tab.
- Enable the Automatically add datapaths for
new drivepools configured option.
|
 |
| |
- From the CommCell Console, right-click the Storage Policy Copy that
was created during the library configuration and then click Properties.
- From the Copy Properties dialog
box, click the Data Path Configuration tab.
- Enable the Automatically add new datapaths option.
|
 |
To configure the other MediaAgents that share the library in SAN |
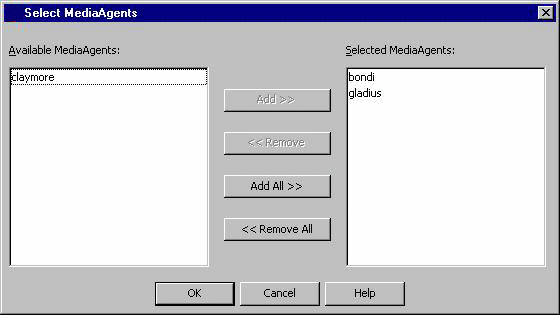
| 5. |
From the Library and Drive Configuration
window, click the Start menu and choose
Select MediaAgents. Select the following
MediaAgents:
- The MediaAgent in which the library is already configured.
- Other MediaAgent(s) in which you wish to configure the library using
DDS.
|
 |
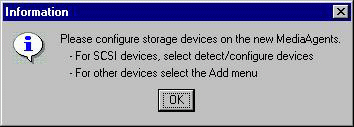
| 6. |
Click OK in the Information prompt. |
 |
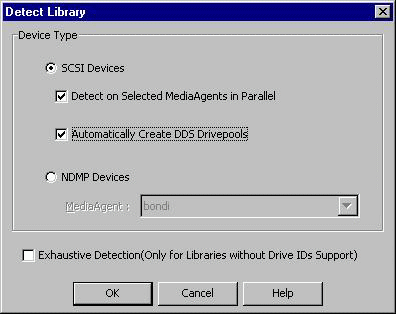
| 7. |
Detect the devices that are controlled by MediaAgents that will access the
library as described in
Detect Devices.
In the Detect Library dialog box, select
the following options:
- Detect on Selected MediaAgents in Parallel
- Automatically create DDS Drivepools
NOTES
- The option
to automatically create/configure DDS DrivePools is not available for NAS-attached libraries; Dynamic Drive Sharing must be
configured manually. For instructions on how to configure DDS for
NAS-attached libraries, see
Configure NAS-attached Libraries Shared Across a SAN .
|
 |
| |
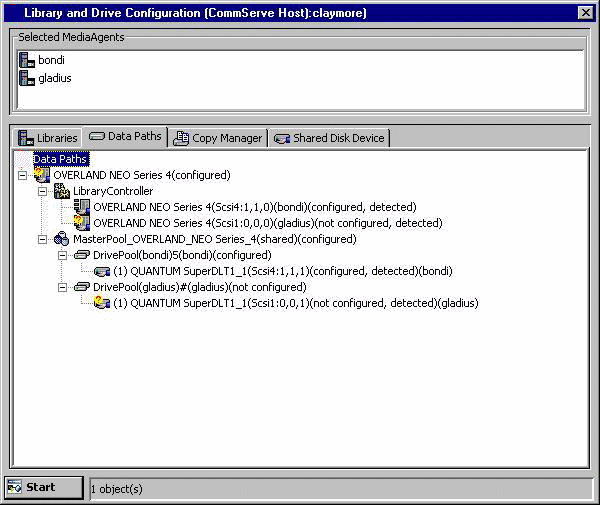
The system detects the drives and automatically displays them with the
DDS setup in the Library and Drive Configuration window.
The Library tab provides
the physical view of the devices (library and drives).
|
 |
| |
The Data Paths tab provides a logical view of the data path used to access
the devices - library, master drive pool, drive pool, drive.
|
 |
| 8. |
Configure the library as described in
Configure Devices.
This will configure the library and the library controllers for the library.
If you do not wish to configure the library controllers on one or more
of the MediaAgents, you must delete them before configuring the library.
To delete, right-click the appropriate library controller and then choose
Delete. Click OK
in the confirmation prompt that appears.
|
Post Configuration Considerations |
| If you subsequently add new MediaAgents with visibility to a configured
library and drives, the system will automatically configure the libraries
and drives in those MediaAgents.
Perform the following steps if you wish to disable the automatic library
and drive configuration in such MediaAgents:
|
| From the Library and Drive Configuration
window, open the Library Properties dialog
box associated with the library you wish to disable automatic configuration. |
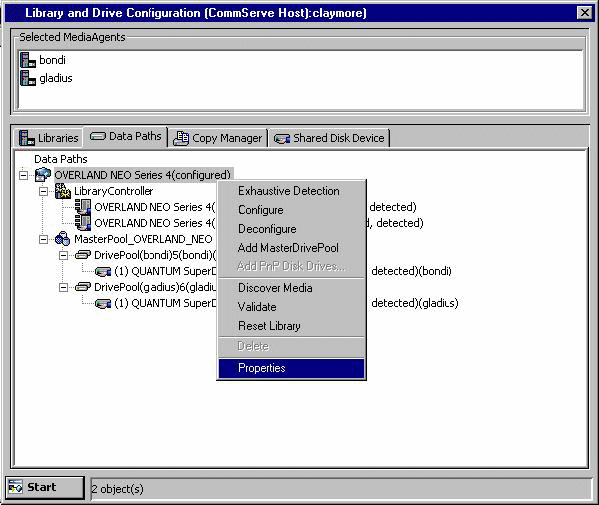 |
Disable the following options:
- Auto Configure DDS DrivePool
- Auto Configure Failover Library Controller
|
 |
The following procedure explains the steps involved in configuring a
NAS-attached library
which is shared in the SAN environment by multiple NAS file servers and/or
MediaAgents.
|
|
- During configuration, all of the drive devices must have a value
for their serial number. If the automatic configuration does not populate
a serial number for a drive, you must manually enter a serial number
value, using the
Manually configure
the library and drives attached to the NAS file server procedure.
Each instance of a drive must have the same serial number.
-
During configuration of NAS-attached libraries and drives,
connectivity is required between the CommServe and the NAS file server.
Even after configuration is complete, connectivity is still required to
the CommServe for various operations, such as cleaning up snapshots from
a killed NAS iDataAgent job.
-
This feature requires a Feature License to be available in the CommServe® Server.
Review general license requirements included in
License Administration. Also,
View All Licenses provides step-by-step
instructions on how to view the license information.
|
|
|
| 1. |
You must first configure the library from any one of the MediaAgents
that share the library across a SAN. Use one of the following
procedures to configure the library for the first time:
Once you have configured the library for the first time you can
use the following procedure to configure the library from a NAS file
server. |
| 2. |
Display
the Library and Drive Configuration window.
|
| 3. |
If necessary, select a new MediaAgent that must be used by the File
Server to communicate. To select a new MediaAgent, click the Start
button and then click Select MediaAgents. Select the
appropriate MediaAgent from the Select MediaAgent dialog box
and click OK. |
|
4. |
Click the Start button, and then select Detect/Configure Devices.
|
 |
|
5. |
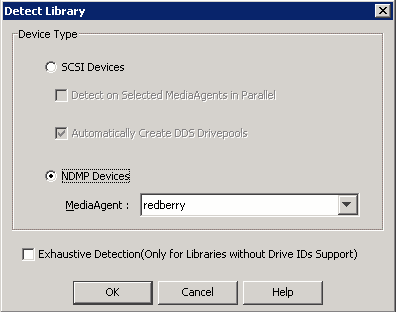
Select the NDMP Devices and the MediaAgent that will control
the library. Select the Exhaustive Detection option.
Click OK.
NOTES
- The exhaustive detection process accurately maps the drives in a
library. During this process, the system attempts to mount a tape in
each of the selected drives and determines the correct drive to
library mapping. Due to the nature of this operation and depending
on the number of drives, this operation may take several minutes to
complete.
- As this operation involves the mounting of a tape in a drive,
ensure that there are some media in the library to mount. If you do
not select Exhaustive Detection, the system still attempts to
discover the media changer and drives connected to the selected NDMP
host, but the system will not mount tapes in those drives to confirm
the correct drive mapping.
- For cluster, select the cluster virtual server as the
MediaAgent.
|
 |
|
6. |
A prompt appears informing you that the exhaustive detection will unload
all drives and hence may interfere with backup/restore jobs.
Click
Yes. |
|
|
7. |
Select the File Server from which you wish to detect the library and click
OK.
|
 |
|
8. |
Click Yes to start the device
detection process.
NOTES
- The system attempts to detect the devices and mount the media in the
drives to verify the correct drive-to-library mapping.
|
 |
| 9. |
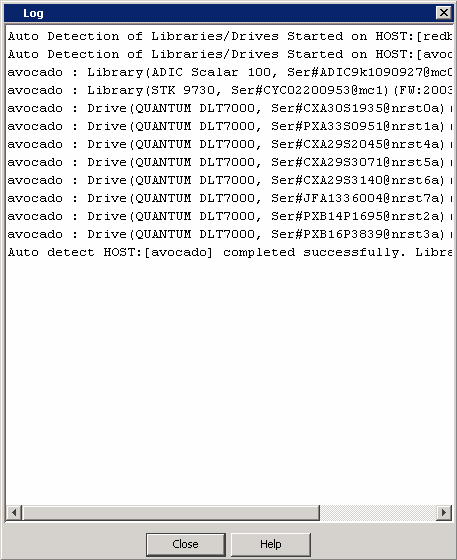
When the exhaustive detection process is completed, the log file is
displayed. Note the log file contents and click Close to proceed. |
 |
|
10. |
An Information prompt appears, informing you to right-click the
device to continue the configuration. Click OK to proceed |
 |
|
11. |
When the Exhaustive Detection is completed, the system displays the
devices in the Library and Drive Configuration window. NOTES
- New detected devices are not configured at this point, and the
configuration information will not be saved when you exit from the
Library and Drive Configuration window until those devices are
configured.
Right-click the library and then click Configure.
The Library tab provides
the physical view of the devices (library and drives).
|
 |
|
|
The Data Paths tab provides a logical view of the data path used to access
the devices - library, master drive pool, drive pool, drive.
|
 |
| 12. |
Configure the library as described in
Configure Devices.
|
|
| 13. |
If you have configured the library, the status of the library
changes to configured.
If you chose to configure all associated drives, the status of the drives,
the master drive pool, and drive pool that contains the drives changes to
configured.
If you do not need to configure any other libraries, exit now.
NOTES
- If there are additional unconfigured libraries shown that you do
not need, you can delete them.
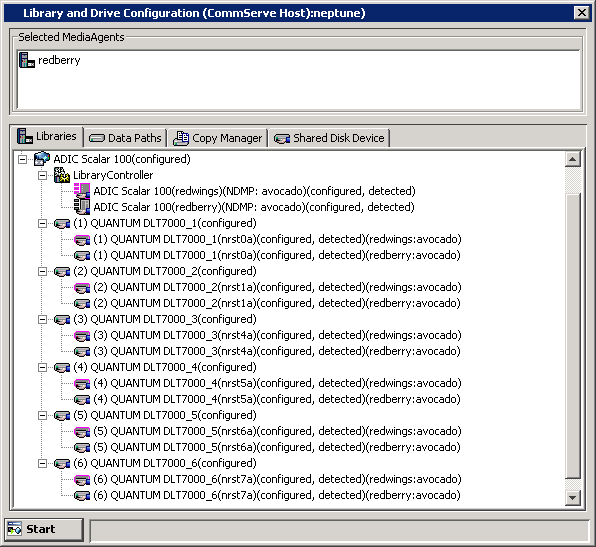
The Library tab provides
the physical view of the devices (library and drives).
|
 |
| |
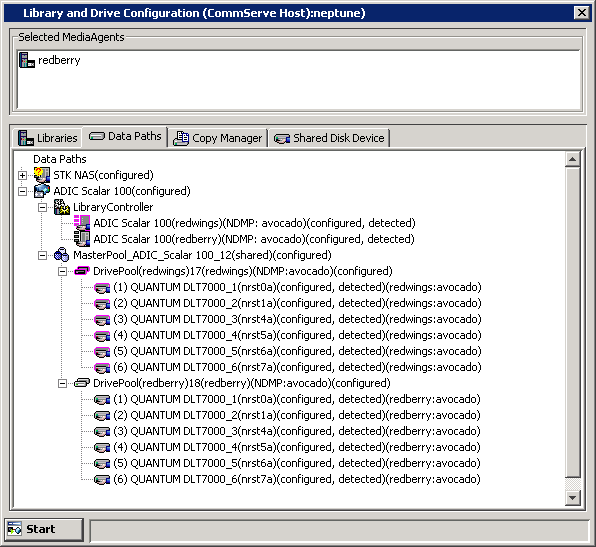
The Data Paths tab provides a logical view of the data path used to access
the devices - library, master drive pool, drive pool, drive.
This task is now complete.
|
 |
The following sections provide guidelines on configuring a library with mixed
drive types in the SAN environment. (This procedure does not apply to
NAS-attached libraries.)
Considerations for a Library With Mixed Drive Types in SAN
|
| 1. |
Configure any of the MediaAgents sharing the library as described in
Configure a Library with Mixed Drive Types. |
| 2. |
After configuring the library:
Display
the Library and Drive Configuration window.
|
| 3. |
Open the Library Properties dialog box and
select the following option:
- Auto Configure DDS DrivePool: Enable
this option to automatically configure the DDS drive pools for MediaAgents
sharing these drives.
Optionally, consider the following options:
- Auto Configure Failover Library Controllers:
Enable this option to automatically configure the Failover
Library Controllers
in all the MediaAgents sharing this library.
- Automatically create storage policy for
new Datapaths: Disable this option for libraries with mixed drive
types.
Click OK.
NOTES
- The option
to automatically create/configure DDS DrivePools is not available for NAS-attached libraries; Dynamic Drive Sharing must be
configured manually. For instructions on how to configure DDS for
NAS-attached libraries, see
Configure NAS-attached Libraries Shared Across a SAN .
|
 |
To automatically configure the other MediaAgents that share the library
in SAN
|
| 4. |
Install the library and ensure that the operating system detects the library.
(See Driver Configurations
for information on how to check this information for various operating systems.) |
| 5. |
Install the MediaAgent software on all the other computers that will share
the library. (See MediaAgent
Deployment for information on installing the MediaAgent software.) |
| |
If you have already installed the MediaAgent software, stop and start the
MediaAgent Services on all the MediaAgents sharing this library. For more
information on stopping and starting services, see the following topics:
|
| |
Open the Library and Drive Configuration window and verify that the libraries
are configured from all the MediaAgents that share the library. |
Post Configuration Considerations
|
Consider the following:
- When you create new storage policies, or have existing storage policies,
ensure that the appropriate combination of drive pool and scratch pool
are associated with them.
- Also when you configure the
alternate
data paths in a storage policy copy, ensure that the same combination
of drive pool and scratch pool are added as the alternate paths .
|


