Topics | How To | Related Topics
Configure Data Interface Pairs
Configure the Client for Data Encryption
Configure the Proxy for Exchange
Configure the Search Server URLs
Suspend Use of a Client Computer Temporarily
Change the Job Results Path of a Client
Change the User Account for Accessing the Job Results Directory
Change the Retention of the Job Results of a Client Computer
Set the Job Priority of a Client
Specify CDR Log File Location on Source and Destination Computers
View Data Interface Pairs Configured for the Client
View the Data Recovery Job History of a Client
View the Data Protection Job History of a Client
View the Log Files of a CommServe, SRM Server, MediaAgent, or Client Computer
Add a Client for NAS NDMP iDataAgents
View the Software Install Folder
For remote clients:
Associate or Disassociate a User Group to a Client
Associate or Disassociate a Client to a Client Group
Enable/Disable Robust Network Layer
Change Robust Network Layer Configuration
View the Software Version (For CommServe, MediaAgent, Client and/or Agent)
Required Capability: See Capabilities and Permitted Actions
| Level | Capability |
| CommCell | Administrative Management with CommCell level association |
| Client Computer Group | Administrative Management with Client Computer Group level association |
| Client | Agent Management with Client level association |
| Agent | Agent Management with Agent level association |
| Subclient | Agent Management with Subclient level association |
![]() To
enable or disable activity control at the CommCell, client computer group, client, agent, or subclient levels:
To
enable or disable activity control at the CommCell, client computer group, client, agent, or subclient levels:
|
|
Disabled data management and/or data recovery operations are displayed with client and/or agent icon changes in the CommCell Browser. For a comprehensive list of all icons in the CommCell Console, see CommCell Console Icons. |
The following procedure can be used to browse data from the client, agent, instance, or backup set level, replication set level, depending on the functionality of a given agent.
Required Capability: See Capabilities and Permitted Actions
![]() To browse the
latest data:
To browse the
latest data:
Required Capability: None.
![]() To
check client connectivity:
To
check client connectivity:
Before You Begin
Required Capability: Capabilities and Permitted Actions
![]() To
configure data interface pairs:
To
configure data interface pairs:
Alternatively, in the CommCell Browser, right-click the Client computer for which you wish to configure data interface pair, and select Properties. In the Advanced tab of the properties dialog box, click the Add button in the Data Interface Pairs area.
Click Next to continue.
If necessary, you can type in the IP address of the NIC cards that must be used to communicate between the 2 computers.
If you have multiple interfaces defined for the computers, click the check box associated with the data interface pair you wish to enable.
You can select multiple interface pairs between the computers, if necessary. The system will use a round-robin algorithm when multiple pairs are selected.To encrypt data during data protection and recovery operations using the CommCell Console, you must configure encryption at the client level first and then at the subclient level.
To encrypt data during third-party Command Line operations, you must configure encryption at the client level first and then at the instance level.
See Data Encryption - Support for a list of supported products.
Before You Begin
This procedure configures data encryption for all supported agents that reside on this client, however, no content at any level (instance or subclient) will be encrypted until the respective level's encryption property is enabled.
Required Capability: Capabilities and Permitted Actions
![]() To
configure the client for data encryption:
To
configure the client for data encryption:
|
Before You Begin
Required Capability: Capabilities and Permitted Actions
![]() To
optimize data for search:
To
optimize data for search:
Before You Begin
Required Capability: Capabilities and Permitted Actions
![]() To configure the Proxy for Exchange client:
To configure the Proxy for Exchange client:
NOTES
Before You Begin
Required Capability: Capabilities and Permitted Actions
![]() To configure
Search Server URLs for the client:
To configure
Search Server URLs for the client:
Required Capabilities: Capabilities and Permitted Actions
| Administrative Management capability cannot be used to perform the deconfigure operation from the MediaAgent level. |
Before you Begin:
![]() To deconfigure a
client, MediaAgent, agent, or enabler:
To deconfigure a
client, MediaAgent, agent, or enabler:
Click OK to continue.
Click Yes to continue with the deconfiguration or No to abort.
If the deconfigure is successful, the tree element is dimmed and available for deletion.
Required Capability: Capabilities and Permitted Actions
![]() To
suspend use of a client computer temporarily:
To
suspend use of a client computer temporarily:
NOTES
Before You Begin
Review Using UNC Paths for Job Results Directory
Required Capability: Capabilities and Permitted Actions
![]() To change
the job results path of a client:
To change
the job results path of a client:
You can also click Browse to browse to a new job results path from the Browse for Job Result Path dialog box. Click OK.
Required Capability: Capabilities and Permitted Actions
![]() To
change the user account for accessing the Job Results Directory for the client:
To
change the user account for accessing the Job Results Directory for the client:
Required Capability: Capabilities and Permitted Actions
![]() To change the
retention of the job results of a client computer:
To change the
retention of the job results of a client computer:
Required Capability: Capabilities and Permitted Actions
![]() To
view data interface pairs:
To
view data interface pairs:
In the CommCell Browser, right-click the Client computer for which you wish to view the data interface pair, and select Properties. In the client's properties dialog box, select the Advanced tab.
The list of data interface pairs configured for the client is displayed in the Data Interface pairs area.
Required Capability: Capabilities and Permitted Actions
![]() To
set the priority of a client:
To
set the priority of a client:
Before You Begin
Required Capability: Capabilities and Permitted Actions
![]() To specify
a location for the CDR log files:
To specify
a location for the CDR log files:
![]() To
view the history of data recovery operations:
To
view the history of data recovery operations:
If you selected Stub Recall as a job history filter option, the system displays the results of the options you selected in the Data Recovery Job History window's Stub Recall Jobs tab.
![]() To
view the data protection job history of a client:
To
view the data protection job history of a client:
Required Capability: See Capabilities and Permitted Actions
![]() To view the log files
of a CommServe, SRM Server, MediaAgent, or client computer.
To view the log files
of a CommServe, SRM Server, MediaAgent, or client computer.
Before You Begin
Required Capability: Capabilities and Permitted Actions
![]() To delete a client computer:
To delete a client computer:
If the Delete command is not available, then you have not successfully deleted the base client software (if relevant) from the client computer.
If you click Yes, the backup data that corresponds to the selected client computer is deleted. Consequently, you will not be able to browse or restore this data. If you click Yes, the client computer icon is removed from the view.
Before You Begin
Required Capability: Capabilities and Permitted Actions
![]() To delete a
pseudo-client:
To delete a
pseudo-client:
For a NAS client, if the Delete command is not shown, you have not deconfigured the client, and the Deconfigure command will be shown instead; refer to Deconfiguring Agents. (There is no base client software for a NAS Client.)
Required Capability: Capabilities and Permitted Actions
![]() To
delete data interface pairs:
To
delete data interface pairs:
Alternatively, in the CommCell Browser, right-click the client computer of which you wish to delete the data interface pair, and select Properties. Select the Advanced tab from the client's Properties dialog box. From the Data Interface Pairs list, select the pair that you wish to delete and click the Delete button.
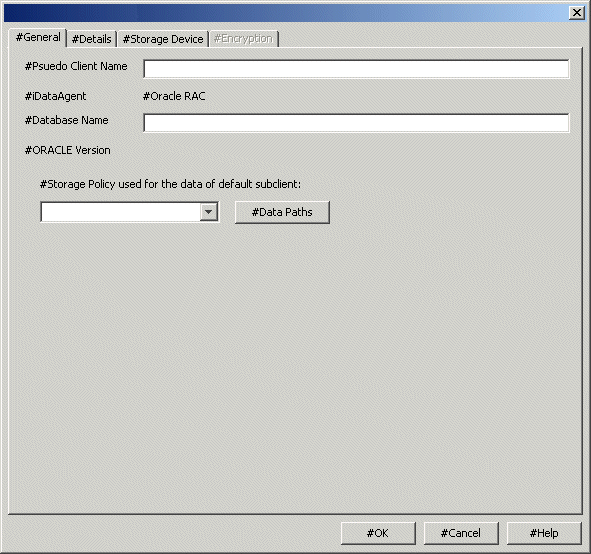
When you create a DB2 DPF pseudo-client, you also create a DB2 DPF partition instance at the same time. Each pseudo-client can include only this one partition instance; you cannot create additional instances for any one pseudo-client. To create additional partition instances, you must create additional pseudo-clients.
| Before You Begin | |
Review the following to avoid common problems:
|
|
| Add Client Checklist | |
| For each DB2 DPF pseudo-client/instance that you want to create, collect the following information in the first block before creating the pseudo-client. Also collect the information in the second block. (Use the spaces provided to record the information. Retain this information in your Disaster Recovery binder.) | |
| 1. |
Name of the DB2 DPF pseudo-client:
___________________________________________________ Instance path for which the DB2 DPF pseudo-client is being created: _________________________ __________________________________________________________________________________ User account information (Windows only, optionally): ______________________________________ Names of DB2 DPF database partitions and corresponding clients for the DB2 DPF instance __________________________________________________________________________________ |
| 2. |
Storage policy to be used by the default subclient for
data:__________________________________ Storage policies to be used by the instance for user command backups and archive log backups:___ ___________________________________________________________________________________ |
| To create a DB2 DPF Client | ||
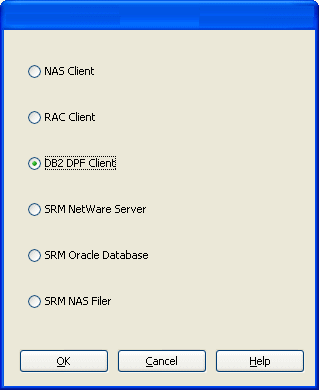
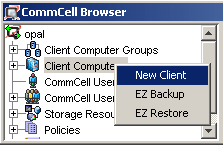
| 1. | From the CommCell Console, right-click Client Computers and click New Client. | |
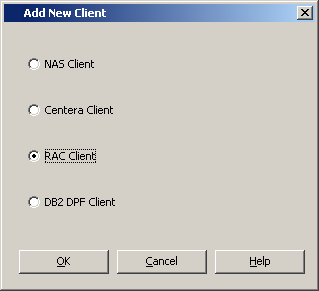
| 2. | From the Add New Client dialog box, click DB2 DPF Client and then click OK. |
 |
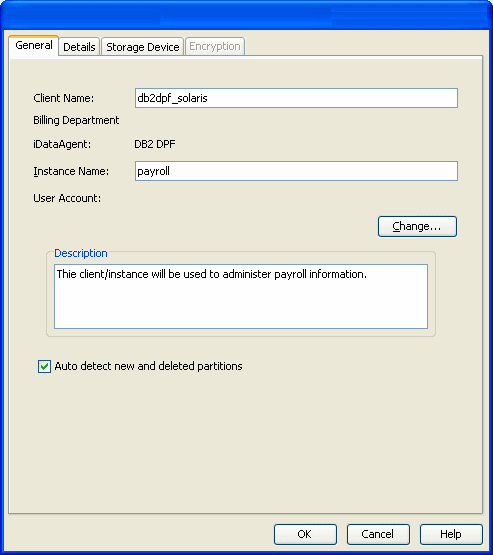
| 3. | In the Create DPF Client (General) dialog box, type or select values for the fields as appropriate. To change the Windows user account, click Change User Account, type the DB2 DPF user name and password credentials, and click OK. Ensure that Auto detect new and deleted partitions is enabled. Then click Details. |
 |
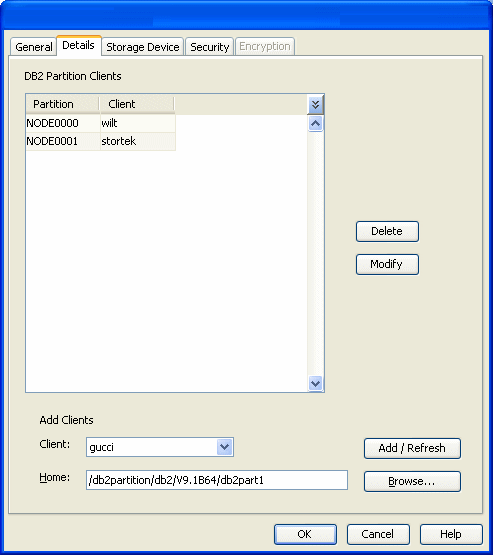
| 4. | In the Create DPF Client (Details) dialog box, use the Clients list and click Add/Refresh to include the appropriate database partitions in the instance. Selected database partitions and their corresponding clients will be displayed in the DB2 Partition Clients space. |
 |
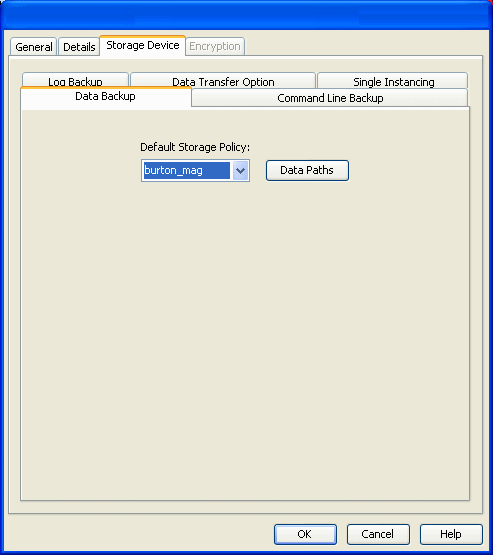
| 5. | From the Data Backup tab in the Create DPF Client (Storage Device) dialog box, click the default data storage policy from the list. |
 |
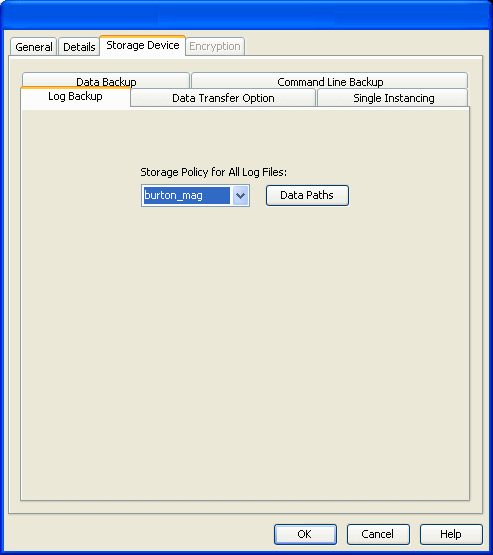
| 6. | From the Log Backup tab in the Create DPF Client (Storage Device) dialog box, click the storage policy for all log files from the list. |
 |
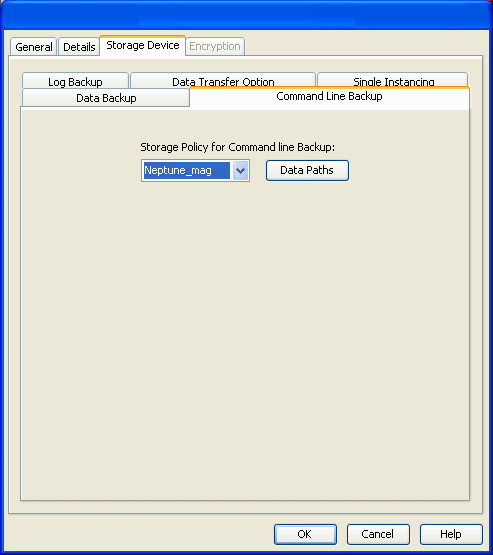
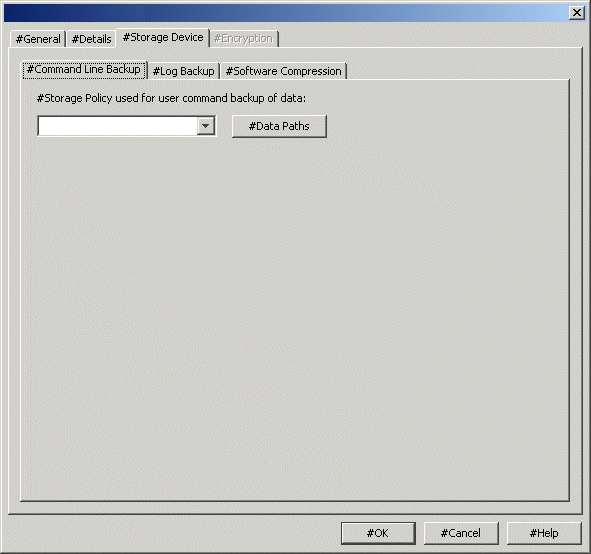
| 7. |
From the Command
Line Backup tab in the Create DPF Client (Storage Device) dialog
box, click the storage policy for command line backups from the list. Also, configure items in the Data Transfer Option and De-Duplication tabs as appropriate. |
 |
| 8. |
Click OK. This task is now complete. |
|
| Before You Begin | |||
Review the following to avoid common problems:
|
|||
| Add Client Checklist | |||
| For each Oracle iDataAgent instance that you want to include in the Oracle RAC node, collect the following information in the first block before creating the RAC pseudo-client. Also collect the information in the second block. (Use the space provided at the right to record the information. Retain this information in your Disaster Recovery binder.) | |||
1. |
Name of the Oracle iDataAgent instance(s) along with the name of the associated physical client for each Oracle iDataAgent:__________________________________________________________________________________ Path to the Oracle home directory:_______________________________________________________________ Oracle User Account and Password (for Windows):___________________________________________________ Oracle User Name (for Unix):____________________________________________________________________ Database connect string:________________________________________________________________________ Catalog connect string for the catalog database:_____________________________________________________ ____________________________________________________________________________________________ Path to the TNS Admin directory (optional):_________________________________________________________ Block size for backup and restore operations for each Oracle instance (optional):__________________________ ____________________________________________________________________________________________ Pass-phrase to enable data encryption for RMAN command line backups (optional):________________________ ____________________________________________________________________________________________ |
||
2. |
Storage policy to be used by the default subclient for data:____________________________________________ Storage policies to be used by the instance for user command backups and archive log backups:_____________ ____________________________________________________________________________________________ |
||
| To create a RAC Client | |||
1. |
From the CommCell Console, right-click Client Computers and click New Client. |
||
2. |
From the Add New Client dialog box, click RAC Client and then click OK. |
|
|
3. |
In the Create RAC Client (General) dialog box, type or select values for the fields as appropriate. Then click Details. |
|
|
4. |
In the Create RAC Client (Details) dialog box, type or select values for the fields at the bottom of the dialog box as appropriate. To create a RAC client for Windows, go to step 6. To create a RAC client for unix, go to the next step. |
 |
|
5. |
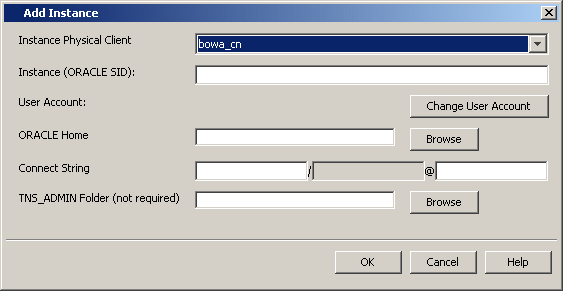
To create a RAC client for Unix, in the Create RAC Client (Details) dialog box, click Add. In the Add Instance dialog box, select an Unix physical client containing the Oracle iDataAgent instances that you want to include in the Oracle RAC node. Thereafter, type or browse values for the fields as appropriate. Then click OK. Repeat this step for each Oracle iDataAgent instance that you want to include. Note: Based on the type of Oracle instance added initially (Unix or Windows), you can only select the same type of instances in the subsequent additions. Once you have added the instances, go to step 7. |
 |
|
| 6. |
To create a RAC client for Windows, in the Create RAC Client (Details) dialog box, click Add.
In the
Add Instance dialog box, select
a Windows physical client containing the
Oracle
iDataAgent instances that you want to
include in the Oracle RAC node. Click Change User Account and type the Oracle user name and password credentials and click OK. Thereafter, type or browse values for the fields as appropriate. Then click OK. Repeat this step for each Oracle iDataAgent instance that you want to include. Note: Based on the type of Oracle instance added initially (Unix or Windows), you can only select the same type of instances in the subsequent additions. |
|
|
7. |
From each tab in the Create RAC Client (Storage Device) dialog box, select values for the fields as appropriate. |
 |
|
8. |
If Encryption is enabled, click Encryption and select the appropriate value. |
||
9. |
After you configure all your instances as appropriate, click OK. This task is now complete. |
||
| Before You Begin | ||
Review the following to avoid common problems:
|
||
| Add Client Checklist | ||
| Collect the following information before installing the software. (Use the space provided at the right to record the information. Retain this information in your Disaster Recovery binder.) | ||
| 1. |
MediaAgent:_________________________________________________________________________ NDMP Server Host Name:______________________________________________________________ Storage Policy:_______________________________________________________________________ Backup content path:__________________________________________________________________ See Step 3 for more information. |
|
| To add a NAS client | ||
| 1. | Right-click Client Computers and select New Client. |
 |
| 2. | Select NAS Client and click OK. |
 |
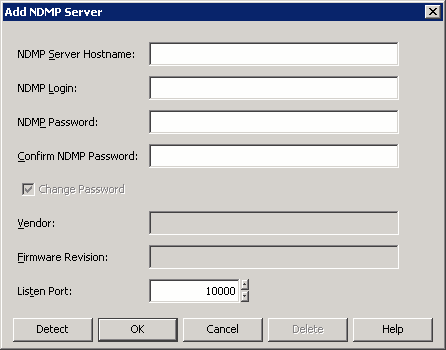
| 3. |
Enter or edit the following information in the
Add NDMP Server dialog and then click OK. NDMP Server Hostname: The long name of the NAS file server. NDMP Login: The user account through which the system will access the filer. NDMP Password: The password for the NDMP Server Login account. Confirm NDMP Password: The password for the NDMP Server Login account, for confirmation. Click the Detect button. The system automatically populates the Vendor, Hardware OS Revision and Listen Port information. NOTES
|
 |
NOTES
|
||
![]() To
view the Software Install folder:
To
view the Software Install folder:
The Software Install Directory displays the software installation folder on the local computer.
![]() To
Store Update Packages Locally before Installation:
To
Store Update Packages Locally before Installation:
Required Capability: See Capabilities and Permitted Actions
![]() To
associate or disassociate a user group to a CommCell entity:
To
associate or disassociate a user group to a CommCell entity:
Required Capability: Capabilities and Permitted Actions
![]() To
associate or disassociate a client to a client group:
To
associate or disassociate a client to a client group:
Required Capability: Capabilities and Permitted Actions
![]() To
enable or disable the Robust Network Layer feature:
To
enable or disable the Robust Network Layer feature:
Alternatively, right click on a MediaAgent and select Properties from the pop-up menu. Select the MediaAgent Properties (Control) tab.
Required Capability: Capabilities and Permitted Actions
![]() To
change the Robust Network Layer configuration:
To
change the Robust Network Layer configuration:
Alternatively, right click on a MediaAgent and select Properties from the pop-up menu. Select the MediaAgent Properties (Control) tab.
![]() To
view the Software Version:
To
view the Software Version:
The component version and post release service pack, additional updates and missing updates are displayed.